


For DIY homeowner to work productively and efficiently, all your necessary tools should be where you need them, when you need them. From easy visibility to convenient accessibility, there’s a lot to consider when organizing a workspace.
If you’re giving your garage or workshop a complete remodel, a good place to start might be the walls. Painting the walls of the workshop white or another bright color helps reflect interior light, enhancing the visibility of the room.
A good choice for workshop lighting is fluorescent tube lighting, which minimizes glare. Halogen lamps are available with tripods for easy placement, and smaller 50-watt clamping lamps will help for more detail-oriented bench work. Flexible LED strip lighting can eliminate shadows even in the smallest nooks and crannies.
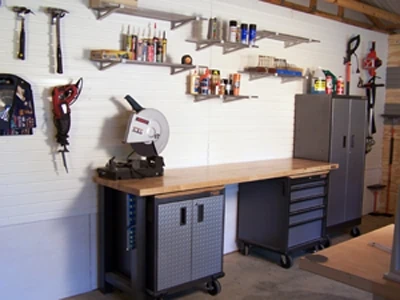
Also, optimize your workbench for maximum comfort and convenience. The workbench is usually the hub of all shop operations. A common height for workbenches is just a couple of inches below the user’s waistline. The surface should be clear and flat, and its size can be built to fit your needs. A bench 5 to 7 feet long and 18 to 36 inches wide will suit most work. But before you build or purchase a bench, be sure it makes sense for the size of your miter and/or table saw.
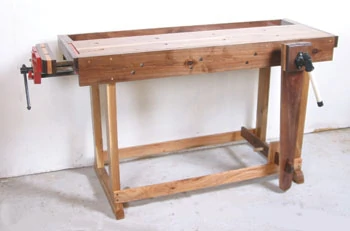
Many people add an extension panel to their workbench that can fold up level with the tabletop for work with large pieces, and then unlock and fold out of the way when not needed. Lockable wheels will also allow you to easily move the bench around and then secure it in a stationary position. And don’t forget to outfit the area with a comfortable stool, which you’ll greatly appreciate when sitting for long periods at the bench planning and designing projects.
Smart Storage
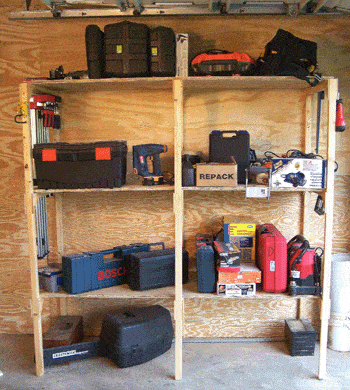
Every home has a limited amount of floor space for storage, but you can add significant square footage of elevated storage space by building shelves. Wall-mounted shelves can be hung with store-bought brackets screwed into the framing studs. Two-tiered shelves can be built with simple legs and rails made of 2×4 and shelving made of 2×6 or 2×8. Screw or nail the shelves together and use diagonal bracing to keep the structure square. Some workshop shelves utilize 2×2 ladder brackets with three-tiered plywood shelving. Styles vary, but most shop shelves are built with simple construction from inexpensive materials.
Wall-storage systems are popular because they make use of otherwise unused wall space to organize tools and supplies. Many of these systems consist of slat-wall panels fastened to the wall, which hold various hooks, shelves and straps to keep items of the floor.
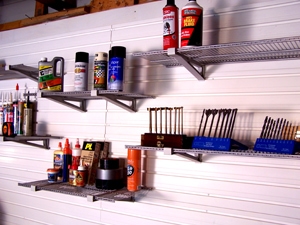
Pegboard panels mounted to the wall have long been popular for storing small items such as wrenches and screwdrivers. Various hooks and holders can mount to the pegboard holes with almost limitless versatility to keep your hand tools handy.
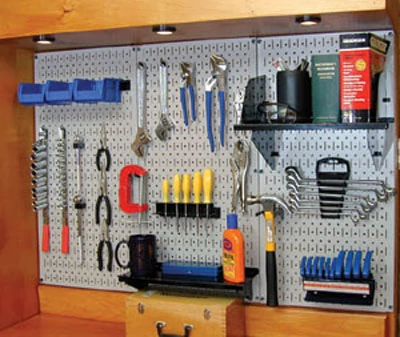
Tool cabinets are excellent options for serious DIY’ers who have a lot of equipment that needs to be sorted by type and application. The number of drawers varies, and many versions include caster wheels to easily roll the cabinet around the shop.
Think Outside the Shop
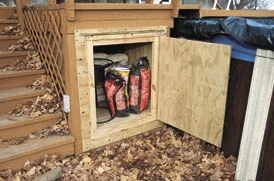
What if you don’t have a whole garage or spare room to make into a workshop? Although you can optimize interior spaces with shelves, cabinets and wall storage, you’re ultimately limited by the size of the house. Consider overlooked areas of the home that can be modified to provide extra storage space. Convert the space beneath a staircase into a closet, or build a plywood bin in the unused space beneath your deck. Install a subfloor in the attic to create storage space above the joists, or construct an outdoor storage shed to keep your long-handle lawn and landscape tools. With a little creative thinking, you can find a number of storage options outside the typical workspace.
– M. Weber
