Looking for more storage space? Look up! One often unused storage area is the loft or “attic” over your garage. In some instances of attached garages, opening this area may also provide easier access to the house attic. If you already have a crawl-hole access door, the first step is to examine the area. Is the framing open, or are trusses used? A trussed building provides less storage space than an open-framed building, and in some instances the area above a garage may not have much available space. Determine the approximate access opening location. Use a drill to bore a starting hole and use a saber saw to cut between the ceiling joists to create an initial examination opening. Use an electronic stud finder to locate joists. If the ceiling joists are 2-by-6’s or larger, there will probably be enough support for storage. If the ceiling joists are 2-by-4’s, they will have to be strengthened by adding 2-by-4’s to their sides. You may also wish to add vertical stiffeners from the joists to the rafters along the sides. Also examine for exposed wires and other utilities that may need to be relocated. Joists in a garage loft space are rarely floored, and you will probably wish to add flooring. Three-quarter-inch particleboard underlayment makes a decent support floor over the floor joists. The main idea is to provide a good, solid support floor for storing items.
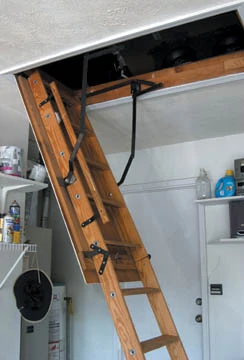
The next step is to provide access. Drop-down folding stairs, such as those from Memphis Folding Stairs, are the best choice. These provide a safer access than ladders, and are stored up, out of the way in the loft space when not in use.
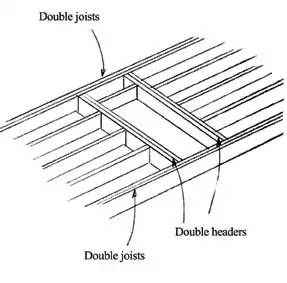
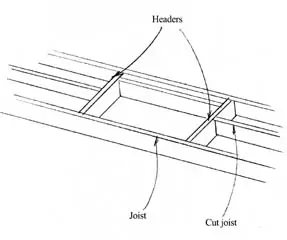
It is extremely important to make sure the ceiling will support the storage weight. Also, use the proper framing around the opening. Make sure any cut joists are strengthened with the proper headers.
Measure and Cut
The first step is to measure the ceiling height carefully, and purchase a unit that allows the stairs to be properly unfolded. Make sure there is room for a safe landing area at the bottom of the stairway. There must also be enough clearance for the swing of the stair unit as it is being unfolded to full length. In most instances folding stairways are installed parallel to ceiling joists. In some instances, however, the stair must be installed perpendicular to the ceiling joists.
Cut the rough opening in the ceiling or plaster to the size indicated by the stairway instruction sheet. Normally this will be about 1/2 to 5/8 inch larger than the actual unit to allow for shimming and squaring. If you must cut ceiling joists to allow for installation, make sure you install headers to tie the cut members to other joists. The header materials should be of the same size lumber as the existing joists. Regardless, form a four-sided frame or stairwell to install the stairway. Make sure to keep the construction square for easy of installation. If the home has roof trusses, do not cut ceiling joists without consulting an engineer or city inspector and getting approval.
Stair Installation
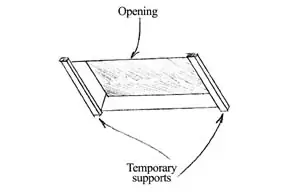
Installation of the Memphis Folding Stair begins by using temporary support boards across the width of the opening at front and back. They should be nailed or screwed securely enough to support the stairway until it is permanently attached. The boards should form a ledge of 1/2-inch at the main hinge end and a 7/8-inch ledge at the pull cord end. Raise the stairway unit into the attic by turning it sideways and through the rough opening and then lowering it carefully onto the ledge support strips. The best tactic is to have one person in the attic and a helper on the floor to position the stairway in place.
Caution: Do not at this time place any weight on the stairway. Do not raise or lower the stairway. Do not allow the stairway to be moved in any manner as it may fall and cause bodily injury. Use a ladder to do any work that involves further anchoring. Make sure the stair is square and level in the rough opening. Use blocks of wood as shims to straighten the stair frame if it has been bowed in inventory. Bowing boards can be straightened using nails and shims. Also use shims between the rough opening and the stairway frame. Several 8d common nails can be driven partially through the frame into the rough opening framework to add further support. Do not drive these nails in all the way.
Carefully lower the stairway and unfold the sections. Do not stand on the stair at this time. Use a ladder for further installation. Nail the sides of the stairway to the rough opening joists using only 16d nails or 1/4-by-3-inch lag screws. Do not use other fasteners. Complete the nailing by placing the nails in the prepunched holes in the pivot plate on the spring arms and in the prepunched holes in the spring brackets at the hinge header. Then finish anchoring the unit in place following the manufacturer’s instructions. Remove the temporary support boards and install the molding around the outside edge of the opening to finish it off.
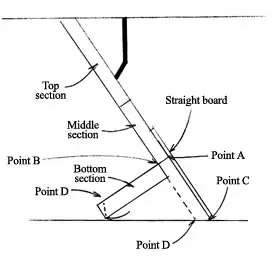
Proper adjustment of the stairway is important. If you have not done so previously, pull down the stairway, opening the sections. Fold the bottom section under the middle section so the top and middle sections form a straight line. While applying pressure to ensure the spring arms are fully extended, place a straight edge on top of the middle section. Slide the straight edge down until it contacts the floor. Measure from point “A” to the floor as shown in the drawing. Record the measurement on the topside of the bottom section “C.” Using the same procedure, measure bottom side “B” to the floor. Record the measurement on bottom side “D.” Cut from “C” to “D” to match the slant of the bottom edge of the bottom section to the floor.
In many instances the floor at the landing area may be uneven. This may be due to an unlevel floor or a floor drain. Measure both sides of the stair and cut each to fit. The bottom section should fit flush to the floor on both sides after cutting. The joints should be tight at each section with weight on the stair.
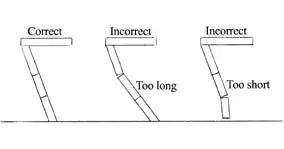
Once you have finished installing, stand on the second step of the bottom section to check that the stair is properly slanted from the ceiling to the floor and that all sections of the stair are in a completely straight line. Do not allow the feet of the stairway to rest on any structure such as blocks, boxes, platforms or other structures. Stairs are designed for specific ceiling-to-floor measurements and the correct length of stair must be used to fit these measurements where the stair is installed. If the stairway is cut off too short, corrections cannot be made. The bottom section must be replaced immediately before use. If the stairway is installed before the final floor covering, such as vinyl or carpeting, then the length adjustment must be made. Any failure to adjust the stairway to a perfectly straight line with both feet evenly placed on the floor can place stress on the components and cause a break in the stairway.
Finishing Up
As you wrap up the project, you’ll probably wish to install a light in the storage room with a switch in the garage, or even a simple pull-chain light.
Keep in mind that even with careful attention to proper ceiling support, it’s important not to overload the loft storage with heavy objects. Not only can this cause structural damage, but carrying heavy objects up and down a stairway can also be dangerous. Loft storage can also be extremely hot in the summer and cold in the winter, so don’t store perishable items in a loft.
If, however, you’re looking for more storage for off-season items that do not have a lot of weight, consider building in your garage loft.
Even if you don’t have a finished garage with a ceiling, you can still have plenty of “up” storage. This same tactic works with barns or garden sheds with trusses, or even open framing. First determine what you wish to store. For instance I store seasonal tools, such as snow shovels, tree pruners and other long-handled tools above the ceiling joists of my garden shed. Also stored up there are a few replacements, such as a guttering piece, a few pieces of exterior trim in case I need to replace pieces. This is an open-framed structure, and I’ve beefed it up to provide plenty of support.
My barn, on the other hand is truss-framed. You can also create overhead storage for certain items with this type of construction. If the trusses are open with no ceiling material, simply screw 2-by-4-inch support pieces across the bottom of the trusses. It’s unbelievable what you can store in this manner; wood for future projects, tents, water or snow skis, even empty coolers.


