

By Tim Walton Photos by Larry Walton
Getting started in the morning has always been a challenge for me. Please don’t ask my wife about my energy drink budget.
Recently my truck was having a hard time getting started, as well. My Ford’s diesel engine uses a glow plug system to preheat the cylinders enough to help combustion on cold startup. This system alone is taxing on the electrical system as it pulls a large amount of amperage. Add to this the sheer weight of the large 7.3-liter engine, which must be turned by the starter. It’s little wonder these pickups come equipped with two batteries.
What about the alternator? We’re getting to that. When my pickup began having cold starting issues last winter, I didn’t address it or even give it much thought. I ignored that it was cranking longer than normal. This ultimately led to the demise of the batteries, which appeared to be the originals and were probably due anyway, right?
Since the electrical system components are linked, the alternator had to work harder to charge weak or old batteries. Batteries can only take a charge a certain number of times, but even fewer when full discharges are part of the program (like when your vehicle’s engine won’t even turn over because of lack of power).
The engine cycled slowly, but the death spiral for the electrical components went on quite nicely. Was it the weak glow plugs that caused the battery failure? The battery failure that caused the alternator’s demise? Or was it a failing alternator that brought on the battery death?
The moral of this story: Pay attention to starting issues early, which can save you time and money. Replacing the faulty component can save the others. Ignoring the problem can come at a high price in parts, not to mention the consequences for being late to your destination every morning.
However, if you do have a bad alternator or batteries, you can save yourself some cash by diagnosing the problem early. Installation of these simple components is something you can do yourself.
Here is how we replaced the alternator on my pickup after replacing the batteries.

Make sure to disconnect the battery (or batteries in our case) before doing any work on the electrical system.

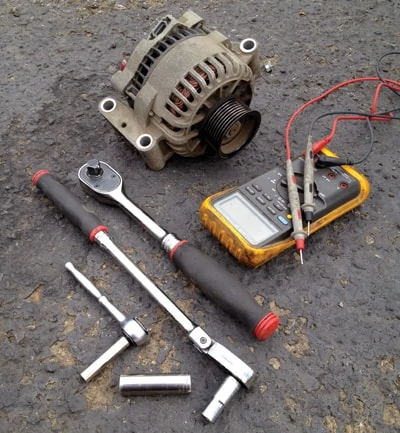
Diagnosing a problem by replacing parts is often not economical. We used a battery/alternator load tester to make sure the alternator was bad. It could also have been a fusible link or fuse that prevented the batteries from charging.

Locate the accessory/serpentine belt tensioner so you can loosen the belt enough to get it off the alternator pulley. Note the routing of the belt for reinstallation later.

The tensioner on the 7.3-liter Power Stroke accepts a 1/2-in. drive or breaker bar. Rotating the ratchet will give you enough slack to remove the belt.

Remove the bolt that fastens the power lead wire to the alternator.

Disconnect the electrical plug that goes to the voltage regulator. Be sure to release the clip and don’t pull on the wiring itself.

Break loose the bolts that hold the alternator in place. The oxidation of the steel bolts and aluminum bracket on some vehicles can act like a thread lock, so a longer handled ratchet can help.

Make sure to remove all the bolts which hold the alternator. On the Power Stroke there are only three bolts, which all match and are very visible and accessible. It’s a good habit to keep track of the origin of each bolt because length, diameter and thread count can vary with location for some applications.

Set the wiring aside and remove the defective alternator. Make sure you double-check that the plugs and mounting parts on the two alternators are the same.

Our new shiny alternator is a direct fit and will mount using the stock bolts.

Tighten down the bolts making sure to torque them tight enough, as the accessory belt will be putting a decent amount of force on the pulley. Reference a factory service manual if you’re unsure about the torque rating to use.

The lead wire attaches on the back of the unit. Make sure to not over-tighten the nut that holds it in place on the stud. Spinning the stud could break wires inside the alternator. We left the insulating cover back to check the voltage output of the new alternator.

Plug back in the voltage regulator harness. Ours needed solid pressure, but it did click into place.

Turn the tensioner again to put slack into the belt so you can reinstall it over the pulley of the new alternator.

Make sure that you have the accessory belt routed correctly.

Reconnect the batteries on both sides.

We used a multimeter on the DC voltage setting to confirm that the alternator was working properly. We connected the negative lead to the negative side of the battery and the positive lead to the output wire on the alternator.

The multimeter read over 14 volts when the engine was running. This was a positive change from approximately 12 volts indicated by the old alternator.
Other Automotive Related Articles
- Flat Tire Repair
- Replace a Broken Lug Nut Stud
- Upgrading the Engine’s Air-Intake System
- Winter Maintenance for your Vehicle
