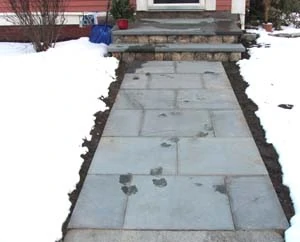
Stay Clean & Safe in the Winter Months
By Rob Robillard
In the North East, winter means shoveling and salting your walkway and stairs. The problem is that salt destroys stonework, and black ice can cause bone-breaking falls. One bad fall can result in a broken bone or cause you to throw out your back.
Heating a driveway or walkway is a great way to dispense with snow melt chemicals and ensure that your footpath is always clear and thus less likely to cause a slip-and-fall injury.
I recently had the opportunity to install a WarmlyYours Radiant Heat snow melting system in a front walkway. In this article I’ll discuss what’s involved in the installation of this product as well as provide you with feedback on my experience.
Two Types of Systems
There are two systems typically used outdoors when heating walkways and driveways: electrical heating cable and hydronic heating piping.
An electric snow melting system like WarmlyYours is top-of-the-line, designed to be energy efficient and fast at melting away the snow and preventing ice from forming. This system can be installed under concrete and asphalt and in mortar underneath brick pavers.
A hydronic heating system uses copper tubing or cross-linked polyethylene (PEX) with a liquid treated with antifreeze to warm the driveway or walkway. The glycol solution is heated with a boiler, operated with either manual or automatic controls.
On this walkway project, electric heating was the only option and also the most cost-effective to install.
We chose to use the WarmlyYours Premium Snow Melting System, which was custom designed for my project and came complete with all the cable, controllers and snow sensors needed for a quality snow melting system.
Installing the System Under Bluestone Pavers
On this project the homeowners had a wooden stoop porch and a cobblestone front walkway that must have been a complete nightmare to shovel. They decided to tear out the wood stoop and cobbles to replace them with a field-stone stoop with a bluestone top and a bluestone walkway. The WarmlyYours system we chose to install was the Premium Control and Aerial Sensor option.
The WarmlyYours company designs durable, high-quality indoor and outdoor snow melt and heating products. Their heating cables are designed for concrete slab floors of new homes, outdoor driveways, walkways, stairs and patios. The product is well suited for large areas like basements, garages, additions and driveways.
A snow melting system heats the paving material, i.e. bluestone, which heats the walkway to a temperature above freezing that melts the snow, completely eliminating the need for shoveling and plowing.
Before starting my project I gave my customer service representative the exact project dimensions, and they provided me with a custom detailed installation drawing. The radiant heating experts at WarmlyYours offer a customized plan based on each customer’s unique project, and I took full advantage of their expertise.
Snow Melt System Specifications
The snow melt system was designed to be installed in asphalt, concrete or in mortar under pavers, and comes in mats or loose cable in specific lengths tailored to an individual project.
For my project I used 251 ft. of loose cable, which I looped and spaced approximately 3 in. apart. The system is CSA-certified for outdoor use in Canada and US and is offered in 120V or 240V configurations. It is rated for 3000 watts, 240 volts and 12.5 amps.
WarmlyYours sent me the following as part of the premium system:
- • 251′ of snow melt heat cable
- • Relay panel
- • Premium snow melt control panel
- • Snow sensor
- • Temperature sensor
What is Radiant Heating Cable?
The Heating Cable is comprised of a dual multi-strand heating element with a primary insulation of Fluoropolymer. The insulated core is protected with a woven metal braid and an outer jacket of PVC, EPR or a Zero Halogen Polyolefin-based compound to make it sturdier and to provide corrosion protection.

These cables are terminated with 20-ft. long standard cold leads. The cold lead is obviously not heated and is used to enter into the building and attach to the control panel. The hot and cold junction is uniquely designed to make it 100-percent foolproof.
Types of Heating Elements
The snow melting system can be installed two ways: as a roll consisting of the heating cable taped on a polypropylene (PP) mesh mat or as a heating cable laid in a serpentine fashion, equally spaced and fastened to a metal grill or screen.
Both of these snow melting applications are available in a wide range of capacities and sizes to suit your unique requirements.
For normal concrete slab floors and mortar under pavers, WarmlyYours offers concrete mats ranging in length from 5 to 50 feet and in 2- and 3-ft. widths. They remind me of laying a towel at the beach—it is that quick and simple. These PP mats generate 50 watts per square foot.
The other option is free cable, which is ideal for oddly-shaped areas that include curved or diagonal walls, and is available in lengths ranging from 43 to 428 feet. The energy-efficient twin-conductor heating cables generate 12 watts per lineal foot. Typical spacing of these cables is 3-1/2 to 5 in. on center.
I chose to use cable application on my installation because I needed to go from the stoop landing down to the step and then down again to the walkway. Making this transition with loose cable was the sensible decision.
Electrical Requirements
To install this system the electrician needed to install a 20-amp/240 VAC electrical circuit breaker and one 15-amp/120 VAC breaker. For better electrical efficiency I had my project wired for 240 volts.
My electrician also installed a master power shut-off at the control panel that has a red LED light indicator to show when the power is turned on, which is useful for completely shutting down the power or for servicing the snow melt unit.
Designing the Stone Landing
I chose to build a concrete block landing and step with applied veneer stone to cover the sides of the landing and step risers.
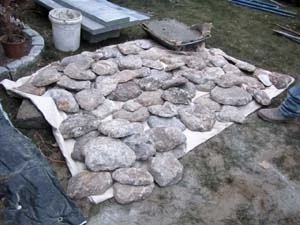
I felt the radiant cable would be easier to install with a block foundation. Originally we had planned on building a true field-stone base and step but soon scrapped the idea. The concrete block would allow me to easily loop the heating cable and then travel down to the step and walkway.
The top of the landing and step would receive 1-1/2-in. thick bluestone treads with mitered corners and a large, center bluestone slab. All of the bluestone would be set in 1 to 1-1/2-in. of mortar.
Preparing the Jobsite
The first order of business was to remove the old wood landing and step. I then installed Ice and Water Shield and copper flashing to the house wall where the new masonry landing and step were going.

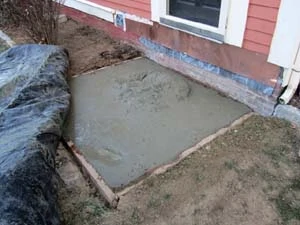
I had my landscape contractor dig out the loam where the wood landing was. They dug down to a depth of 24 inches. I had them use the two existing 10-by-48-in. deep concrete footings as part of my landing footing. These footings had supported the old wood porch landing.
We then drilled and installed No. 8 rebar into these footings as well as the brick wall of the house foundation. We connected this rebar with perpendicular rebar to make a grid. Once this was complete we formed the landing and step pad, added more rebar and then poured concrete into the entire formed area making one monolithic footing.
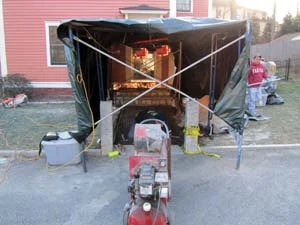
Because of the cold temperatures I installed scaffold pipe staging and used a tarp on top to make a tent. Using a torpedo heater I heated this area for the entire day and eight hours into the night to keep the concrete warm during the curing process.
Laying Out the Walkway
Next, we focused on the walkway and removed all of the old cobblestones and installed a solid base for the new walkway. I used the old walkway width and length as a guide and stayed within those dimensions when ordering my materials.
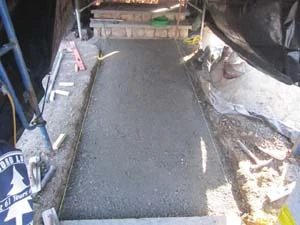
Before setting the bluestone, I established a guide line along one edge of the walkway to ensure that the stone is laid in a straight line.
Decide what pattern you want to use in the design of your walkway. One popular pattern is herringbone. Bluestone is usually laid in a pattern and we used a running bond pattern (similar to a brick wall). The pattern you choose will determine the size and shape of the bluestone tiles you need to purchase. Many customers like to create their own patterns, but we liked the symmetry of the running bond.
Finding the center point of the bottom step, I located the center of the walkway. I then drove rebar spikes into the ground at this center point. A piece of string was then tied to the spike and pulled taut to a spike at the other end of the walkway. I used a framing square to check that the string was perpendicular to the masonry step.
Once I was sure that my line was straight and square, I measured out from this center line at various points to locate the edges of the path. I marked both edge lines with marker paint along the entire length of the walkway. Later we added layout strings on the edges.
We then excavated the walkway area inside the edge lines to a depth of 6 inches. We placed 4 in. of gravel and 1 in. of concrete sand on top of the gravel, leveling and compacting every inch with a gas-powered plate compactor. It is important to pack the base to prevent the stones from shifting.
I again utilized the scaffold and tarp to create a tent and used my heater to keep us, the sand and the gravel from freezing. It also kept the mortar on the landing warm.
Installing the Cables
I drilled holes through the house sill and into the new masonry landing and installed two galvanized conduit pipes.
One conduit pipe contained the system’s slab temperature sensor and the other contained the 20-ft. cold lead wire that connects to the system control panel.
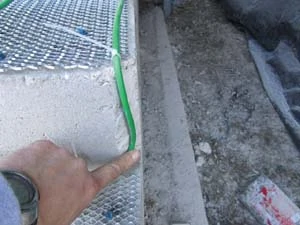
In order to transition the heating cable from the landing to the step and then to the walkway, I used a grinder and diamond blade to cut off the corner of the concrete block. The stone veneer comes with corner blocks that cover all of the corners. By removing the block’s corner I was able to create a channel for the heating cable to pass through freely.
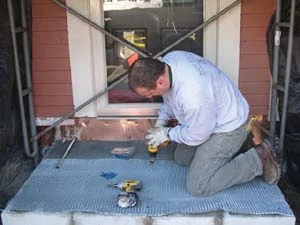
I used galvanized mesh similar to what masons use on stucco homes to secure my cables. On the masonry landing and step I used Tapcon screws to secure the mesh, and on the walkway I bent galvanized wire in the shape of a “U” to pin the mesh down into the gravel base.
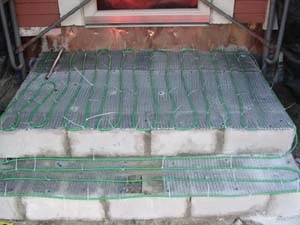
The electric radiant heating cable was then installed in a serpentine pattern onto the stucco wire mesh with plastic tie wraps.
I was careful not to overlap the cables at any point to avoid possibly overheating the cables.
The manufacturer recommends a minimum cable spacing of 3 in. and the maximum spacing at 12 inches. I also made sure I installed the cable at a depth that would not be deeper than 2-1/2 in. from the top of the finished bluestone.
Note: Do not kink the cable sharply when bending it for installation.
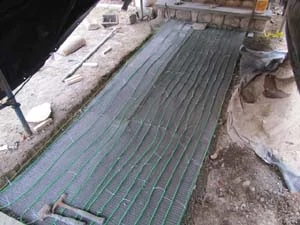
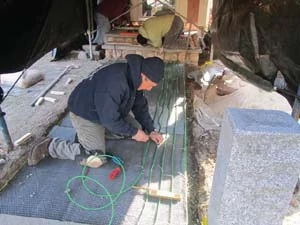
It is extremely important that you do not use any heavy equipment, machinery or vehicles over the exposed heating cable during the paver installation process.
Care also must be taken by the bluestone installer to ensure that the mortar covers the heating cables/mats so they do not make direct contact with the bluestone. The manufacturer recommends that at least 1-1/2-in. thick mortar is poured over the cables/mats but no more than 2 inches.
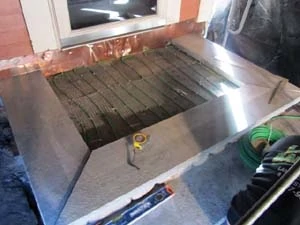
During this process we had the electrician use a 500 VDC megohmmeter and a multi-meter to continuously check on the heating cables over which we were working, to ensure they were not damaged. The electrician then needs to complete final testing of all the cables/mats to verify that each element has survived the pour of mortar and is ready for action once the mortar is cured.
Installation of the Bluestone Pavers
On the landing and step, a 1-in. bed of mortar was installed over the heating cables.

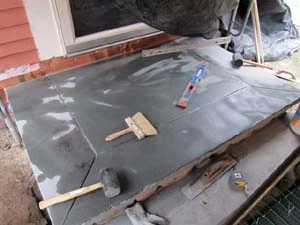
In the walkway a layer of sand was added over the heating cables. I started setting the stones at the base of the steps, using a rubber mallet to tap each piece securely in the sand.
The finished bluestone we were installing was 2 in. thick. Each stone was checked for level, and we maintained a consistent gap between them for an attractive look.
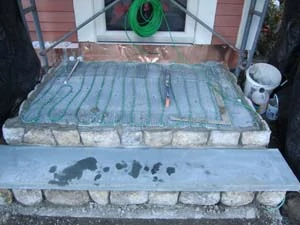
Mortar mixture was added along both edges of this walkway below the grass line to help prevent erosion issues and to help hold, or “book-end,” the blue stones in place.
For faster installation we laid all of the full pieces first and then went back and cut the edge pieces. The bluestone joints were filled with colored polymeric sand.
Installing the Snow Sensor
The premium system has an aerial mounted snow sensor that attaches to the exterior of the house, and a low-voltage wire runs back to the Warmly Yours control panel. The Snow Sensor detects falling or blowing snow at temperatures below 38°F (3.3°C). When used with the in-slab sensor, the system automatically controls the snow/ice melting heaters, thus ensuring minimum operating costs.
The system also has an adjust-able hold-on timer that keeps the heater in operation for up to 10 hours after the snowfall stops to ensure complete melting and drying of the walkway. WarmlyYours recommends setting this hold-on to 3-5 hours.
An optional Remote Control Override, can be located where the system’s operation can be conveniently observed. It duplicates many of the controls and indicators on the SPC-120 front panel. It is used to clear tracked and drifting snow that may not land on a sensor.
As part of this installation I installed a slab-mounted, high-limit sensor that prevents excessive temperatures so the system does not overheat or heat up an already warm slab.
Operating Tips
Energy consumption will vary depending on ambient temperature and building insulation. For lower energy consumption, the homeowner chose to use a 7-day Programmable Thermostat control.
Energy consumption can be minimized by turning the system off when heating is not required, but extra time will be required for the slab to warm up once the system is turned on again.
Tip: Avoid placing objects like thick mats on the heated slab, especially in the area where the floor temperature sensor is located. These restrict the transfer of heat away from the cables and result in the floor area beneath them being warmer than other areas. Avoid mats with rubber or vinyl backing because these may decompose with heat and could stain the flooring.
How’d It Work?
I found the installation instructions really easy to follow. I did have a few questions and needed to call my project manager, Matthew Caruso. All of my questions were answered thoroughly and promptly, which is a huge plus when you’re working on a project with deadlines and other contractors are involved. A project manager is involved in every WarmlyYours design. The manager approves your design and follows your project to the end.
I was impressed with the level of customer attention and service provided.
The cables were very easy to install, and the electrical portion of the project was handled by an electrician. I made and installed a mounting board for the Warmly Yours Controller for a clean look to the installation.
The First Snow Storm — A Real Test
The WarmlyYours snow melting system is wired to the snow and ice sensor that turns the system on and off automatically, saving the need to operate the system manually.
The very first snow storm of the season dropped 18 inches of heavy wet snow in a 12-hour period. A blizzard is categorized as a storm that delivers a minimum of 35-mph wind with snow visibility of 1/4 mile or less. That means drifting snow!
The WarmlyYours Snow Melting System turned on automatically and ran throughout the storm. The storm dropped 1 to 3 in. per hour. At one point the walkway had 1 in. of snow on it about two hours into the storm, but I attributed this to the bluestone needing time to warm up. Once it reached snow melting temperature the result was a completely clear and dry surface. After the 12-hour blizzard had passed, the system continued to heat the slab for 3 more hours.
When I installed the walkway cable I was particularly diligent about spacing the cables I installed. I made sure all of my loops were 3 inches apart. Towards the end of the walkway installation I was getting nervous that I might run out of cable so I began to space my loops at 5 to 6 in. apart and finished the last 18 in. of the walkway this way. My observations during the storm were that the section of walkway with the 3-in. spaced wires melted first and stayed clear throughout the entire storm. The 4- to 6-in. spaced wire section took a little longer to melt the snow and was covered with 1 in. of snow during the heaviest part of the blizzard.
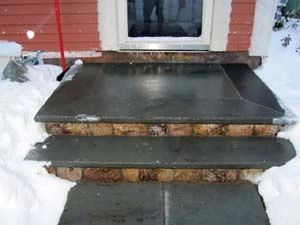
I also observed that the edges of the bluestone landing and step iced up slightly. If you remember,
I installed and stopped the heating cables at the concrete block (landing foundation) edge. The landing then had stone veneer applied and an overhanging bluestone top. This means that there is approximately 4 to 5 in. of landing edge and step edge that do not have snow melt cable directly below it and subsequently need time to warm up. They eventually did warm up and melt the ice, but not until after the storm.
A quick scrape with a shovel cleared this during the storm, and the rest melted soon after.
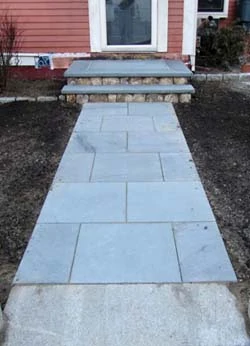
Four hours after the storm the walkway was clear and dry with no residual ice or snow. The system worked extremely well in the harshest environment. I was very impressed!
Snow Be Gone
If you are considering installing a snow melting system, the best time for installation would be during a new home project or major landscaping changes to the property. If old, cracked walkways need replacing, that would also be an excellent time for this type of installation.
The system for this project costs approximately $2,400 MSRP, and the company was easy to deal with. From start to finish, installing the Warmly Yours snow melting system cables took six hours, plus time for making the electrical connections.
The installation is straightforward and the results are worth the investment: No more shoveling this walkway. The bluestone paving material absorbs heat from the system, melting the ice and snow while the homeowner relaxes inside. There’s no need for expensive deicing chemicals that can reduce the life of your driveway. And your family, guests or customers can visit you safely.
Editor’s Note: Robert Robillard is a remodeling contractor based in Concord, MA. He is also the editor of a www.AConcordCarpenter.com.
Other Radiant Heating Articles


