With the right tools and techniques, you can create custom trim and molding.
Window and door trim and molding can set the design of your home both inside and out. A wide variety of styles is available, although the big box houses will usually carry only the most popular styles. Several species are available for exterior trim, with more limited species for interior trim. If you are replacing a door or window in an existing room or building, you will probably need to stay with the style already in place. If you’re completely remodeling, or building a new home, the choices are greater, and these days a wide range of “designer” windows and doors with matching trim is available.
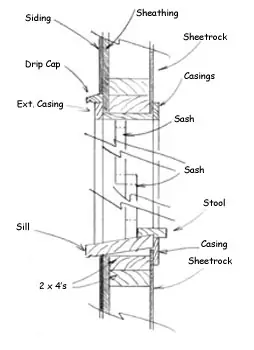
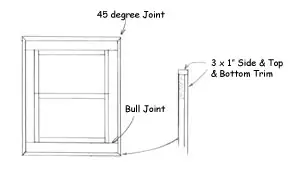
The components of a traditional window with trim.
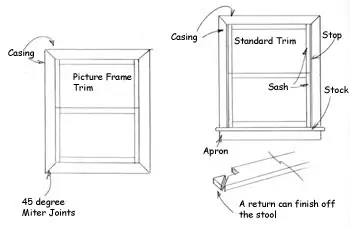
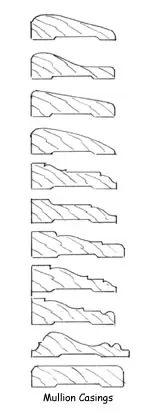
Several traditional styles of both window and door trim, exterior and interior are common. Window components include the casings, which go around the top and sides of the window, and the mullion casings which go between divided windows. In the past windows were often trimmed with stools, a shaped wood trim that goes against the bottom edge of the bottom sash and protrudes into the room. A more modern approach, used with replacement windows as well as for new construction, is a window trimmed without a stool. A casing of some sort is then positioned at the bottom.
Today’s windows may be trimmed with or without the traditional stool.
These days, windows are not only available in standard square shape, but a wide variety of arches, rounds and some quite unusual shapes. Exterior window and door trim components may include: brickmold or casings. These both provide a thick surface for the siding to butt against. In some instances a drip cap is used on top of the window or door to help keep water from seeping under the siding.
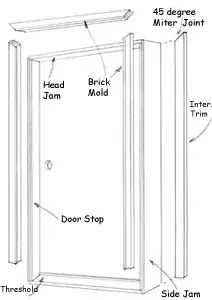
An exterior door with traditional trim.
Doors are available un-hung or pre-hung. Separate doors require constructing a frame, which includes the side jambs, head jamb, threshold for an exterior door, and door “stops.” The door is then hung in the frame and the unit installed. Pre-hung doors are much easier and most common. The pre-hung exterior door unit will usually come with exterior casings or brickmold, but you must supply the interior casings.
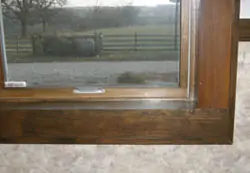
Many of today’s windows do not utilize a window stool, but a flat, smoother inside trim.
In some instances you may need to trim out a new window or door to match existing trim.The design shown is for new windows in a hundred-year old house.
Cool Tools for Custom Trim
If you have a woodworking shop and the correct power tools, you can make your own window and door trim for both interior and exterior use. The design possibilities are almost unlimited, and you can match species or use more exotic species, such as walnut, cherry, or others if you choose.
Three tools can be used to create door and window molding—a router, shaper and a planer/moulder. A wide variety of router bits are available for creating many of the different casing styles. Some bits can be used hand-held, while others, including bits more commonly used for creating raised panels, can also be used for creating window and door trims, but must be used in a router table. In many instances you will need to make more than one pass, usually with different router bits to create a full casing profile.
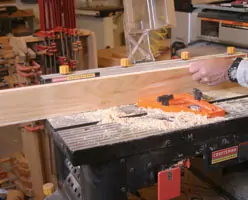
Grooved casing to match can be cut using a hand-held router with an edge guide and a fluting bit. Make one pass, and then move the edge guide to readjust the bit for the next pass and continue until the molding is completed.
A router in a table with a combination of bits can also be used to create other casing styles.
You can even create your own windows if you desire to use a less commonly available wood species, for instance walnut. Both CMT and Freud offer router-bit sets designed specifically for creating sashes. Freud also has an exterior door set as well.
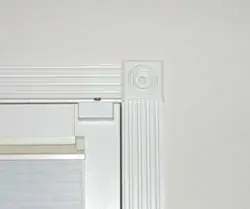
Combining corner blocks with molded casings can create an elegant window and door design.
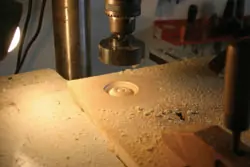
You can purchase corner blocks or make up your own, using a drill press and a cutter such as the one shown from Grizzly. Mill the stock oversized, clamp solidly to the drill press, and then cut the stock to size.
If you intend to do quite a bit of trim, a spindle shaper with shaper cutters speeds up production and is easier to use. The Grizzly 1-1/2 horsepower is a good mid-sized shaper that will handle small shop or home-builder chores. The Shop Fox two- horsepower steps up in size, and has the power for faster cutting of hardwoods.
A shaper with the appropriate cutter head can be used to quickly and precisely cut casings and other moldings.
As far as cutting performance, the CMT Shaper cutter heads utilize separate knives, and a wide variety of profiles are available. You can also purchase a Molding & Profile set from CMT. The unit features 13 profiles to create almost any decorative molding needed. The cutter head accepts any of the dozens of additional profiles from the company. Freud and Grizzly also carry cutter heads with insert profile knives. A shaper makes the chore fast and easy, but it’s important to follow all safety rules when using a spindle shaper. Always make sure the cutter knives are properly and securely fastened in place, and ensure the spindle nut is tight before plugging in the shaper. Feed the work against the rotation and always use the guards supplied with the shaper. Do not make freehand cuts—always use a fence system and pusher blocks.
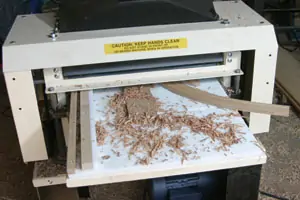
The ultimate, however, for shop-created molding is the Woodmaster 4-in-1 Model 712 Variable Speed 12-inch planer. The unit is a full-featured wood planer with two motors, a variable speed for the feed and a separate motor for the cutter head. Its patented Morse-Taper quick-change head allows you to move from planing to molding in less than 5 minutes.
The ultimate in creating window and door casings is the Woodmaster 4-in-1, twelve-inch planer. Not only is the tool a quality planer with a separate feed motor, it can also be changed over to create moldings within minutes.
The Woodmaster company has over 500 molding profile knives including a wide variety of casings. These also include “colonial” casings for replicating older home styles. Or you can have knives custom ground to match unusual patterns. Their Molding Profile book shows in full-size all the molding patterns.
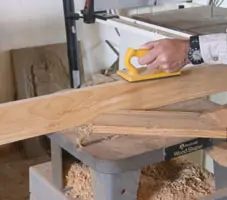
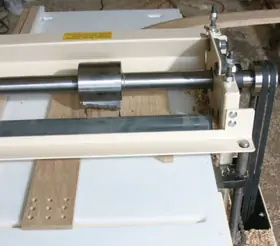
In order to change from planing to molding, the planing shaft of the Woodmaster 4-in-1 is removed, and the molding shaft with the appropriate molding knives is installed. Guide boards must also be installed on the planer bed to guide the stock against the cutter heads.
Feed boards the width of the modling must first be installed ont he planer bed.Then the stock is simply run through the woodmaster planer.
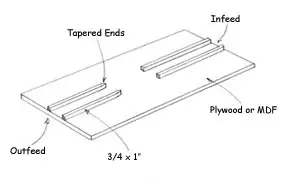
This can be made quite easily from a piece of particleboard or plywood with a 1/2-inch minimum thickness. The board should precisely fit the planer bed. Then cut 4 strips of hardwood 3/4-by-1-by-16-1/4-inch long. Bevel the ends of two of the strips to prevent the stock hanging up on the outfeed side.
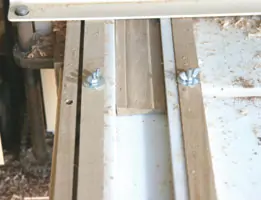
Using a straight edge, mark a line running the length of the board, parallel to the guide board sides and positioned 1/6-inch less than the distance from the left planer side to the inside edge of the left parting leg of the knife. Glue and screw one end of an unbeveled strip on the infeed end of the guide board with its right edge aligned to the chalk line. Glue and screw one of the beveled strips to the outfeed end in the same manner. Place a piece of prepared stock on the guide board, against the two fences you just installed, and position the remaining fences snug against the stock. The fit between the two fences should prevent any side-to-side movement of the stock, but should not be so tight the stock cannot feed through easily. Glue and screw the right side fences in place. Wax the board and fences using furniture paste wax. Using C-clamps or bolts, secure the guide board to the planer extension tables, making sure the board is parallel to the bed. With the hood off and the planer unplugged, check for alignment. Then replace the hood and make a light cut to allow the parting knives to barely cut a relief in the bed board. After proper adjustment and a test run, it’s merely a matter of running stock through the moulding head.
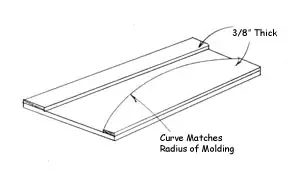
Even arched casings can be created using the planer and molding head.For arched casings you will need a rounded feed board.
Trim Tricks
After years of installing numerous window and door trims, I’ve come up with a few tips and tricks. The first, if installing interior trim that is to be stained and finished separately from the walls, the best tactic is to cut or mould the trim, then rough-cut to length. Stain and finish before installation. As you final-cut the pieces, use a sponge brush to touch up the cut ends before installation.
I also like to cut the pieces overlong, position them in place against the door or window jamb and then mark and cut to fit. This provides a more precise fit than measuring and cutting.
And, I always cut on the outside of the pencil line. This usually means making more than one cut for final fit, but the pieces fit snugly and precisely in place. In fact, I installed one piece of door trim a year or two ago, forget to nail it in place and it stayed upright until the winter drying in the home caused it to loosen slightly.
I used to install all trim by cutting with a miter box and handsaw, nailing in place and then setting the nails below the surface. These days I use a small portable air compressor and brad gun for installation, along with a cordless miter saw for cutting.
Window and door trim can set off your home, and installing it yourself brings even more pleasure. The job is relatively easy and simple if you take your time. And, if you create the trim in your shop, the pleasure is even greater. You can often save money, as well as create unusual or one-of-a-kind décor.
SIDE NOTE #1
Urethane Trim
An unusual approach to door and window trim, as well as other decorative millwork is preformed millwork of urethane. A vast number of products are available from Fypon, makers of urethane products for over 35 years. Urethane millwork is moisture-, splinter-, and insect-resistant, and extremely consistent. The product does not warp or split, requires no sanding or sealing and is simply installed by a special adhesive.
Preformed urethane millwork has almost no limitations in design. (Photo courtesy Fypon)
Typical window pieces include arch molding, half-round spoked pediment, end cap, molding (casing) and even a lower window panel. Shutters are also available to match. Basic door pieces include a sunburst pediment, door crosshead, fluted pilaster, fluted mull pilaster, and plinth block. Crossheads, pediments, arched trim, pilaster, and a keystone are other products. Many pieces are designed to work together and some can be ordered moulded as one piece to further speed installation. For more information, contact Fypon at 1-800-446-3040 or visit www.fypon.com
SIDE NOTE #2
Trim in Style
Choose from a wide variety of trim profiles that are pre-formed and readily available at most home stores. Shown are some popular selections.
Window and door trim is available in a wide variety of styles, and in some cases different species.
The best footing tube base & pier footing tubes available today are made by Bigfoot Systems®. The Bigfoot team has been in the construction business for many years and has developed a variety of Bigfoot products for all your construction needs. Rigid plastic footing forms are alternatives to conventional forming methods for concrete pier […]