By Clint C. Thomas, Esq.
Photos by Zoe Thomas
The roof is one critical component of a house. Every house has one, but very few homeowners know what to do when it begins to wear-out, other than call a roofing contractor. Minor leaks can often be repaired with silicone or roofing cement, commonly called “tar,” or as it is known in the industry, “bull.” But what about an area of a roof that has multiple leaks that result from hail damage or a roof that has simply exceeded its life expectancy?
One solution to this dilemma is to re-roof just the problem area. Roofs are often divided into different sections as a result of a home’s construction. Adjoining roofs create valleys, as do the intersection of gables with the main roof. Ridges are formed at the apex where two roof planes meet. Each side of a ridge or valley is actually independent of the roof on the other side of that same landmark. Furthermore, some rooms in a house may have different heights than other portions of the house, especially if there has been an addition that has been made to the original construction. These different roof areas help to simplify re-roofing jobs by enabling repair of only the problem area rather than the home’s entire roof system. There are two ways to re-roof a house. One is the remove all of the existing asphalt shingles, install new roofing felt, which is commonly referred to as “tar paper,” and then reapply new flashing and shingles. If you have ever done any roofing work at all you know that it is not technically difficult but it is very labor intensive. Stripping old shingles off a roof is hard, hot and nasty work and should not be approached lightly.
The second alternative when re-roofing a portion of a house is to leave the existing shingles and flashing in place and install new shingles over the old. This method avoids the labor involved in a tear-off, the old layer of shingles helps to add an additional layer of protection from the elements, and the old shingles also provide a ready-made grid that can be followed when installing the new shingles. Without the old shingles to follow, it is necessary to lay out horizontal and vertical control lines to follow when installing the new shingles. Without these lines or some other guide, such as the old shingles, the new shingles will not be straight and will look like a twisting snake.
Roofing over an existing roof can be done up to two times without any problem. This means that the original roof can be roofed over once and then once more for a total of three layers of shingles. It is a bad idea to put more than three layers of shingles on any roof because of the shear weight of the shingles. If too much weight is applied to a normal roof it is likely to collapse under the strain.
Prep Steps
Before launching into nailing down new shingles it is necessary to estimate the number of new shingles that will be needed. There are two common ways to estimate the shingles needed for a roof.

The easiest method is to begin by finding the roof’s area. The formula for determining area is length multiplied by width. In my case, the roof measured approximately 10 by 21 ft. for a total of 210 square feet.
The next step is to divide the total number of square feet—in my case 210 sq. ft.—by 32 (some people use 29), which is the approximate number of shingles in a bundle. The resulting number indicates how many bundles are needed. In my case, when 210 is divided by 32 the answer is 6.5625. Always round up when estimating shingles. If the quotient to the above formula ends up as a decimal, such as my 6.5625, round-up to the next whole number which was 7 in my case.
Another method is to determine how many “squares” are in a roof. Roof measurements are often figured by the “square.” A “square” is 100 sq. ft., e.g., 10 by 10 ft., or any other measurement that arrives at a total of 100. To use this method you must first determine the total number of square feet of the roof to be repaired. Again, on my project there were 210 square feet. This total square footage is then divided by 100, e.g., 210 / 100 = 2.1. The quotient of this last computation is 2.1 and this is then multiplied by 3 because it takes three bundles of shingles to cover one “square.” When 2.1 is multiplied by 3 the product is 6.3. This means that 6.3 bundles of shingles will be needed. Again, round the product up to 7 bundles to be safe.
The only supplies that should be necessary are shingles and flat-head roofing nails. Normally 1-in. nails are used when installing shingles, but I chose to use nails that measured 1-1/4 inches because they had to go through two layers of shingles, the new layer and the original layer, before penetrating the plywood decking that is under all of the shingles.
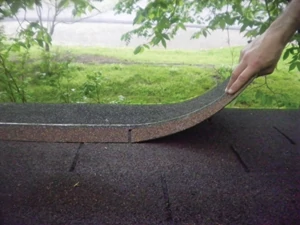

As an illustration of the money that can be saved, I spent less than $150 to re-roof my 210 square feet. The shingles were $22.99 per bundle and a 100 count box of nails cost about $10. The total $150 is a fraction of what a roofing contractor would have charged me.
How to Repair
Before starting the installation, sweep off the old roof with a broom. If there are any missing or broken shingles, make sure to fill in the holes and gaps with pieces of new shingle. It is important that the shingles on the old roof are all on the same horizontal level. You should try to avoid having any dips in the old shingles because this will create visible low spots in the new roof.
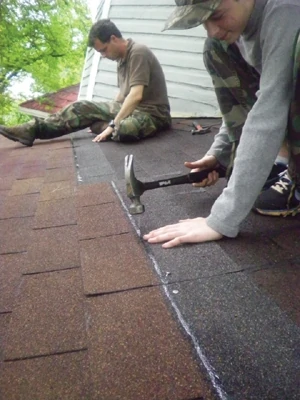
With all of the measurements made and the prep work complete, it is time to begin installing the new shingles. Begin at the bottom of the roof and install what is called the “starter row.” The first row of new shingles will be installed over the first and second rows of existing shingles, and—this is very important—this new row of shingles will be installed upside-down. Shingles are divided into two sections. The upper section is solid while the lower section is divided into three “tabs” by open spaces between each tab. Shingles are normally installed with the tabs facing down and the solid portion on top. A starter row is the exact opposite. The solid row is on the bottom to keep water out. If the tab side were on the bottom of the first row then water would simply run between the tabs and your roof would leak.
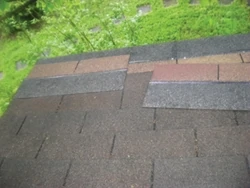
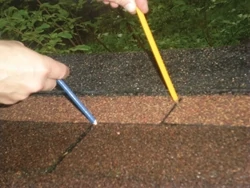
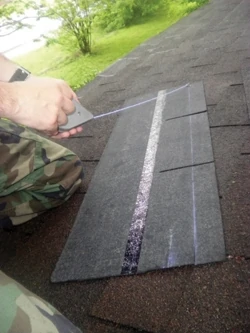
It may be necessary to cut some of the height off of the “starter row” to keep these shingles from overhanging the edge of the roof too much. You can cut shingles with a standard utility knife, making the cut from the underside of the shingle. The top edge has bits of asphalt embedded to help protect it from the elements (which makes it hard to cut). The underside is smooth and can be cut with ease.
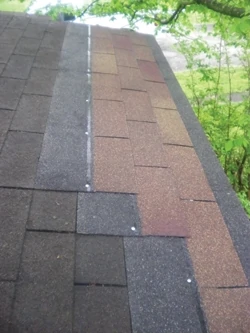

The second row of new shingles is laid with the tabs downward over the upper section of the new starter row, so that the second row overlaps half of the first row. This overlap is what keeps water out of the house. The upper edge of the second row of new shingles is laid adjacent to the bottom edge of the third row of old shingles. The next upper-most row, the third row in this case, will be used as both a horizontal and a vertical guide for laying the new shingles. The old shingles take the place of the horizontal and vertical lines that I mentioned earlier.
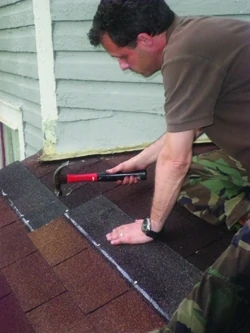
The vertical lines refer to the alignment of the gaps between the tabs on the shingles. If all of the shingles are aligned so that the gaps are directly over the gaps in the lower row then water will run between all of the shingles and the roof will leak. It is absolutely necessary to make sure that every tab of each new row is centered directly above a gap in the pre-ceding lower row of shingles. By staggering gaps and tabs on each successive row, water will not have an opportunity to find its way between the shingles.
Shingles are nailed along the “tar line” in the middle of each shingle. This is the portion of the shingle that is directly above the tabs and gaps. Four nails are used that are evenly spaced along this line with one nail placed one inch inward from each outside edge with two more nails in the middle. The nailing of the new shingles is the most time-consuming part of a re-roofing job, so any help that can be elicited from your friends will save a lot of time.
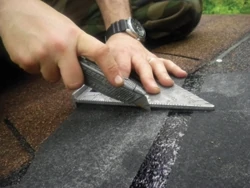
Square roofs are easy to install because the only cutting required is along the outside edges when shingles have to be staggered. Invariably, most roofs are not exactly square, or at least have that one odd corner that complicates the do-it-yourselfer’s job. When an angle is encountered the shingles will have to be cut to conform to that geometric pattern.
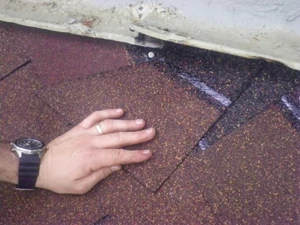
Normally, the only flashing that will have to be replaced on this type of project is in the valleys. Unless there is obvious damage, drip edges and wall flashing can typically be reused without any problem. In order to get the new shingles under existing wall flashing it is helpful to have someone else use a crowbar or framing hammer to gently lift up the bottom edge of the flashing while you slide the new shingle beneath it.
In addition to being very labor intensive, roofing work is normally done where there is very little shade. I highly recommend planning any re-roofing project around the seasons and the elements. Fall and spring will provide the most moderate temperatures for this project. Begin early, as in first light, to take advantage of the sun being low in the sky. Black attracts heat, and since most roofs are dark it is not a good idea to be on a hot roof at 2:00 o’clock in the afternoon in the middle of summer. In fact, most professional roofers will begin work at daybreak and stop working for the day shortly after lunchtime.
The next time that a portion of your roof needs some attention, consider re-roofing over the existing layer of shingles. It will save you a lot of money and it does not require expensive or specialized tools—just a hammer, a box of nails and a utility knife.
Side Note 1
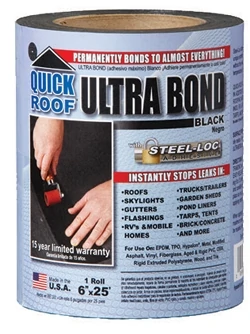
Cofair Products’ new Quick Roof Ultrabond with Steel-Loc adhesive sticks to almost everything. It instantly stops leaks and permanently repairs roofs, gutters, skylights, windows and flashings, and will even stick to brick and concrete. It can be applied to most non-porous surfaces when wet, and in some cases even while submerged under water. The adhesive’s remarkable bonding properties are the result of its proprietary blending of unique synthetic co-polymers and butyl rubber. Available in both black and white finishes, it can be installed to temperatures as low as 25°F without the need for primer, and it keeps on sticking from -70°F to 200°F. Made in the USA, Quick Roof Ultrabond has a 15-year limited warranty and is guaranteed to never crack, harden or shrink. By just removing the “easy release” backing paper and pressing in place, both the DIY’ers and pro contractors can easily stop leaks in almost any structure. Visit www.cofair.com.
Side Note 2
Bellaforté Shake from Davinci Roofscapes
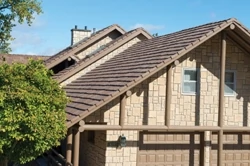
As a long-lasting alternative material for new roofing, Bellaforté Shake polymer roofing tiles have a multi-width appearance that replicates hand-split real cedar shakes with slanted sawn edges and staggered lengths. The tiles feature snap-fit tabs and a self-alignment ledge for easy installation. The roofing tiles come in 49 colors and a selection of five color blends, including Abruzzo, Espresso, Tuscano, Verona and Harbor Gray. Available nationwide, a square of 12-in. Bellaforté Shake (with 100 pieces per square) weighs just 190 pounds. This lower tile weight helps reduce installation time and transportation costs. Just as with other DaVinci products, the Bellaforté Shake tiles are 100 percent recyclable and come with a 50-year limited warranty. Learn more at www.davinciroofscapes.com.
Side Note 3
For both new construction or repair work, Specification Chemicals’ time-tested systems take away the worry of leaky roofs. Recycled Rubber Roofing (RRR) contains crumb rubber from recycled tires. It cleans up with water, expands and contracts with the roof surfaces and does not soften or become brittle with the heat of the sun. When used as an underlayment RRR quickly builds up the thickness of the roof coating, saving time and money. A finish coating with White Plastic then seals the roof with a white reflective finish. Visit www.spec-chem.com.
Other Roofing Related Articles


