Trim techniques for the DIY’er—from planning and prepping to scarfing and coping.
Popular in a wide variety of styles, colors and profiles, crown molding (also spelled moulding) can do wonders to make a room “pop.” However, some DIY’ers have trouble matching the mitered angles and installing the long trim boards along the ceiling. Many find the job frustrating or intimidating, and shy away from the installation. This article takes a look at a basic crown molding installation, and shows a few tips and tricks to move the job along smoothly. I started and completed this project on a Saturday without any assistance. Granted, I was working with all “right” angles and no compound miters, but for a basic installation, this should illustrate how do-able the project is, even for a first-timer.
Planning
Fortunately, with ceiling trim there are generally no doors or other room openings with which to contend. This simplifies the layout somewhat, but you should plan the layout with the intention of coping the inside corners. Since inside miter joints are very likely to open, coping the joints hides this problem. In a basic square-room installation, the first piece of crown should be installed on the wall opposite the door with two square-cut ends butted tightly to the wall surfaces. Then proceed around the room with the next adjacent pieces having one square end and one coped end, which installs against the butted first piece. This means that as someone walks into the room, they are presented with the best face of the crown joints on the opposite side of the room. The final run of molding, above the door, will have two coped ends—but these are at the least noticeable locations in the room.
I should note it is difficult to successfully fit a piece of molding that is coped at both ends—even for a pro. To make this easier, you can fit each coped corner on a separate piece of molding and cut a scarf joint to join the two pieces in a continuous run.
More on coping and scarfing later.
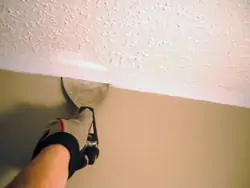
First remove any existing trim and fasteners.
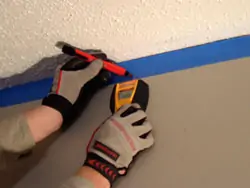
Next, mark the wall studs and ceiling joists where you will be nailing.
Prepping
Naturally, you should take all the linear measurements of the room’s walls to determine how much molding you’ll need. And always purchase a few extra sticks of molding to compensate for the waste cuts and for any mistakes you make. Collect all materials and tools on site.
For a basic single-piece molding installation, the crown will install against the ceiling. (However, for more complex built-up molding profiles, you should sketch your custom profile on paper, determine the measurements and snap a level chalk line around the room—but that’s another story).
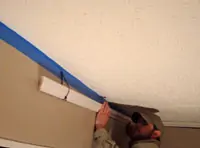
Since the molding I was installing was so small, I masked the top of the ceiling in painter’s tape. This served two purposes: First, the tape was wider than the installed molding, so I went around the room with a stud finder and pencil, marking the stud locations on the bottom edge of the tape. When I placed the molding over the tape, I could see my stud marking and know exactly where to nail. Second, after the molding was completely installed, the tape was already in place to mask my painting. Once the paint dried, I just cut away the excess tape. Whether or not you use this method, you still need to mark the wall stud and ceiling joist locations—perhaps with tabs of tape—to guarantee solid backing for your nails.
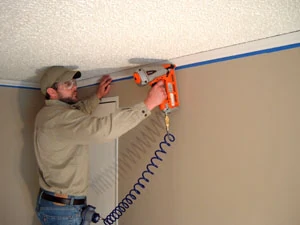
Another advantage of installing this small, simple profile is that it’s easy to fasten. Nailing into the upper and lower edge, an air-powered finish nailer easily penetrated the molding and into the framing behind the wallboard. Plus, I was using LP brand molding that I picked up at the local building supply store. It’s made from a polystyrene substrate material, which not only makes it resistant to moisture, but also extremely lightweight. So it did not take many nails to fasten it securely. However, this won’t always be the case. For larger, heavier molding profiles, you may need to install blocking behind the molding. Nail the triangular blocking to the wall studs and top plate, placing them every 16 inches. Then nail the molding into the blocking (and framing if possible). This technique comes in handy when you can’t nail into a ceiling joist because the joist runs parallel to the molding.
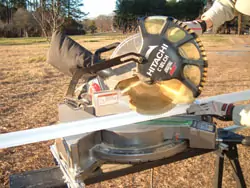
When cutting the moulding on a power miter saw, position the strip upside-down and backward, so the miter fence acts as the house wall, with the saw base representing the ceiling.
Cutting and Installing
You can cut crown molding with a miter box and handsaw, or with a powered miter saw. I chose the latter, but the principles are the same with either tool.
As noted earlier, start with the wall farthest from the room’s entry. Install the first run of molding with square-cut ends, butting it against each corner. Next, measure out from the corner along the adjacent wall (adding a couple of inches) to find the rough length of the coped molding.
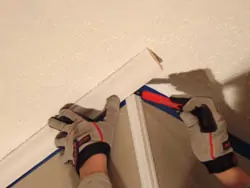
For long runs of moulding, scarf two strips of moulding and fasten over a stud.
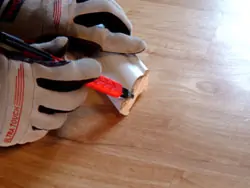
For inside corners, begin coping the joint by marking the profile on a 45-degree miter.
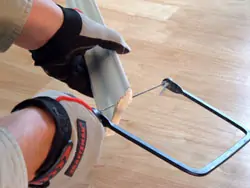
Cut away the waste area with a coping saw
Coping is an alternative to miters, in which the molding profile, or shape, is duplicated to nest tightly against the face of the adjoining molding for a “perfect” fit. Transfer your measurement onto the intersecting end of the second piece of molding, and cut a 45-degree inside miter. Run a pencil along the mitered edge, marking the edges and curves for better visibility.
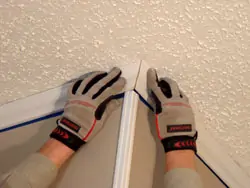
Clamp the molding securely and use a coping saw to back-cut along the pencil line, following the contours of the profile. Keep the blade 1/16 inch to the waste side of the cutline. Then use a file to clean up the profile, revealing a shaped edge that will be the only point of contact between the intersecting molding pieces. This should create a socket that fits snugly over the face of the first piece. After checking for fit on the wall, cut the uncoped end square and butt it against the far corner to meet another coped piece on the next wall.
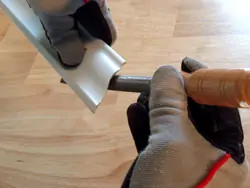
The coped joint should fit like a perfect socket over the preceding piece of moulding.
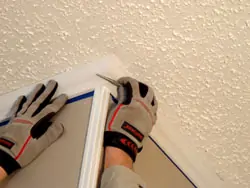
On outside corners, mark the cut in place.
For outside corners on crown molding, position the molding upside down and face up in the miter fence (or miter box). You will be placing the molding so the ceiling-side will be flat against the bottom of the saw base, and the wall-side will be flat against the vertical back fence. Ideally you will need to make a 45-degree cut on one end of one piece, and another 45 on the intersecting piece. However, walls are often out of square, so first check the angle with an angle gauge and cut accordingly.
Note: The profile of the molding may feature a variety of designs, such as an ogee wave (usually placed at top) or crown dentil trim (usually at bottom). This homeowener preferred the crown be installed with the ogee at the bottom, against the wall.
Check the outside angle with an angle finder, then cut a miter on the second strip to match the first.
Run a nail set along the outside miter joint to bend the fibers indward and conceal the joint.
One tip on outside corners: First cope the opposite end of the molding, hold it along the wall and butted against the preceding piece, letting the end run long over the corner.
Mark the cutline where the molding overhangs the corner. Then make a miter cut at that mark. Do the same for the adjoining piece. Install the pieces by applying a bead of carpenter’s glue to the joint and securing with finish nails. You can then smooth the joint by running the rounded edge of a nail set over it to press the fibers closed. For thick, heavy moldings or problem gaps, drill pilot holes at the top and bottom of the joint, and drive 4d finish nails perpendicular through one molding into the end of the other.
For long walls, you’ll probably have to splice two or more strips of molding to cover the entire span. This is done by making an angled scarf joint. Mark the molding strips for 45-degree cuts that will position the joint over a wall stud. Make the miters in opposite directions on the ends of the adjoining pieces, so they fit together flush.
For a standard square room, you can proceed around the room, coping, butting and scarfing until you’ve completed the job. Then caulk all the seams and polish it off with your favorite finish.
More Tips for Molding and Trim
Smooth Cuts—For the best appearance, cut into the finished face of the molding to prevent tear-out. With power miter saws, use a fine-toothed blade. When cutting with a miter box, try candle wax or furniture polish to lubricate the blade.
Nail it right—On this job I was eager to test a new Kobalt belt-mounted CO2 regulator, so I used a pneumatic finish nailer. You can pick up the regulators at Lowe’s, and it’s like having a miniature air compressor on your tool belt—a really clever idea to power air tools. The regulator performed very well, and so did the nailer for that matter. But a word of caution: You must be extremely careful when using a powered nailer on trim. While it’s faster than a hammer and nail, the tip of the nailer can also damage the trim, forcing you to repair dings and dents on the new molding. I admit, after installing the crown, I had some puttying to do.
A more traditional way to nail is with a finish hammer and finish nails. Drive nails to within 1/4 inch of the surface of the molding to prevent scarring the face. Then use a nail set to drive all nails below the surface of the molding. Fill the holes with caulk or wood putty.
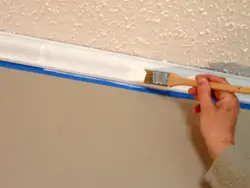
Finishing—A variety of molding finishes are available. Many come prefinished and ready to install in white or a variety of woodgrain colors. If you choose to paint the molding, some pros suggest painting the molding prior to attaching it to the wall, citing that it is easier to touch up the painted molding, once it is installed. As for me, I painted after the fact because this was such a simple installation.
Helping Hand—The job shown in this article was a solo mission. I didn’t have any help handling the long strips of molding. If this is a problem, try looping a string around the end of the molding. Tack a nail along the wall near the ceiling. Then hook the string over the nail to temporarily hold it in place while you fasten the molding.
Check Out More EHT Crown Moulding Stories
For a look at Professional Cutting Advice for crown molding, click here.
For a step-by-step guide to installing PVC crown, click here.
For 13 Pro Tips for Crown Molding and Trim, click here.
For a Look at All Types of Molding, from Crown to Base and even Elaborate Built-up Profiles, click here.


