By Michael Morris
Photography by Daniel Morris
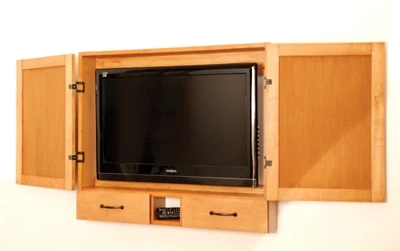
Off-the-shelf woodworking jigs help build this flat-screen TV cabinet.
Flat-screen televisions are a great improvement over tube-type TVs. Today’s plasma and LCD flat-screens are lightweight—most under 50 lbs.—and just a few inches in thickness (newer models are only an inch or so thick), which makes them perfect for mounting on a wall.
One problem with a wall-hung setup is that, when the TV is off, the screen presents a large, blank, blacked-out image. The solution is to hide the set inside an attractive, wall-mounted wood cabinet more appropriate to home décor.
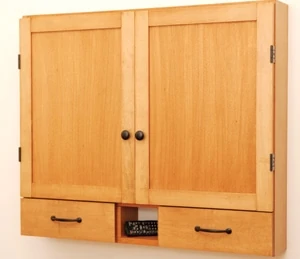
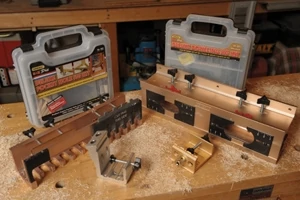
To simplify the construction of this cabinet, I relied on four inexpensive, easy-to-use jigs from the General Tools & Instruments “E-Z Pro” line. I used a dovetail jig to create a sturdy, wall-mountable framework; a mortise & tenon jig to make the recessed-panel doors; a doweling jig for attaching internal components including a shelf, drawer dividers, and reinforcing stretchers; and a pocket-hole jig to make quick work of drawers for remote control devices, instruction booklets, DVDs and other items.
In planning the cutting and construction sequence, I recommend that you first cut and assemble the outer frame before making final cuts to the internal components. This is because the half-blind dovetail joints used to connect these parts may require slight fitting adjustments, which could affect the other components’ lengths. To be safe, cut and fit your dovetails before measuring the exact lengths of the shelf and the upper and lower stretchers. Also, if you are not familiar with any of the woodworking jigs mentioned above, be sure to make test cuts in scrap wood before attempting final cuts in costly materials.
This cabinet is sized for a 32-in. flat-screen set. Television measurements are based on diagonal screen size, so the actual outer measurements of this set are 31-in. wide, 21-in. high, and 4.25-in. deep. I added roughly two inches of clearance on all sides of the set within the cabinet dimensions, plus height for the drawers and shelf, resulting in an exterior cabinet size of 36-in. wide by 31-in. high. The 5.5-in. width of the (nominal)
1×6 maple boards used here, along with full-overlay doors, provided just enough cabinet depth for a flat-screen set with a hanger mount.
Quick and ‘E-Z’ Dovetails
General’s “Dovetailer” E-Z Pro Jig is a compact, all-in-one unit that guides your electric router to cut both pins and tails at the same time in the same setup. The kit comes with everything you need, including a 1/2-in. carbide dovetail bit with preassembled guide bushings to make full or half-blind dovetail joints. You can also use this jig to make other size and shape dovetails, or square-cut box joints, if you supply your own bits.
The cabinet frame is a simple open-faced box. After cutting the top, bottom, and side pieces to finished length, mark the board faces and intersecting corners to identify how they will be arranged in final assembly. This is important to ensure that the dovetail joints match up accurately after they are cut.
Begin the half-blind dovetail joint sequence by cutting the TAILS—the dovetail “fingers”—at each end of the top and bottom frame pieces. It’s easier to set the jig and cut all the tails at one time before you readjust the jig guide to cut the dovetail PINS—the mating slots—and it will result in more accurately aligned joints.

The Dovetailer is simple to set up. First, align the jig’s built-in gauge to the appropriate depth indicated on its scale; if you use the 1/2-in. dovetail bit supplied with the kit, as we did, set the gauge to the 1/2 mark. Chuck the bit into your router and—with the router turned off—place the router baseplate atop the jig, then adjust the bit depth so that it barely touches the gauge. Don’t worry that the bit will impact the plastic gauge during operation—when the router is positioned for cutting, only the guide bushing, not the spinning bit, contacts the gauge.
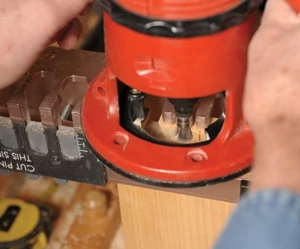

With the jig and router ready to go, make a center mark near one end of the inside face on the first board. I find it easier to clamp the board vertically against a workbench when cutting the tails, which positions the jig atop the board end and allows you and the router to work comfortably atop the jig.
Place the jig on the board end so that the legend CUT TAILS THIS SIDE is facing you on the flat horizontal surface, and align your center mark on one of the jig’s central dividers. The outside or finish surface of the board should be facing away from you. It’s not necessary to measure or position the board precisely in the jig—alignment of the tails and pins is done when the pins are cut in the next steps.
Tighten the jig’s face clamp against the board, using the two thumb screws on the opposite side of the jig. Position the router baseplate flat atop the jig and rout the tails by following the jig slots. The guide bushing will prevent you from over cutting, but take care not to tilt the router, and cut slowly to avoid wood tear-out on the board faces. Rout all of the tails onto both ends of the top and bottom boards.
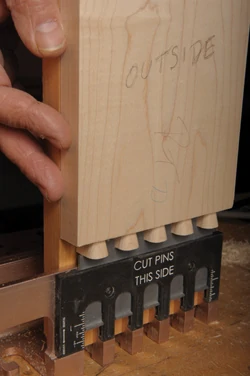
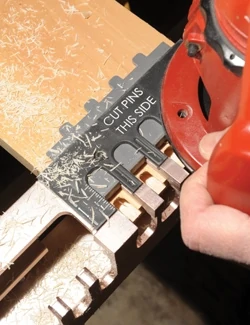
To rout the pins, first reset the jig guide to correspond to the thickness of the wood (if you’re using nominal 1×6 material, as we are, set the guide to the 3/4 mark), then position the jig on the end of one side board. For this step, it’s easier to clamp your board flat on a workbench so that the words CUT PINS THIS SIDE on the jig are facing up.
Register the pins and tails by aligning each side board with its intersecting end board (which you previously marked). This is easily done by inserting the board’s cut tails into the gray-plastic guide slots and simply lining it up against the PINS board you are about to rout.
Be sure that both the outside face of the TAILS board, and the inside face of the corresponding PINS board, are facing toward you as you look at the jig (the jig’s instruction booklet has a helpful illustration of this step).
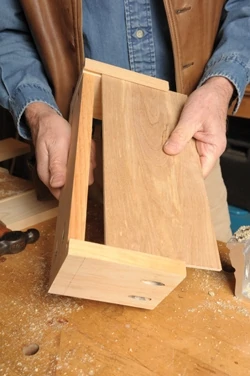
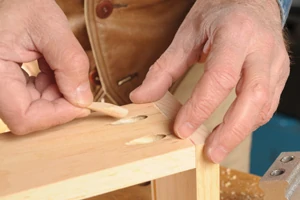
After aligning your first PINS board, clamp it into the jig using the jig’s thumb screws. When using any of the E-Z Pro jigs, be sure to clamp your workpieces securely but do not over tighten the clamps—too much muscle can distort the wood or even the jig itself. Rout the pins on all of the side-board ends, then assemble and test-fit the cabinet frame components. Do not glue any of the components at this time. When you’re satisfied with the cabinet frame fit, take precise measurements for the doors, drawers and two drawer dividers, shelf, and upper and lower stretchers.
Fast Fasteners for Frame Parts
The stretchers help to square-up and reinforce the frame, and an angled lower edge on the upper stretcher allows it to also serve as a cabinet wall-mount. Start by cutting a 1×6 to length, then reset your table saw blade at a 30-degree angle and rip the board into two roughly equal widths. When you’re ready to hang your cabinet, simply level and screw one piece to the wall with its angled edge facing up and out; the matching length, installed into the cabinet frame with its angle facing down, will nest securely into it.
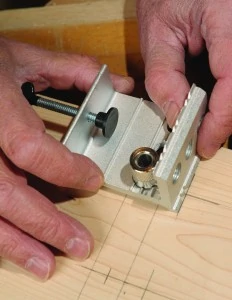
Fit the top and bottom stretchers in place and mark locations for dowels. Two dowels, evenly spaced, are sufficient to anchor each piece; the upper stretcher attaches to the frame top, and the lower stretcher to the shelf top. Also mark for dowels on the drawer dividers and their locations between the shelf and frame bottom.
The E-Z Pro Doweling Jig came in handy for this operation. When clamped in place, its interchangeable drill-guide inserts let you quickly place and bore accurately aligned dowels in board ends, edges and faces.
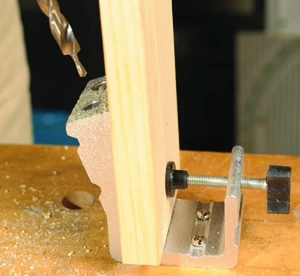

To make final assembly easier, I opted to fasten the stretcher ends to the cabinet sides with pocket hole screws. It took less than a minute to create each joint using the E-Z Pro Pocket Hole Jig. One screw at the ends of the stretchers is enough to lock them in place.
I also used the Pocket Hole Jig to make the drawer sides and backs, using 3/4-in. stock. Although dovetail joints are often employed for this, these drawers are narrow due to the shallow cabinet depth and don’t require joints as complex or strong as dovetails. With the E-Z Pro jig, setting up and cutting each pocket hole is a snap. The jig comes with a stepped drill bit and stop collar to make perfect repeat cuts every time.
Cut all the drawer components to size, then rout a 1/4-by-1/4-in. groove in the interiors of the sides and drawer fronts for the plywood drawer bottoms. Take care not to extend the front grooves beyond the side pieces.
Mortising the doors
Making inset-panel, stile-and-rail cabinet doors can be a difficult, exacting, time-consuming process, but there are ways to reduce the work—and cost, as in the case of solid-wood raised panels. This cabinet’s panels are nominal 1/4-in. plywood (3/16-in. actual thickness), which makes them substantially less expensive and easier to create. Note: When buying plywood, it’s important to choose one with a decent-looking “B” side, as both faces will be visible when the doors are complete (and open during use). I used interior-grade mahogany plywood and stained both sides to match the cabinet wood.
Another shortcut that results in a strong, professional-quality framework is to use mortise-and-tenon joints instead of traditional “book match” routed stile-and-rail joints. Cutting precise-fitting mortises and tenons presents its own difficulties, but once again one of General’s E-Z Pro jigs came to my rescue. Like the Dovetailer, the E-Z Pro Mortise & Tenon Jig is an all-in-one unit that lets you use a plunge router to cut mortises and matching tenons at the same time.
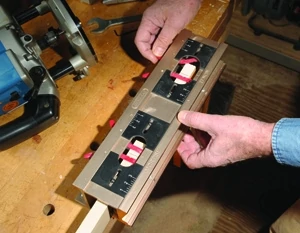
It takes just a few minutes to set up this E-Z Pro jig. Start by securely clamping or screwing it to your workbench to keep it stationary during operation. Then, following the unit’s directions, adjust it for the thickness of your stock (in this case, 3/4-in.), and adjust the marked templates on the jig to correspond to the size of your mortises and tenons. The jig also provides everything you need to set up and cut with your router, including a 1/4-in. diameter upcutting bit and a quick-change guide bushing assembly that helps you center the bit (and lets you use other-size bits in future projects).
With the jig and router ready to go, cut the vertical cabinet door stiles to finished length. You’ll rout the mortises—the cavities—into these pieces. Next cut the top and bottom horizontal rails, but add two inches to their total length to allow for the 1-in.-long tenons—the cavity inserts—that will be formed at each end.
Mark a centerline for the mortise location on your first stile piece and place it into the left side of the jig (marked MORTISE). Be sure the mark is centered between, and snug up against, the jig’s red swing-out positioning bars, then tighten the jig’s face clamp to hold the piece in place.
Support the outboard ends of longer workpieces so they remain in position parallel to the jig’s surface.
Next, mark a centerline on the end of a rail piece and insert it vertically into the right side of the jig (marked TENON). Again, center it beneath the positioning bars and tighten the jig’s face clamp. Retract the positioning bars, and your first mortise and tenon are ready for routing.
Set the router bit to a 1-in. cutting depth, measured from the face of the guide bushing, and set your router plunge depth to 1-1/2-in. to allow for the bushing itself and the gap between the jig surface and the workpieces mounted below.
Begin by routing the mortise cavity. The guide bushing automatically centers in the template opening, so all you have to do is plunge the bit into the wood in a series of cuts from one end of the template to the other. Finish with a sweeping cut along the length of the mortise.

Next, move to the tenon side of the jig and, with the router plunge mechanism fully retracted, place the guide bushing into the template opening. Keep the guide bushing against the inner circumference of the template opening as you make successive plunges with the bit, moving the router in a clockwise motion.
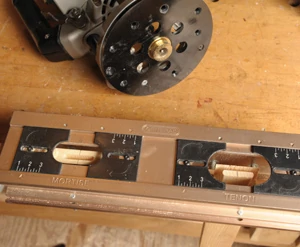
Be careful not to let the bit wander inward and cut into the tenon. Finish with a sweeping circular cut completely around the now-formed tenon.
Remove the stile and rail pieces from the jig and test-fit them together. A close-fitting joint is desired, but if the fit is too tight, sand the tenon lightly. Also, depending on the thickness of your workpiece, a thin “flashing” or perimeter “fence” of uncut wood may remain around the corners or outer edge of the tenon after routing. This is easily cut away using a razor knife or fine-tooth saw. Alternatively, you can reset the tenon gauge to allow the router to make a wider pass, which usually eliminates any flashing.
Final Assembly
Cut all the mortises and tenons, then dry-fit both cabinet doors to check for size and squareness, and make any adjustments necessary. The next step requires routing a 1/4×1/4-in. groove in each piece for the plywood door inserts. A router table with fence is an ideal setup for this, or you can use a router guide, or dado blade in your table saw. Center the groove, but to ensure that all of the grooves line up uniformly when cut, mark each wood piece so that the sides you want to show on the front of the doors face you as you rout them.
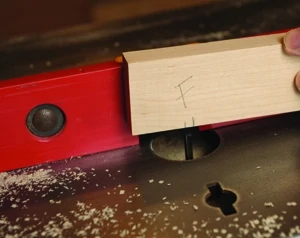
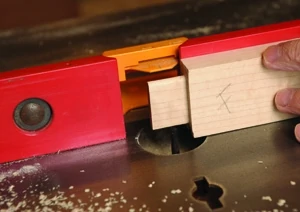
Cut the plywood door inserts to fit, allowing for some slight movement in the grooves for natural expansion and contraction. During final assembly, take care to avoid gluing these “floating” inserts in place. After cutting, sanding and fitting, the overall finished size of our doors came to 18.25-in. wide by 25.5-in. tall.
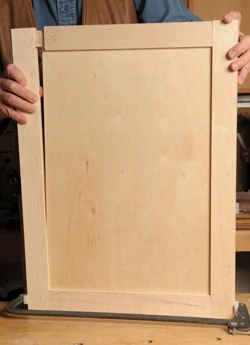
The non-mortise, full-overlay hinges I chose for this project are less expensive, easier to install, and more decorative than most of the Euro-style cabinet hinges available (www.rockler.com). They also allow a full 270-degree opening, enabling the doors to fold back toward the wall for an unobstructed view of the television screen from any angle.
Finally, I prefer applying an initial stain coat to the individual cabinet and door parts before assembly, and then adding a second stain coat and finish after glue-up. If you follow this practice, avoid staining the joint areas, especially if you use oil stains that will prevent the glue from bonding.
Other DIY Project Articles


