

Boards or tiles? Metal or wood? What’s the right look for the ceiling of your home?
Ceilings are one area of the home that often go ignored yet present a great opportunity to enhance the interior décor. Although they’re often left naked with little more enhancement than a sprayed or brushed-on texture, the more striking ceilings exhibit a distinctive style with visual accents, artistic patterns or elaborate molding. From traditional materials to modern alternatives, here’s a look at some of the choices available for your next ceiling remodel.
Wood Ceilings
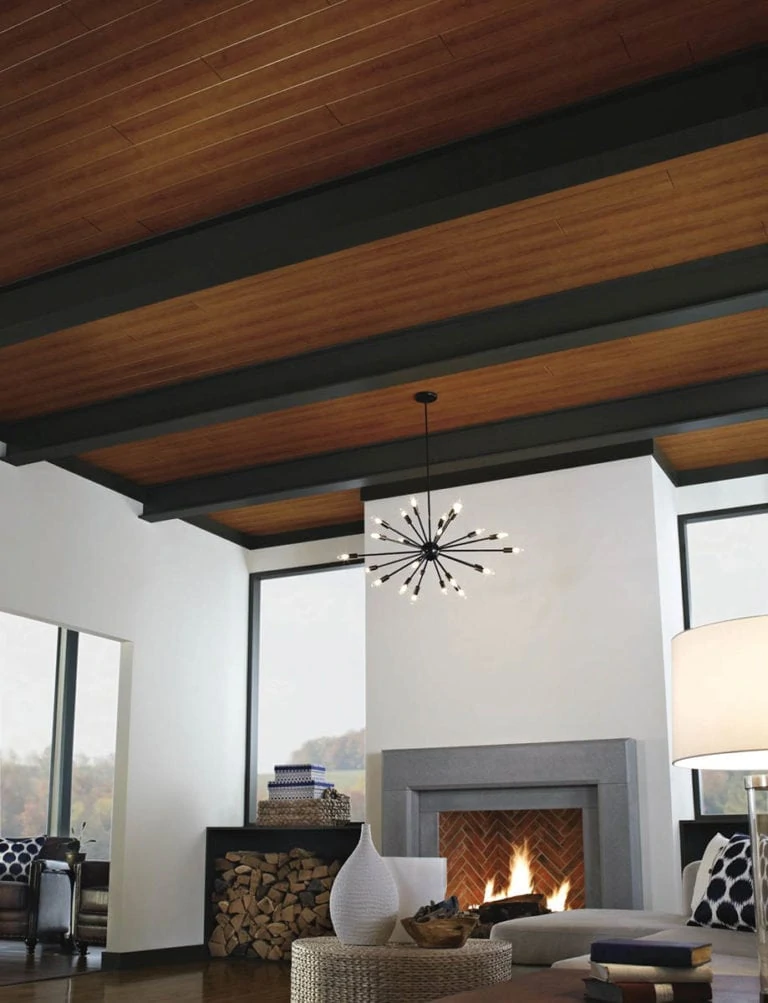
In recent issues of EHT, we’ve covered tongue-and-groove wood planks applied to a ceiling. Depending on the orientation of the joists in relation to the ceiling boards, it may be necessary to install plywood sheeting or perpendicular wood furring strips to ensure secure fastening of the ceiling boards. These nail-up wood ceilings can be made from traditional wood floor-boards or bead-board planks.
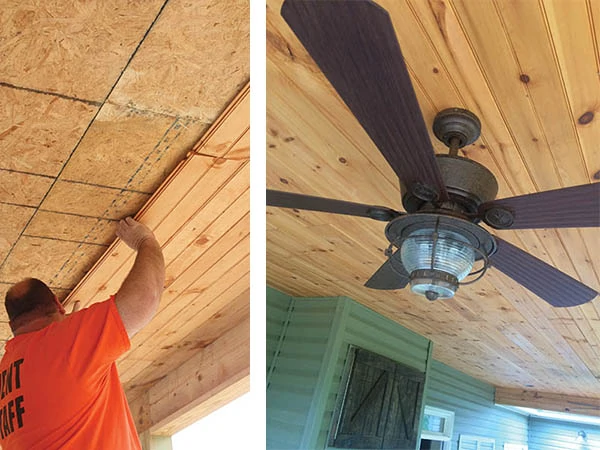
To conceal the fasteners during installation, the boards can be blind-nailed into the plywood or furring strips (although the first and last boards will be face-nailed). Finish nails are recommended to prevent splitting the wood. A variety of paint and staining options are available, and the linear boards of this ceiling treatment can give the illusion the room is longer than it actually is.

Faux Wood Beams
Take your wood ceiling (or any ceiling) a step further by accentuating it with faux wood beams. Authentic timber beams bring a classic, rugged natural wood appearance to any home. But rather than hoisting up a heavy solid timber beam and anchoring it in place, companies such as FauxWoodBeams.com offer a much easier solution—decorative beams manufactured from lightweight polyurethane. Made in molds of real hand-hewn beams, these easy-to-install alternatives have a look and texture that closely mimics the grain, ruts and checking found on natural wood.


The hollow beams are installed over blocks of lumber mounted to the ceiling. Because the beams are so light, you can mount the installation blocks into studs with the screws, and you can mount them into the ceiling with anchor bolts. You’ll typically install the blocks every 4 to 5 feet along the ceiling. Apply adhesive to the edges of the faux beam, then slide it over the mounting blocks and drive screws through the side of the beam into the blocks. Countersink the screws and use wood filler to cover the heads.
Coffered Ceilings
For a stately look, it’s hard to top an ornate coffered ceiling. A beautiful design element found in high-end interiors throughout the world, a coffered ceiling has traditionally required experienced craftsmen to spend many long hours measuring, constructing, designing and installing the many components involved. However, you can streamline this complicated process with a made-to-order ceiling manufactured to your specs.
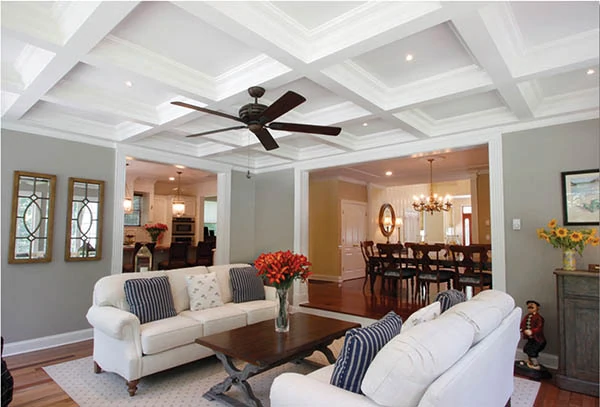
With Tilton Coffered Ceilings, each ceiling system is designed to fit a unique space and is custom-built to order. With a multitude of beams styles and sizes as well as many molding and panel options, there’s bound to be a good selection for your home. Each ceiling is based on individual coffer modules (includes ceiling panel and molding) that are combined to create the completed ceiling during assembly.
Beyond the speed of design and installation, the Tilton system offers another big advantage: elimination of installation issues due to defects in the ceiling (such as sloping, sagging, etc.). With its integrated ceiling panel, the Tilton coffered ceiling completely covers the ceiling surface while allowing for independent adjustment of each coffer module to ensure a straight and level finish.
Surface-Mount Ceiling Tiles
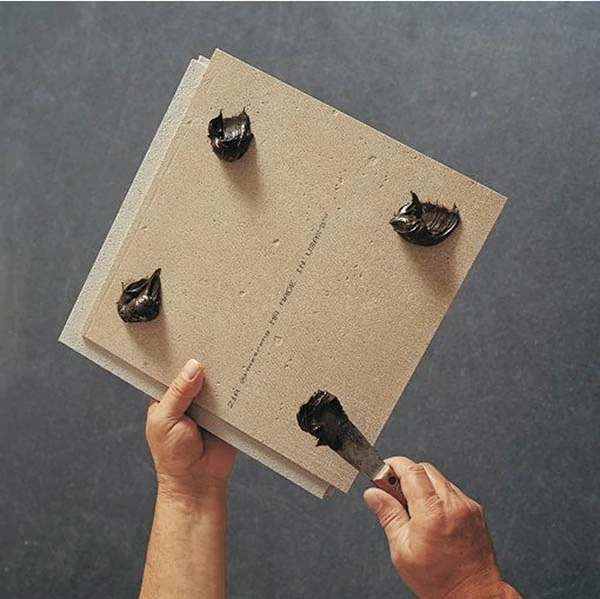
Presenting a different option in material, ceiling tiles are available with the appearance of both wood and metal. Tiles that mount directly to the ceiling surface will maximize ceiling height.
Wood-look tiles made of MDF or mineral fiber can emulate linear floorboards, but their thinner profile typically weighs less. A beveled tongue-and-groove edge minimizes the appearance of gaps during normal expansion. Wood-look tiles are sold in a wide range of colors, including everything from classic painted white to exposed faux woodgrains with stained or weathered finishes. These prefinished tiles require no sanding, staining or sealing, and make a great option for covering damaged drywall, plaster or popcorn ceilings.
Depending on manufacturer, wood-look planks can be fastened to furring strips or mounted to the ceiling with a system of tracks and clips.

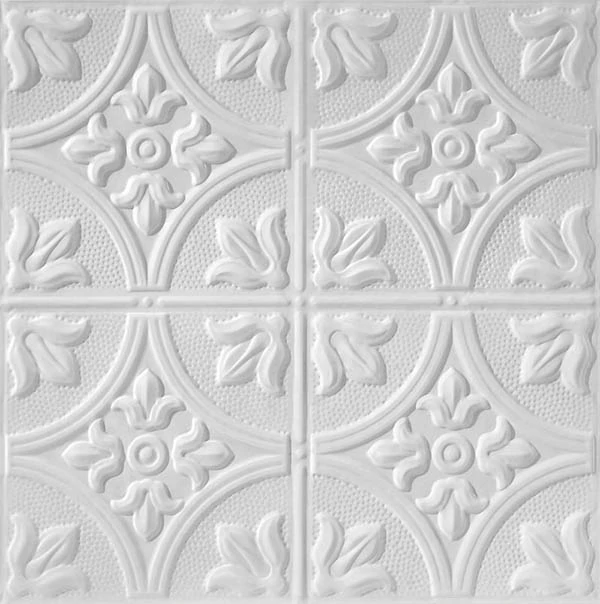
Designer tiles generally come in a square shape that can have the look of metal, wood or molded coffers. The metal tiles can be installed from wall to wall for a bold, dramatic statement, or installed as a strategic accent area to enhance the focal point of a room.
Tiles made of mineral fiber can be mounted directly to existing drywall or plaster ceilings with a recommended Acoustical Ceiling Tile Adhesive. Metal tiles can be surface-mounted using a combination of adhesive and cone-head nails that have a matching finish. Be sure to use an adhesive that will stick to both the metal panels and to the wall surface where the panels are to be mounted (such as Liquid Nails or AcrylPro). Keep in mind that when using a surface-mount installation method, the drywall or plaster ceiling must be smooth and even.

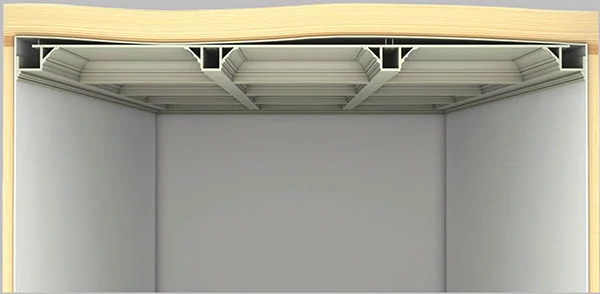
An alternative installation method for surface-mount tiles is to use a track-and-clip system. The Easy Up System from Armstrong Ceilings uses tracks that can be installed directly onto exposed joists, maintaining the room’s ceiling height. The clips hold the planks or tiles securely to the tracks.
Drop Ceilings
The ceiling surface does not have to be smooth and even to install a drop ceiling. In fact, these grid-suspended ceilings are often utilized to conceal ductwork, plumbing or electrical lines while keeping them easily accessible for maintenance. Plus, these ceilings generally use acoustical tiles. Acoustic ceilings earn their name from the sound-absorbent tiles that “soften” the surface of the ceiling to deaden reverberating noise. This also helps block sound transmission to other rooms.
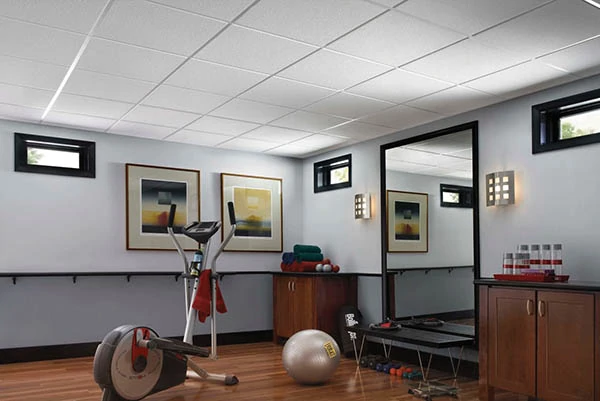
Today, various styles and colors of acoustical tiles offer textures that mimic slate, stucco, metal, swirls or even corduroy. Interlocking tiles can create an elaborate, decorative pattern. And different edge treatments are also available to dress up suspended tiles.
The tiles of a drop ceiling essentially “drop” into the squares provided by the grid system, making installation of the grid the most challenging aspect of this system. Using 1/4-inch graph paper, diagram the room to scale. Be sure to keep the border tiles even, uniform and as wide as possible. If the room is out of square, split the difference and leave a similar sized border tile on each side of the room.

The first step of a new drop ceiling installation is to level and fasten the L-shaped molding to the walls. Use a laser level to project a guideline and make alignment easier. Pay attention to the manufacturer’s minimum height restrictions. Don’t try to gain extra height in the room, or it might be difficult to install the tiles.
Use wood screws to secure the L-molding to the wall. Next, install the main support runners along the centerline and ensure the cross-tee slots are in the right location. The grid will come with instructions, so follow them closely. Complete the grid by snapping the end tabs of the cross tees into the slots on the main runner.
In addition to the snap-together connections, the grid should must be supported by wire connected to the framing members above. Traditionally, 16-guage wire or heavier was used to support the main runners, attaching them with eyehole screw hooks installed every 4 feet.
Bending and adjusting the wire was a pain in the neck, though, and Armstrong Ceilings now offers an easier way to support the grid with QuickHang Grid Hooks. The Grid Hooks come with brackets that get nailed to the wall. The wire hooks then slide through the brackets and hook onto the suspended grid. The installer can then easily slide the hooks up and down within the bracket to secure its final height, which is much simpler than the old method.
Side Note 1
Colorful Woodgrain PVC Exterior ceiling from Versatex
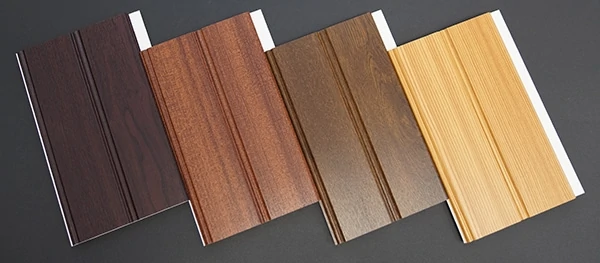
The Versatex Canvas Series of maintenance-free, hardwood-toned PVC trimboards opens up endless creative possibilities for homeowners, builders and architects alike. Designed to bring the warmth and contrast of natural wood to the ceilings of covered decks, porches and verandas, the original Canvas Series T&G won immediate acceptance for new construction and renovation after its introduction last year. Now Versatex has expanded the range of options with two innovative profiles in matching, colorfast woodgrain finishes.
“We added the new Canvas Series profile—a 1/2 x 6 tongue-and-groove beadboard and a bed mould—to the Canvas Series in response to overwhelming requests from contractors and builders who desire a different look, compared to the WP4 we currently offer,” says Versatex spokesman Rick Kapres.
Available in textures and colors that replicate the beauty of black cherry, walnut or tropical macore—as well as a sunny amber tone—all Canvas Series components feature the easy workability, stability and weather-resistance of Versatex premium PVC exterior trim. Versatex supplies the Canvas Series T&G stealth beadboard in 18-ft. lengths, and the bed mould in 16ft. lengths.
“More and more homeowners are looking for that extra coziness and personality that the look of hardwood can provide,” says Kapres. “Now there’s a permanent, durable answer for situations where severe conditions like coastal humidity and salt spray take their toll on natural wood.” Learn more at www.versatex.com.
Side Note 2
DIY Tray Ceiling

A “tray ceiling” is a common term for a recessed ceiling, often with the recessed sides sloped at an angle. The original flat ceiling has its edges lowered to create the center recess area. The lowered edges vary in width according to the dimensions of the room. The basic purpose of a tray ceiling is to break up an ordinary flat ceiling line and add a variation in height to create architectural interest. A feeling of spaciousness can be created by the look of the different levels, and a tray ceiling can make a low ceiling look higher.
The entire ceiling should have drywall attached before the tray construction starts. First, determine the width of the lowered area of the ceiling (typically 12 to 24 In. wide). Mark off the layout by snapping chalk lines to use as an installation guide.
Next, attach furring strips to the ceiling along the wall and inner edge. The furring is 1-1/2-in. thick and should be fastened to the solid framing behind the drywall. Glue and screws are used to secure the furring.
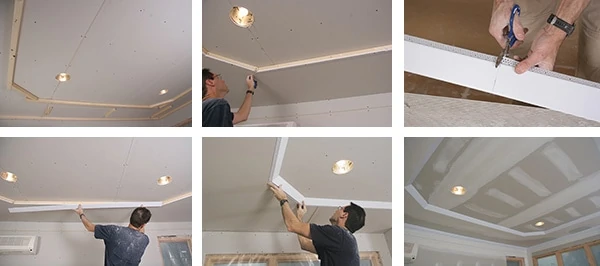
Attach 1/2-in. thick drywall to the furring using standard drywall installation techniques.
Next, attach a transition piece such as the EZ-Tray bead available from Trim-Tex. The EZ-Tray is a 3-in. wide, chamfer-edged layering bead specifically designed to make a tray ceiling. Align it with the edge of the lower ceiling and staple it along the mud leg of the bead. Attaching the bead to snapped lines helps ensure straight looking edges. The edge that fits against the upper ceiling should have adhesive caulk applied to hold it tight against the drywall. After sanding and priming, this upper edge gets caulked again to create a perfect transition edge.
Tape all the seams and inside corners on the drywall and conceal with joint compound. Conceal the mud edge of the EZ-Tray bead with two or three coats of joint compound. Then, sand and apply a coat of primer. After sanding, applying more caulk along the upper edge of the tray angle may be necessary for a more perfect transition.
The right paint color can greatly enhance a tray ceiling. For instance, a recessed tray ceiling can be painted a few shades darker than the main ceiling color to make it appear even more recessed and to provide a stronger contrast to the look.
Editor’s Note: This sidebar appears courtesy Myron R. Ferguson and Trim-Tex.
