A welder quite often isn’t the most sought after tool by many do-it-yourselfers. A welder can, however, be a very handy and important tool for the contractor or those wishing to repair or build metal projects around the home. Welders are a necessity around the farm and ranch, as well as for those doing auto repair work. Welding and welders may seem daunting to the first timer and, indeed, welding can be challenging, requiring learned skills. These days welding, however, isn’t just for shop class nerds or professional metalworkers; it can be fun, and any number of modern-day tools make welding easier for even the first timer. Many modern welders are also less expensive and don’t require a special 220-volt circuit. Larger models do, however, require a 220-volt circuit.
Types Available
Four basic welding tools and techniques are used: arc (stick), MIG, TIG and oxygen/acetylene. Each welding technique has its advantages and disadvantages.
Stick welding has been the most popular method for most home-shop welding for a long time. Stick welding uses an electric current flowing directly between a gap between the metal and the “stick” or arc-welding electrode. The current causes part of the electrode to melt, allowing it to mix with the metal of the work piece and form the weld. The electrode has a flux coating that burns to form a protective shield around the arc. Stick welding is the most effective method for welding many different alloys or joints. Stick welding can be used outdoors or indoors or in drafty areas, is the most economical method and will weld on rusty or dirty metals.
Stick welding does have some disadvantages. It is limited to metals no thinner than 18 gauge, requires frequent rod changing, has lots of splatter and the welds must be cleaned up after they are finished. Stick welding is also more difficult to learn and use, particularly in striking and holding the arc. Arc welders are available as either AC or DC or AC/DC. AC welders are the most economical and are used for welding thicker metals of 1⁄16 inch or more. They are the best choice for farmers, hobbyists, and home maintenance chores. DC welders provide cleaner welds, fewer arc outages, less splatter and sticking, and better control on thinner metals. They are also more expensive.
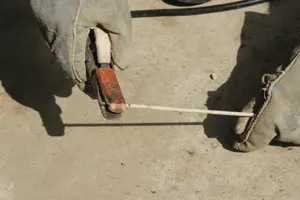
Above: The traditional type of welding for homeowners has been arc or stick, but it takes practice to strike the arc and hold it properly.
MIG welding (GMAW) (also sometimes called wire-feed) uses a wire welding electrode on a spool that is fed automatically at a constant selected speed. The arc created by an electrical current between the base metal and the welding wire melts the wire and joins it with the base. This produces high-strength welds with a very good appearance and little need for cleaning. MIG welding also uses a gas shield process with gas fed through the welding torch and acting as a shield at the arc. This prevents oxidation and contamination of the base metal. The gas utilized may be inert or active, depending on the base metal to be welded. MIG welding is clean, easy and can be used on either thin or thicker plate metals.
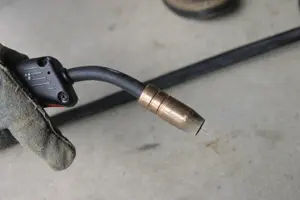
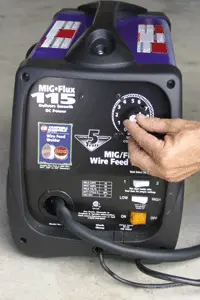
Above: Wire-feed welders feed a wire through a gun and are easy to use, produce clean welds and many are now sized perfectly for homeowners.
A similar type of wire-feed welding is FCAW. It is slightly different from MIG welding in that it does not require a shielding gas. This gas-free welding uses flux-cored welding wire to shield the arc. This form of welding is the simplest, very efficient and extremely effective, especially when welding outdoors in windy conditions.
Both MIG and FCAW are very easy to learn and can create super-clean welds on steel, aluminum and stainless. MIG and FCAW weld materials as thin as 26 gauge.
Another form of welding is TIG, also called Heliarc. It utilizes tungsten inert-gas and is used primarily by professionals.
Oxygen/acetylene welding utilizes oxygen and acetylene mixed at the torch to produce a flame hot enough to melt metal. It can be used for metal cutting as well as welding purposes. Oxygen/acetylene welding takes quite a bit of practice and skill, as well as quite a bit of safety rules in storing and using the gases.
Safety
Welding, like many work procedures, can be dangerous if you don’t follow safety rules.
1. Work in a safe area, free of all flammables, with both a fire extinguisher and a bucket of sand available.
2. Exposure to a welding arc is extremely harmful to eyes and skin. Prolonged exposure can cause blindness and burns. Never weld unless you are adequately protected. Wear a heavy, long-sleeved shirt, cuffless pants, high-topped shoes, flameproof welding gloves and a protective welding helmet.
3. Read and understand the welder’s owner’s manual.
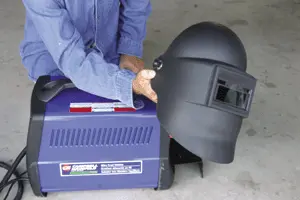
Above: Auto-darkening helmets, like the Campbell Hausfeld model shown, make it easy to see the gun or stick placement but provide instant darkening.
Basic Practices
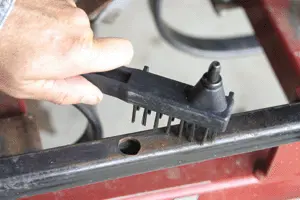
The following steps are the basics for MIG or arc welding. It’s extremely important that all metal surfaces to be joined are free of rust, dirt, scale, oil and paint. If the surfaces are not properly cleaned, the weld can be porous and brittle. Remove oxidation and dirt with a steel-bristled wire brush. Remove all oil or grease with a good cleaner.
The metal to be welded, as well as the ground-clamp area, must first be cleaned of rust, scale and grease.
Aluminum requires even more preparation. First, use a good chemical aluminum cleaner. Aluminum has an anodized surface and this must be wire brushed, sanded or ground off the surfaces to be welded, as well as anywhere the ground clamp is to be placed.
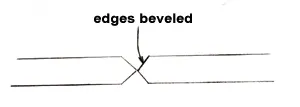
If joining thick metal pieces, they should first have their edges beveled with a metal grinder. The angle of the bevel should be approximately 60 degrees at the pointof contact.
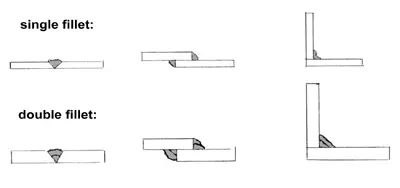
A variety of joints are used to fasten the metal pieces together. Below is a chart of the most common joints.:
Connect the ground clamp to the work piece and as close as possible to the area to be welded. On-board computer systems of automobiles can be damaged if the ground clamp is connected directly. Do not weld until you have disconnected the cable from the battery that is attached to the chassis ground.
When first learning to weld, it’s a good idea to practice on scrap metal. Try different heat settings, base metal thicknesses and welding positions for each type and size of wire you will be using. Make sure you read and understand the owner’s manual. Then turn on the welder and follow the manufacturer’s instructions on tuning in the wire speed and heat settings.
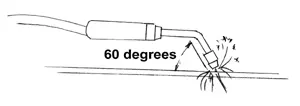
Properly holding the gun is important for wire-feed welding. The gun can be held in two basic methods, depending on the type of weld being made. Because the welding tip is designed with the contact tip recessed from the end of the nozzle and the nozzle electrically insulated from the rest of the gun, wire-feed welding is easy to learn. You can actually rest the nozzle on the work piece and drag it along. This is very helpful for beginners. Stick welding requires that you first touch the work to strike an arc, then lift the electrode to prevent it from sticking and this takes some practice and skill.
Wire-feed welding is really quite simple. Line the gun up in the proper position on the joint to be welded. Lower your helmet or hold up a welding shield and pull the trigger to start the arc. In a second or two you’ll notice a weld puddle beginning to form and the base of the bead beginning to build. You can either push or pull the gun to move it along the weld joint. When welding aluminum, it’s best to push the gun as this creates a cleaner appearance. Move the gun steadily and at the right speed to create a solid weld without lumps or an uneven bead. This part does take some practice, but it’s still easier than stick welding.
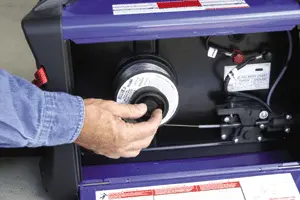
The wire spool is first loaded into the welder and the wire fed through the gun.
The wire-feed rate and amp settings are then set to suit the material being welded.
Stick welding begins by first selecting the proper electrode. The electrode is basically a rod coated with flux. The type and thickness of the metal and the position of the work piece determines the electrode type and amount of heat needed.
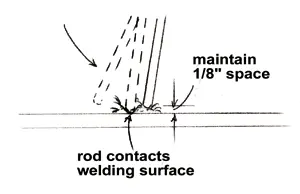
Naturally, the thicker metals require more heat. Welding electrode and arc-welder manufacturers provide selection charts as to the electrodes needed for specific chores. You must next select the proper amperage for the electrode and the work piece. Turn on the welder, set the amps, protect your eyes and strike the arc. It is akin to striking a match, scratching the tip of the rod against the work surface, and then quickly lifting it to the required 1⁄8-inch. This gap must then be maintained consistently during the welding process. If the gap becomes too narrow the electrode will stick to the work surface. If the gap becomes too wide the arc stops. At the same time you are maintaining the proper distance, you must also maintain a consistent rate of travel with the rod along the joint to create a proper bead. Too fast and the joint will be weak. Too slow and the bead will overbuild with more slag. This does take practice, and it’s best to practice on scrap pieces.
Above: Arc or stick welding requires a bit more skill. The arc is made by scratching the stick across the metal surface, then immediately lifting it and holding it 1/8″ above the surface.
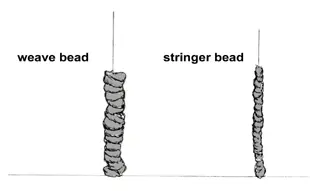
Two types of beads are commonly used: stringer and weave. A stringer bead is created by moving the gun in a fairly straight line and keeping the nozzle and wire centered on the joint. This, naturally, is the easiest bead to make. A weave bed is used when you must deposit metal over a wider space than with a stringer bead. This is made by waving the gun nozzle side to side while moving along the weld.
Quite often, more than one bead is required to fill the V shape ground into the joint, as well as to create a strong joint. If using a stick welder, or a self-shielding, flux-core wire in a wire-feed welder, you must chip and brush the slag off each bead after it cools and before making another pass. This slag must also be removed when the weld is finished.
Welders Available
Both stick and wire-feed welders are available in a wide range of sizes, rated by the amperes they create. It’s important to note the duty-cycle when purchasing a welder. This is the percentage of actual weld time that can occur in a ten minute interval. For example with a 20% duty cycle, actual welding can only occur for two minutes, and then the machine must cool for eight minutes. Models such as those from Campbell Hausfeld feature a yellow lamp on the front that lights if the duty cycle is exceeded. Stick welders range from 50/70 amps up to 50/230 amps output. The smaller welders are 115 volt, the larger welders require a 220-volt circuit. The smaller welders will handle materials up to 1⁄8-inch thick, while the larger welders can weld steel up to 3⁄8 inch in one pass. I have a Lincoln Electric, Classic stick electrode welder that is probably over 40 years old and still going strong. I’ve welded everything from bicycles to tractors with it. Another good arc welder for homeowners is the Schumacher 70-amp AC ARC welder. It is fairly easy-to-use and has two heat settings. For more experienced welders the Schumacher 230/140-amp AC/DC arc welder is a good choice. It has an infinite heat-selection feature and the DC output aids in welding hard-to-start positions. Campbell Hausfeld offers a 70-amp AC and a 230-amp AC/DC model. Oxy-acetylene kits are also available from Campbell Hausfeld.
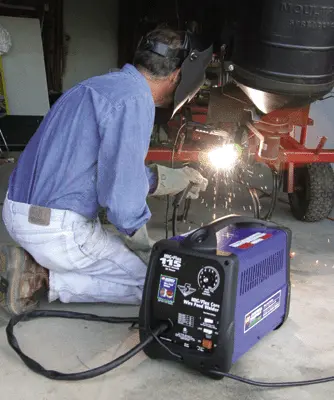
Wire-feed welders range from 30/70 up to 30/85 in 115-volt, 220-volt models up to 200 amps. Wire-feed models are available as flux-core or MIG. The former are the easiest to operate as they require no gas. You can learn to weld in minutes. Many MIG units are also available to weld with flux wire or with gas. This allows you to learn to weld the easy way with the flux wire. Then simply add the gas bottle for more advanced welding. An excellent example is the Campbell Hausfeld, Model 115 MIG/Flux DC, wire-feed welder. It comes complete with a roll of flux wire and a hand-held eye shield. Simply assemble a few parts, install wire roll and start welding.
A wide range of welders, including arc, MIG, TIG and oxygen/acetylene is available from Campbell Hausfeld and Lincoln Electric. Craftsman has introduced several new MIG/flux welders.
Many welders come with a hand-held welding shield. If you do much welding you will appreciate a welding helmet. Auto darkening models such as the Campbell Hausfeld model shown, make it easy to see the beginning placement of the gun or stick, yet instantly darken to protect your eyes.
Don’t be afraid to tackle welding. Today’s tools make the chore easy for even a first-timer, and you’ll probably find it’s fun and addictive.
Side Note
Cutting Metal?
You can cut metal to the sizes needed for welding with a handheld grinder, or with a torch, even with a stick welder set on high. In many instances the cuts will be rough. The best method is with a metal-cutting band saw.


