

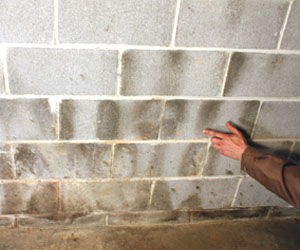
Nobody likes unsightly stains from mold, mildew or water damage, but that’s what occurs in countless basements across the nation. Basements have a tendency to be damp by simple virtue of being the lowest level of the house, often below grade. The basement walls are the barrier between your living space and the gallons and gallons of accumulated water that your home sheds during rainfall.
However, roof runoff is usually not the only contributing factor to the massive amount of water collecting at a home’s foundation walls. Basement waterproofing should begin outside your home. Whenever you discover wetness on interior masonry walls, observe what is causing the seepage problem. Check for leaky gutters and downspouts or blocked drainage pipes. Ruts in the landscape or improper grading can also direct water towards your foundation. As the soil around your foundation becomes saturated, hydrostatic pressure forces water through the porous masonry, creating dark stains on the interior surface. For the best waterproofing results, correct all of these exterior problems before applying a masonry waterproofer to the interior block.
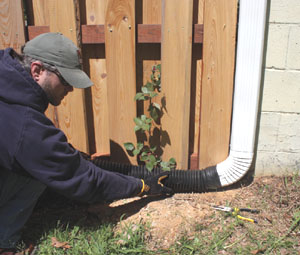
For example, the house shown in this article had no gutter along its rear roof line. As a result, during a rainstorm the water was cascading off the roof and pounding a trench along the foundation wall, where it was seeping through the ground and migrating through the cinderblock, as evidenced by stains on the interior. By installing a gutter and a couple of downspouts, the water is channeled away from that troublesome trench and diverted across the yard and away from the house walls. The gutter system will address much of the water intrusion on the outside, and the application of a masonry waterproofer to the interior walls will prevent future stains from occurring. Together, both the exterior and interior approaches will ensure a clean, bone-dry basement for years to come.
Prep the Surface
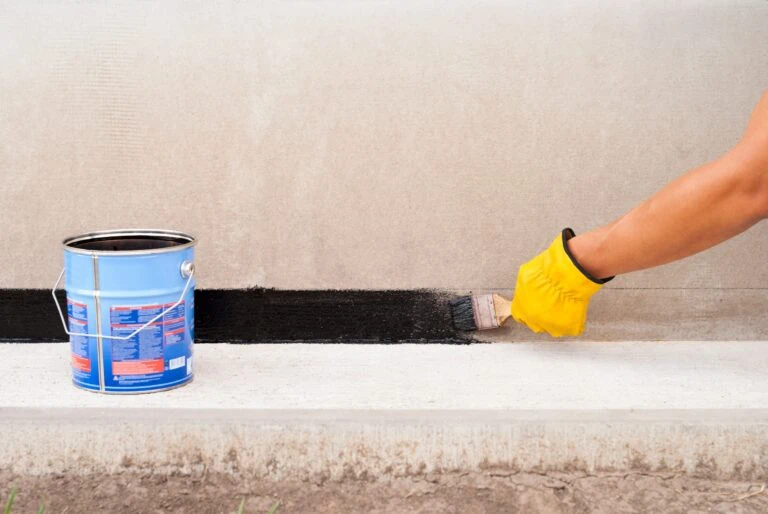
Applying a masonry waterproofing product is basically a painting project, so begin with prepping the surface of the wall for the best adhesion. Clean the block thoroughly with a wire brush to remove all loose and broken mortar, dirt and dust This particular house had many dirt spots caused by dirt daubers—a type of wasp that builds dirt nests on virtually any flat surface it can grab. Another obstacle to any masonry waterproofer is efflorescence (salt deposits). This white, powdery substance is formed when water-soluble salt compounds in the masonry are drawn to the surface by water seepage. These deposits prevent the waterproofing product from adhering to the surface of the wall. To control this problem, wash with a solution of muriatic acid, according to the manufacturer’s directions. Remove old paint by wire-brushing, sand-blasting or scraping (beware of lead paint). Most masonry waterproofers are warrantied when applied over bare masonry only.

As mentioned earlier, the foundation walls of this house also required the removal of mold and mildew stains. Bleach is a well-known killer of mold and bacteria, so I used a solution of bleach and water to scrub away the stains. When all of the mold and other debris is removed, dry the area completely.
Next, use a hammer and cold chisel to chip off any unsightly excess mortar protruding from the joints. If necessary, use a trowel to fill any shallow spots or holes with mortar. Small cracks can be patched with a concrete repair product and troweled smooth.
Also, inspect the floor-to-wall joint for evidence of seepage. When concrete floors cure, they normally shrink and pull away from the wall, creating a gap where water can enter. If this is the case, fill all gaps between the floor and walls with a concrete patching product.

Allow all repairs to dry completely before painting. Then, clear the room of all obstacles and mask off everything you don’t want painted. Sheets of cardboard work well to cover the floor during painting. Also, wear clothing that you’re willing to sacrifice after painting. The solid material in the waterproofer has a tendency to fly off a paint roller and splatter all over the user.
Applying the Waterproofer
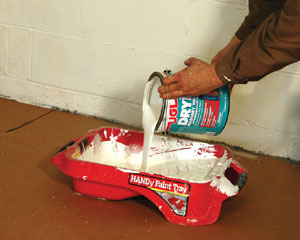
Several manufacturers offer masonry waterproofing products, including Ames, Behr, Quikrete, and UGL. For this project we used UGL’s latex-based Drylok product in white. Drylok is also available in gray, beige or blue. The product works by penetrating the tiny pores in the masonry surface and bonds itself to act as an integral barrier to stop water seepage. Ordinary paint only adheres to the surface, and oncoming water pressure can force it off. However, the high solids content in the waterproofer actually plugs those tiny pathways with a heavy coating that can withstand hydrostatic pressure of 10 psi—that’s the equivalent to water pressure at a depth of 22 feet (1,440 pounds per square foot). And, hopefully, the walls of your house will never be 22 feet under water.
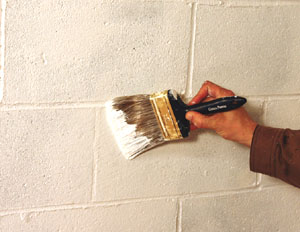
According to the manufacturer’s instructions, one should “apply the first coat with a stiff bristle brush working thoroughly into the pores of the masonry surface.” I’m sure that works but I was in a hurry.
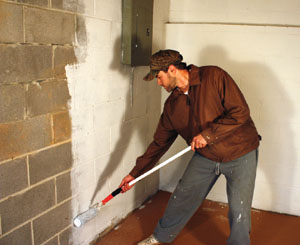
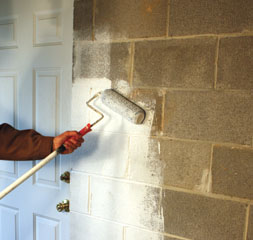
I opted to roll on the first coat using a roller sleeve with a very thick pile. Roll on the product slowly to minimize splatter. Even when rolling slowly, a roller achieves quicker coverage than brush-applying the entire wall. I worked in 3-foot sections, and then back-brushed the waterproofer with a paint brush to push the product deep into the surface of the block. Proceed in this pattern, rolling then brushing section by section, until you’ve completed the first coat over all the basement walls.
Bear in mind that masonry waterproofer is a very thick-bodied paint and is not intended to be spread thin like regular wall paint. One gallon will cover 75 to 100 square feet. Plus, two coats are required to ensure adequate waterproofing and to qualify for the Drylok’s 10-year product warranty. Allow the first coat to dry completely before rolling on the second and final coat.

Finishing Up
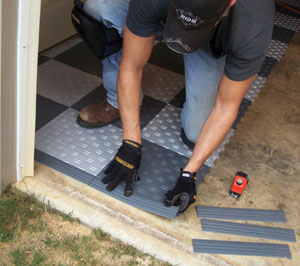
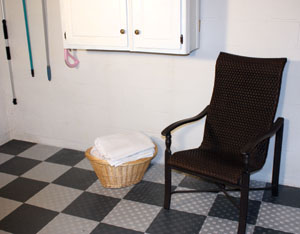
Once completely cured, the masonry waterproofer will keep water and mildew at bay, and protect all the items stored in the basement. To minimize dust and any slight amount of moisture at the floor level, we installed a snap-together floor system called Diamondtrax from the Swisstrax company. We laid a checkerboard pattern with alternating colors of light gray and slate gray. The snap-together floor provides a durable, low-maintenance, slip-resistant floor that provides a softer, more back-friendly walking surface than hard slab concrete. Plus, installation couldn’t be simpler. To install the flooring, simply place the tiles side by side, interlocking the pegs under one tile with the loops on the edge of the other. We then installed a decorative edging strip where the flooring met the garage door.
In the end, the basement was transformed into a nice, clean area that serves as a laundry room and storage area, including a wall-mounted cabinet and a few storage racks for brooms and mops. It was a marked improvement over the damp, drab concrete cave it used to be.
Masonry Waterproofer Resources
Ames Research Laboratories amesresearch.com
Behr behr.com
Quikrete quikrete.com
UGL drylok.com
