By Liz Koch and Matt Weber
Extreme How-To explores the various systems and benefits of radiant heat.
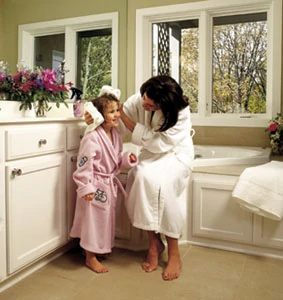
The 3 AM tip-toed scamper to the bathroom can be avoided! Not with a prescription, but with the increased comfort of warm, radiant-heated floors. The concept of radiant heat has been around since the Ancient Romans, but allowing heat to rise naturally to create even warmth in a room is finally starting to gain in popularity for today’s homeowners. Instead of conventional heating systems where a radiator sits against a wall creating pockets of hot and cold air throughout the room, this highly energy-efficient system heats your floors, which then transfers heat evenly throughout the rest of the room.
Comfort level is also greatly increased with radiant heat. In addition to solving the problem of cold tiles, the objects in the room (couches, chairs, etc.) will be heated via the floors, allowing the average temperature of the room to be lower while maintaining a higher level of comfort for the people in it. This allows homeowners to save big on their heating bills. Other benefits of radiant heat include the absence of both visible components and noise output from the system. There are several methods of installing radiant heat, and the method that you choose will depend heavily on the design of the house and rooms in which you want to add radiant heat.
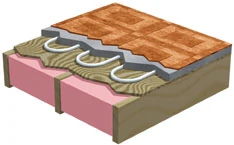
Hydronic Radiant Heating
If you’re installing radiant heat during the construction process, the most efficient way to heat your home is through a hydronic in-slab radiant heat system. For this method, you will need to design a loop system of tubing to circulate hot water under the floors. Depending on the width of the tubing, the loops will vary in recommended length. The most commonly used tubing size is 1/2 inch, which cannot have loops longer than 300 feet. Each loop is connected securely to a manifold and when the system turns on, hot water is pumped through the tubing. The water heats the concrete slab, and the heat emanates from the floors, rising into the rest of the room. When the room reaches the temperature set by your thermostat, the hot water will stop circulating, but the slab will remain warm and keep your room at the desired temperature for several hours before requiring more hot water to circulate.
What You Need for an In-Slab System
A Loop CAD Design. If it’s your first time dabbling in radiant heat or you just want to be sure it’s done right, you can get a loop CAD drawn by a Radiant Certified Designer, usually for under $100. This CAD (Computer Aided Design) maps out the installation of your tubing system. A loop CAD with a materials quote is $75 from PexSupply.com.
ThermaPEX Tubing. A hydronic system uses cross-linked polyethylene tubing with an oxygen barrier. It is flexible enough to bend easily and strong enough to be approved by all major plumbing and heating codes.
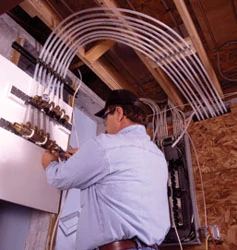
Manifold. The manifold is the hub of a radiant heating system, connecting to the supply and return lines with as many ports as you have loops of tubing. If more than 12 loops are in a system, multiple manifolds may be necessary.
Circulator Pump. The system requires a quality pump, from manufacturers such as Taco or Grundfos, to circulate the water throughout the system. If there won’t be potable water involved, a cast iron pump is a cost-efficient way to get the job done.
Check Valve. This valve ensures that water can only flow one way through the system.
Mixing Valve. Boiler water cannot go directly into the hydronic radiant system; the water must be mixed with cold water, sending 180-degree F water to heat your floors.
Thermostat. The interface between you and your heating system, the thermostat will control when the heat is turned on and how long it stays on to achieve the desired temperature in the room.
Sensors. In-slab sensors will communicate to the thermostat the temperature of the slab, while floor sensors will communicate the surface temperature of your floors to prevent any gapping, cupping or warping due to excessive heat.
Expansion Tank. The expansion tank maintains proper pressure within the system.
Air Eliminator. This device removes all excess air from the system to ensure silence and a steady water flow during operation.
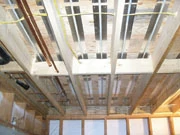
Joist Radiant Heating. Another option is to use hydronic radiant heat using the joists in the ceiling of one room to heat the room above it. Aluminum transfer plates are screwed to the underside of the subfloor, two across for the span of each joist bay. The tubing is then run and secured in the joists along the aluminum transfer plates. Once installed, be sure to thoroughly insulate between the joists with fiberglass batts to ensure you aren’t losing heat as some radiates to the room below. Have a licensed electrician run wire from the room thermostat to the relay switch and then to the circulating pump. You’ll need the same items listed above for slab installation as well as extra insulation, aluminum transfer plates and the 3/4-inch drywall screws to secure them in place.
Other Options for Hydronic Radiant Floors
If access to the slab or joists is not possible, there are still two options available to you for hydronic radiant heat installation. The first is an over pour where the tubing is placed on the subfloor and a minimum of 1-1/2-inch slab is poured on top. This will raise the floors by that amount, but the system works similarly to the slab installation where the tubing will heat the concrete, and the whole surface will maintain that warmth to radiate to the room above. The same components will be necessary for this method.
The second method is to use 1/2-inch plywood panels with pre-cut notches in which to fit the tubing. This is arguably the simplest installation method, since you place the tubing into pre-determined space, and it requires minimal change to the existing room.
(Editor’s Note: Thanks to Liz Koch for contributing the above portion of this article.)
Electric Radiant Heating
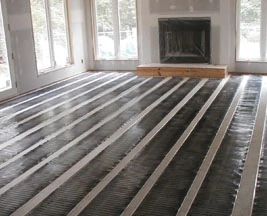
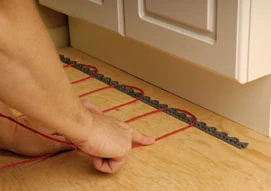
A second type of radiant heat uses electrical cables embedded beneath tiles, marble, slate and in some cases laminates. Depending on the manufacturer, some electric systems can even be installed under carpet, and the heating elements function much like an electric blanket. The heated wiring can be installed in a looped system beneath the flooring, or installed in the form of prefabricated mats. The electric systems do not require poured slabs, which eliminates the mess of concrete when installing in finished houses. Plus, electric systems do not raise the height of the floor surface. This makes installation easier because it’s not necessary to adjust doors, casings, room transitions, etc.
Often, electric radiant systems are sold in kits targeted for the DIY homeowner. Before installing any floor system, first create a layout plan to determine the materials required. Make notes of exact room measurements, placement and number of heating elements, length and wattage per element strip, location of power source and electrical boxes. Be sure the floor is prepared and clean. Most heating elements can be installed over any dry, clean, non-conductive and structurally sound surface. Thermal insulation is often installed with the heating elements. All electrical systems come with detailed installation instructions, but the systems don’t all install exactly the same. Refer to your manual for specifics.
The Right Stuff
With two different but proven systems for radiant floor heat, which one makes sense for your home?
In the case of constructing a new home, a hydronic system will likely be the best choice for use as a sole source of heat for the whole house. If you’re building a new home and want to use radiant heating to “spot warm” the home, hydronic may still be your best bet. Compare prices for both types of systems and explore the varying products on the market. Keep in kind that electric systems have electricity as their sole utility. Water, on the other hand, can be heated by almost any utility, including natural gas, propane, oil, wood, solar or electricity. Your choice will probably boil down to the energy costs of the available utility and the size of the project.
Electrical systems may be your best option when remodeling, because hydronic floor systems can elevate the floors by a couple of inches, resulting in additional remodeling work. Some thin electrical systems only elevate the floor by about 1/8 inch.
Also, consider the way the systems work. The concrete slab of a typical hydronic system can take a few hours to heat up. Electrical systems, on the other hand, usually take between 30 minutes to an hour to heat up. In most cases, electrical systems are governed by a timer and a thermostat that homeowners preset with on/off cycles. While the electricity cost of generating 1,000 Btu’s may be less expensive with a hydronic system than with an electrical one, the way the systems operate plays a major role in energy costs. Hydronic systems are generally left on for a period of months to accommodate the lengthy heat-up time of the systems. Electrical systems are usually timed to switch on and off according to when the homeowners will be at their house. The many “off” sessions cut down the cost of electricity. So consider your lifestyle and how you will be using the heating system.
Cost of installation depends on the nature of the job. For remodeling projects or single-room installations in new homes, hydronic systems will cost more to install. However, in large jobs such as whole-house applications in new construction, an electric system will cost more.
More than Floors
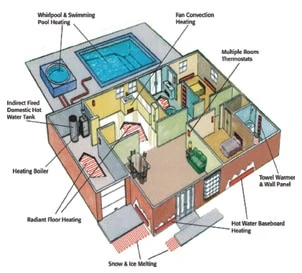
Beyond floor heating, breakthroughs in radiant technology are giving rise to some new and interesting home-heating applications. Advanced electrical cable systems can now be extended into intricate spaces, such as shower stalls, benches and platforms. The latest NuHeat Cable system offers excellent installation flexibility. Installers can make on-site adjustments to any room, including those with tricky curves and angles.
Some radiant products are sold as self-contained panels for single-room heating. Enerjoy PeopleHeaters, from Solid State Heating, are fast-acting panels that deliver instant radiant heat and comfort. The panels can be used alone as primary heat or in combination with any heating system. Available in 120 or 240 volts and a variety of sizes and wattage outputs, the Enerjoy surface-mounted panels can be secured to walls or ceilings as easily as installing a light fixture, with no need for intrusive remodeling. Also available are T-bar panels for suspended grid ceilings, Woodshop ceiling panels and smaller under-desk heaters. The company’s Bathroom Comfort Center includes an Enerjoy heat panel, exhaust fan, light, night-light, three-way rocker switch and a white Euro-style thermostat.
Roof de-icing systems are a smart investment to protect your roof during winter. Freeze/thaw conditions can form ice dams and icicles around eaves, drains and valleys, which cause structural damage and leaking. Snow accumulation can also create a heavy weight load on roofs. Some de-icing systems use electrical cables or mesh as the heating elements, while others use PEX tubing to transfer heat to a customized aluminum panel. De-icing systems are available for all types of applications, including new construction, remodeling and existing roofs.
Baseboard radiant heaters employ a similar zone-heating concept. For example, with the HydroSil heating system you can heat selected rooms or the entire house with permanently installed baseboard heaters wired into your home’s electrical system, or you can heat individual rooms with completely portable units.
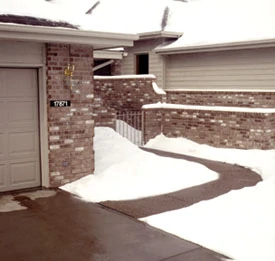
And thanks to radiant heating, you can say goodbye to slipping and sliding on icy sidewalks and shoveling snow. A hydronic system with durable PEX tubing embedded in your sidewalks and driveway delivers warm water that melts ice and snow. These systems use a sensor that is triggered by cold, wet conditions. The sensor automatically activates the system, which stays on until the ice is melted. With no icy walkways, the outside of your home is much safer for your family and visitors, and you can throw away that snow shovel.
As radiant heating grows in popularity, we can expect to see more uses for this technology to heat our homes in new and efficient ways.
Save Energy with Radiant Heat
Radiant heat enables homeowners to increase their comfort while also saving money on utility bills. By employing a zone heating system, unused rooms can be turned down to reduce energy bills. Another energy savings comes from lower thermostat settings. When both air temperature and radiant transfer are compensated for, people feel comfortable at lower room temperatures and adjust the thermostat accordingly.
Heat loss from the outside of the home is also a factor. Conventional systems locate heating registers along outside walls, under windows and in front of sliding glass doors to compensate for all those cold surfaces. That hot air goes up those cold outside walls, across the ceiling and down to the cold air return, losing a lot of heat. Conversely, radiant panels direct the heat to the interior of the space. This can result in energy savings of 10 to 30 percent in most residences.
Radiant Resources
Enerjoy/SSHC, www.sshcinc.com, 1-800-544-5182
Heatizon, www.heatizon.com, 1-888-239-1232
M.P. Global Products, www.quietwarmth.com, (402) 379-9695
NuHeat, www.nuheat.com, 1-800-778-WARM
Pexheat, www.pexheat.com, (631) 240-9173
Radiant Floor Company, www.radiantcompany.com, 1-866-WARM-TOES
Step Warm Floor, www.warmfloor.com, 1-877-783-7832
Warmboard, www.warmboard.com, (831) 685-9276


