

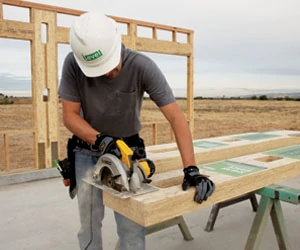
For home construction jobs involving structural framing, a key issue to be aware of the need to provide adequate wall bracing. Residential building codes typically require bracing to help homes resist the lateral (or sideways) forces placed on them by high winds and earthquakes.
While providing wall bracing can appear daunting for both the hard-core do-it-yourselfer—and even some professional builders—an understanding of the general concepts and requirements can help get you started. Knowing why wall bracing is required, and what options are available, will give you a background to better understand code requirements, or to work more closely with other professionals you may engage to assist in your building project.
Importance of Wall Bracing
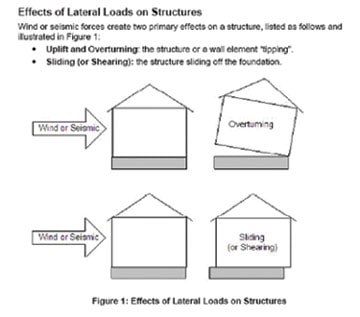
When high winds or seismic forces act on a home, it is subjected to two potential types of damage: 1) uplift and overturning, and 2) shearing. Uplift and overturning is essentially the house tipping over, either as a whole, or more commonly, the walls being pushed out of alignment with the roof and floors. “Shearing” means that the house slides off its foundation. In either case, if the lateral force is strong enough, the damage to the home can be severe. The result is expensive repairs (or even the need for complete reconstruction) and potential injury to the people living inside.
Wall bracing is incorporated into the home’s structural frame to provide additional strength to help it withstand lateral forces. It consists of specially constructed wall segments that are tied to the roof and floors. As a lateral force pushes on the home, stud walls deflect and transfer the load to the roof (or the floor above in multi-story homes). The roof and floor diaphragms then transfer the load to braced wall segments attached to the foundation. The lateral force is thus absorbed by the structure and transferred into the ground.
Wall Bracing Techniques
The key to effective wall bracing is knowing where within a wall to include it, and what size and type of brace is necessary. These can sometimes be complex questions, requiring an engineer or architect to evaluate the framing plan and make detailed calculations on anticipated loads and how they would flow through the structure. This is called a “designed solution,” because it involves a specific design tailored to the unique needs of a given floor plan.
However, in most cases building codes allow for what is known as a “prescriptive solution.” This is specification of building materials and construction practices that can be implemented according to a particular set of rules. Rather than requiring detailed calculations of forces throughout the structure, a prescriptive solution provides guidance for size and position of the bracing. Prescriptive solutions are typically allowed when the anticipated wind speed is less than 110 miles per hour (100 mph in hurricane regions). Prescriptive bracing is also allowed in seismically active regions, but with more restrictions. Check with your local building official to determine if an engineered solution is required, or if a prescriptive solution is allowed. For prescriptive solutions, there are four common ways to provide wall bracing:
• Construct 4-foot wide wall sections of code-prescribed materials.
• Construct narrow wall sections of oriented strand board (OSB) or plywood, and include tie-downs (the minimum width varies, based on a number of parameters).
• Construct an alternate site-built or prefabricated portal frame.
• Use pre-manufactured bracing panels designed to resist lateral loads.
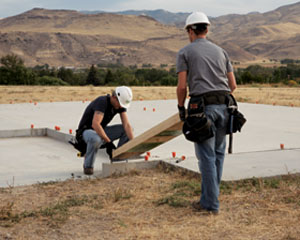
Constructing 4-foot or wider site-built braced wall panels is an optimal solution when there is adequate space in the floor plan for braced wall sections of this width. This is a cost-effective approach and typically involves the use of 4-by-8-foot structural panels of OSB, plywood or gypsum board along with solid sawn or engineered lumber studs.
However, for wall bracing in narrow wall segments or for site-built portals, the work can be time-consuming and difficult. Building codes governing braced wall construction can be tricky to interpret. Plus for site-built portals, an extensive nailing pattern is required. An alternative is to install pre-manufactured panels.
For details on required sizing and placement of wall bracing, refer to section R602.10 of the 2006 International Residential Code (IRC). In addition, building product manufacturers or local building product dealers can help you determine ways to implement prescriptive wall bracing solutions, including selecting an appropriate pre-manufactured panel.
Benefits of Pre-Manufactured Panels
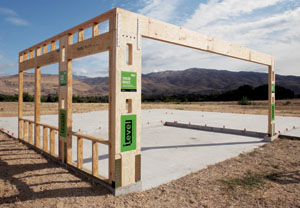
Pre-manufactured panels are one-piece framing members that arrive at the job site ready to install. They are easy to work with and offer more predictable and consistent performance than site-built braced wall panels. In addition, for cases where there is not adequate space to build a 4-foot wide or greater braced wall panel, narrow pre-manufactured panels can often be used. This is a common need in many modern home designs, which have narrow wall segments resulting from large numbers of windows and doors. Depending on the product, a 12-inch wide pre-manufactured panel can be substituted for a 4-by-8-foot wall section sheathed with OSB or plywood, allowing wall bracing to be incorporated into very narrow wall segments.
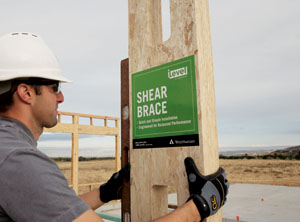
Historically, pre-manufactured panels were typically made from steel. This posed a challenge for many builders, though, since they were not accustomed to working with steel framing members and because such panels offer little or no allowance for field flexibility. Now, such panels are increasingly made of engineered wood, which offers greater flexibility of use. Pre-manufactured engineered wood panels can be field-trimmed to fit, and can be nailed, making it easier to attach exterior sheathing. An example is the iLevel Shear Brace, made from TimberStrand laminated strand lumber, with steel mounting brackets. In addition to providing a familiar material to work with, pre-manufactured engineered wood panels are designed for strength, consistency and straightness.

Tips for Installing Pre-Manufactured Wood Panels
When working with pre-manufactured wood panels, below are a few key points to keep in mind. In addition, be sure to check and follow the manufacturer’s specific requirements for the panel you are using.
Planning the foundation: The required width and depth of the concrete foundation to which a pre-manufactured wood panel will attach depends on the configuration of each panel. Determine these dimensions before pouring the foundation using the manufacturer’s specifications. Ensure that the concrete is level and smooth beneath the panel—grind and fill as necessary.
For homes in which the floor is raised above the foundation, some panels can be attached to specified engineered wood blocks, rather than directly to the concrete. The manufacturer or dealer can provide details on installation.
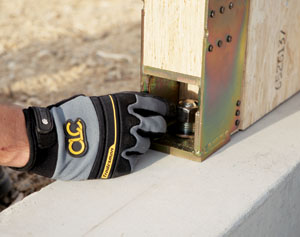
Anchor bolt installation: The bolts to which pre-manufactured wood panels attach should be cast in place in the concrete foundation, rather than drilling the cured concrete and securing the bolts with epoxy. To ensure adequate strength at the attachment point, it is important to use the specific type of bolt (size and grade) supplied with the panel, or as specified by the panel manufacturer.
Some panel manufacturers provide a template for placing the bolts in the concrete. The template protects the threads and holds the bolts at the right position and height until the concrete is set. In addition, in the case of the iLevel Shear Brace, the mounting brackets allow the panel to be adjusted front to back in case the foundation bolts are slightly out of alignment in the concrete.
Panel selection: When choosing a pre-manufactured wood panel, be sure to select one that is tall enough to span from the top of the foundation to the bottom of the header, beam or top plate at the top of the wall. While some pre-manufactured wood panels can be trimmed to fit if they are too tall (within certain limits), gaps above or below should not be shimmed to fit unless permitted by the manufacturer.
Also, select a panel that permits spacing for wiring and switchboxes that need to pass through that area of the home (often necessary for exterior lights in panels used in garage portals). Pre-manufactured wood panels will typically have cutouts for electrical chases and switch boxes. Any additional holes drilled on site must be in accordance with the size and location listed in the manufacturer’s specifications.
Panel installation: Many panels are heavy, so having two people do the job is preferred for safety. One person lifts the panel, while the other guides it into place on the anchor bolts. Make sure the panel is plumb and attach it to the anchor bolts using washers and nuts supplied with the panel (don’t substitute fasteners, as they are designed specifically to meet the load requirements of the individual panel).
The top of the panel is often attached to the framing above with lag screws installed at a 30-degree angle. The number and position of the screws will be determined by the panel’s manufacturer. Again, use the specific screws supplied with the panel.
Wall bracing is an important part of home construction, and can help ensure your project is strong enough to withstand nature’s forces. Planning and installing wall bracing, including pre-manufactured wood panels, does not need to be complicated—but if in doubt, check with a qualified engineer.
