

By Matt Weber
(originally published November 2011)
From the professional carpenter to the hobbyist woodworker, routers are amazingly versatile tools that can cut functional wood joints or craft all sorts of decorative profiles. However, any router is only as effective as its bit. Router bits range from simple round-over styles that ease sharp edges to edge-beading bits that give custom moulding its characteristic shape and shadow lines. Large bits are available to shape the joints of raised-panel doors, while smaller bits can cut repetitive notches for the classic look of dovetail joinery.

Edge vs. Plunge
Routers and their bits can be organized into two categories: edge routing and groove routing. With the help of ball-bearing guides located on the tip of the bit, various edge-routing bits can round the corner of a stair tread, cut a rabbet on the edge of a cabinet case, rout a decorative ogee in custom trim, or bevel the edge of a shelf with a chamfer bit. The bearing wheel of the bit rolls along the edge of the work piece to ensure the bit doesn’t cut too far into the wood.
Groove or “plunge” bits have no center guide bearing in place. With no bearing to obstruct it, a plunge-style router with a groove bit can cut into the face of the work piece, rather than cut just along the edge. This allows the tool to rout an interior groove or channel inside the field of the work piece. For example, users can cut rabbets and mortises with a straight flue bit, or cut dovetail joints along the edge of a board.

Bit & Router Options
Most router bits are manufactured from high-speed steel, and some are coated with titanium nitride to reduce friction and heat. The best bits are carbide tipped for longer cutting life. The harder carbide-tipped bits are necessary to cut hardwoods, plywood and other engineered wood panels and last longer than steel cutters.


Routers in the neighborhood of 2-horsepower are a standard size among hobby woodworkers and professionals alike, capable of operating the most common bit shank sizes—1/4-in. and 1/2-in. Other router sizes, larger or smaller, offer a give and take of features. For example, the smallest routers, called trim routers, have a cutting-speed advantage over a regular router. The bit rotates faster, the compact size translates into more precise handling on small jobs, and many trim routers can even be used one-handed. However, trim routers can only operate small bits.


Stouter routers, with motors in the peak 3-1/4-horsepower range, have the power to drive larger bits with better results. The thicker 1/2-in. shanks have nearly four times the mass of the 1/4-in. shank bits, providing more rigidity so the cutter head can be manufactured in a larger size. The larger shanks also translate into greater stability when in use, and allow a deeper cut in a single pass. You’ll also find a broader selection of profiles among 1/2-in. shank bits. The big bits offer specialty applications, such as milling cabinet doors, and they’re suited for professional—meaning continuous—operation. This means the routers and the bits are more durable, but also bulky, heavy and high-priced to match.
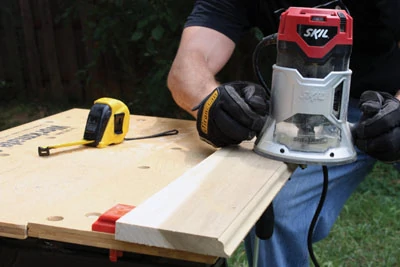
The router setup at the Extreme How-To workshop consists of a 3-1/4-horsepower router permanently mounted in a router table for repetitive tasks and running large bits. We have a 2-1/4-horsepower Skil combo base router that we use for most of our jobsite work. The combo base allows us to easily switch from edge-routing to plunge routing as the job requires. We also have a Festool trim router on hand for detail work.

Best Practice
When using different router bits, you should adjust the router’s RPM speed accordingly to achieve the proper results. The general rule is: The larger the bit, the slower the speed. Check your router’s user guide as well as the instructions for your particular bit for specific details on setting the appropriate speed. Also, avoid freehand routing with large profile bits. It’s much safer to use large profile bits in a router table. Some general guidelines for matching bit size to router speed follow:
Up to 1” bit diameter = 24,000 rpm
1 – 2” bit diameter = 18,000 rpm
2 – 2-1/2” bit diameter = 16000 rpm
2-1/2 to 3-1/2” bit diameter = 12,000 rpm
Always try to use sharp router bits. A good bit will remain sharp for a long time in normal use, and a dull bit can damage the work piece. Insert the shank of the bit into the chuck assembly as far as it will go, then back it out until the cutters are approximately 1/8-in. away from the collet nut.
On a scrap piece of the wood, practice getting the feel of the bit’s most efficient cutting movement. Moving it too slowly through the wood may burn it, leaving dark marks on the wood and harming the bit. Moving it too fast stresses the motor and contributes to overheating.
As seen from the top of the router, the cutting edges of the bit turn clockwise. The most efficient cut is made by feeding the router so the bit turns into work, not away. For example, if routing the edge of work piece, move the router counter-clockwise around the perimeter. However, if you’re routing the interior edge of a cut-out, move the router along the inner edge in a clockwise direction (see diagram). You should feel a constant, even pressure when the bit contacts the work. For some materials, it’s best to make several cuts of increasing depths.

Always keep the tool moving during operation. Allowing the router to dwell in the cut causes burning, and excess heat reduces the life of the bit.
If chattering occurs, stop the router and inspect the bit, collet and bushing (if applicable) to make sure everything is tightly secured and properly installed.
Bit Maintenance
Carbide router bits can be re-sharpened many times. However, always have your bits re-sharpened by a professional grinding firm—don’t try to sharpen your own using files or a whetstone.
After extended use in gummy or sticky wood, a router bit can become coated with wood pitch, which can cause the bit to drag and burn some hardwoods. To clean the bit, fill an empty coffee can with enough solvent or denatured alcohol to cover the bit. Remove the bearings before placing the bit in the can. Place a cover on the container and soak overnight. Use a toothbrush to remove any remaining residue, then wipe clean with a rag. A light coat of machine oil should prevent any surface rust, but before routing, wipe clean all the bit shanks to prevent slippage during operation.
Ball bearings should not be cleaned with solvents, which will deteriorate the oil that lubricates them. Instead, use compressed air to blow off any dust or dirt. “Frozen” bearings that no longer freely rotate should be replaced before next use.
Keep your bits clean and free of dirt, and you can count on them to shape many projects to come.


