

New Stair Treads in No Time—Here’s How to Do It …
By Matt Weber
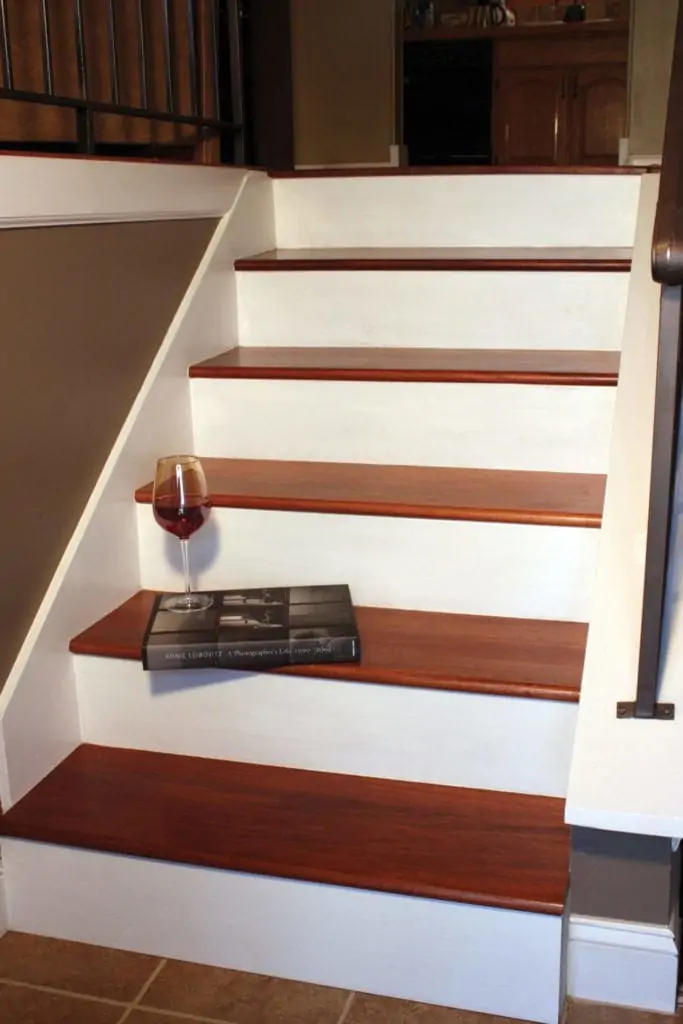
How To Install Stair Treads and Risers
Retro-fitting stair treads is the simplest solution for a DIY’er intent on installing hardwood treads over an existing flight of stairs. High-quality prefinished stair treads are made of solid edge-glued wood—not a veneered or engineered material—and can be used to “cap” or reface an existing tread. The primary advantage of using the prefinished stair treads is the ease of installation.
For example, the stairs shown in this article were built of lumber and covered with carpet. Once the carpet was removed, the raw lumber tread was revealed and it was downright ugly. Rather than reinstall carpet, I opted to go with hardwood stair treads to match the newly installed sapele flooring of the second floor.
By refacing the stairs with the new prefinished treads, there was no need remove the old lumber tread. This is a particularly important advantage when dealing with “pre-fab” staircases that are built in a factory and delivered to the jobsite during construction. It is impossible to remove a tread in a pre-fab staircase without completely disassembling the stairs. However, with retro treads, I only had to prep the staircase to accept the “caps,” and then install the treads and risers. Here’s how it went.
Planning Out Your Stair Treads
Obviously, the first step is to asses the number of risers and treads you need, record the measurements of your existing treads and risers, select your wood species and order your materials to suit.
I ordered the treads from www.stair-treads.com, which serves as an online one-stop shop for prefinished stair treads. Stair-treads.com offers solid-wood prefinished treads and risers, in a wide variety of wood species, as well as prefinished handrails, cove molding and more. If you have a need for stair treads, the company likely has it covered, including return stair treads with mitered corners, oversized treads, open or closed treads, as well as RetroFit replacement treads, which are specially manufactured to match 3/4-inch hardwood flooring (see sidebar). Standard tread depth is 11-1/2 inches, and a variety of widths are available to meet your specifications.
Additionally, Stair-treads.com is not simply a distributor but also the tread manufacturer, and the company will custom-stain the treads to your flooring. In fact, I cut a few samples of the newly installed floorboards and mailed them to the company to match. I then ordered 1-inch-thick sapele treads, which arrived prefinished at the job site with a rich stain that was like a mirror image of the flooring—perfect.

Preparing The Staircase
After removing the old carpeting, vinyl or other floor covering, the first step is to eliminate any bull nose on the exposed lumber tread. One way is to cut it off. Using a handheld circular saw or jigsaw, cut the bull nose of the tread back flush with (or slightly behind) the existing riser. Use a flush-cut saw or a hammer and chisel to clean off the edges next to the skirt board.

However, like most remodeling jobs, I ran into some unforeseen challenges. The exposed risers were made from flimsy 3/8-inch plywood, which had warped over the years. To provide more solid support for the soon-to-be-installed risers, I decided to beef up the staircase by installing new, thicker plywood over the existing risers. In doing so, I built out the thickness of the riser so it was flush with the edge of the tread, rather than cut the tread to be flush with the riser.

Note: If you’re reconstructing your staircase in any way, use screws instead of nails to avoid squeaks. Also, keep in mind that maximum riser height should be 7-3/4 inches and minimum tread run no less than 10 inches.

Next, do a little dance on each stair tread in search of squeaks. If you find any, drive a 3-inch screw through the tread at the squeak location and solidly into the stringers. Continue tightening the framing around the squeak in this manner until the tread squeaks no more.

Installing the Risers
Although made-to-order stair treads are available for purchase, I cut my own from some pre-primed MDF trim boards that I had leftover from a previous job. MDF trim boards are relatively inexpensive, easy to work with, and readily available at home-improvement stores such as Lowe’s. I pre-painted the boards with high-gloss white latex before cutting to size.

Cut the new risers to completely cover the existing risers. I suggest measuring and cutting each riser individually, rather than cutting them all to the same size. For example, the site-built staircase I was remodeling was constructed with slight discrepancies from riser to riser and tread to tread. Since the riser sizes didn’t match exactly, I had to measure and cut each independently to ensure a tight fit. (This same rule holds true when cutting the treads.)
Risers can be cut to length with a miter saw, handheld circular saw, or even a hand saw. I had to rip the risers to width, which is a little trickier. It’s possible to rip the risers with a handheld circ saw with an edge guide, but you’ll get the most accurate results using a table saw with a rip fence. If you accidentally make an ugly cut, install the riser with its ugly edge down, so the thickness of the new tread hides the cut.

Use construction adhesive and finish nails to install the new risers to cover the existing ones. If you’re working with thin hardwood risers, then it’s a good idea to predrill the nail holes to avoid splitting the wood.

Installing the Stair Treads
Individually measure and cut each stair tread to length with a handheld circular saw or sliding miter saw. To make sure you achieve a near perfect fit, I suggest using an angle finder to make sure the treads should indeed be cut at a straight 90 degrees. If the stair construction is a little out of whack, the stringers might slightly flare or contract toward the top or bottom, in which case it may help to cut the tread at a slight angle to match.

There was no need to rip the treads to width, as the standard 11-1/2 inches was the perfect size to cover the tread and leave and attractive 1/2-inch bull nose over each riser. Use plenty of construction adhesive to secure each tread and fasten with finish nails.

Finishing Up
I sealed all the nail holes on the new treads with fast-drying wood putty and, once it cured, I stained the putty to match the stairs. I used caulk to fill the nail holes on the risers. I then masked off all the seams between the white risers, white skirt board, and sapele risers with painters tape. Just caulk the seams, clean up your caulk lines, remove the tape, and the job is done.


Prefinished stair treads spare you the trouble of procuring the wood, cutting and gluing-up your own hardwoods, and sanding and staining the treads. In other words, half the work is done for you, so installation takes only about 15 minutes per tread. For the do-it-yourself home remodeler, prefinished stair treads are a fast and efficient way to get the decorative results you want.
Side Note
Tread size to Match
To make installation as easy as possible, Stair-Treads.com offers the RetroFit line of replacement treads made of solid edge-glued wood and specially designed to match the thickness of 3/4-inch hardwood flooring. Each RetroFit tread has a 3/4-inch body that keeps the step height within code. With 3/4-inch flooring, installing a RetroFit stair tread actually raises the step height by exactly the same height as your new flooring. The RetroFit stair tread also uses a full 1-inch bull nose along the front edge to simulate a full 1-inch stair tread once installed.
