


By Mark Clement
To say that I love crown molding would be elevating the practice of understatement from intramural volleyball to pro football. To me, there’s no reason to have a room if you’re not going to have crown in it. And a custom crown is even better.
To get just the look we wanted for a recent room remodel, we used the simple trick of combining base moldings as backers for a coved, Greek-Revival style crown.
As with any multi-layered trim installation, you start with layout, then do laps of the room until all the pieces are set. To that end I made a mock-up of the crown assembly and used it to strike lines at all the corners. This keeps reveals as even as possible.
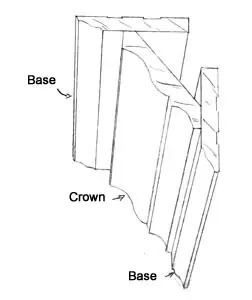
Layer 1 is a 3-1/2-inch ogee base set upside down. I installed it using my favorite trim installation method: Dead-end left; cope right. And because I registered all my layout marks off the pattern-assembly, I can trust that if I’m very close to them on final installation, my reveals will be what I want them to be as the molding is installed live.
Layer 2, which lays flat on the ceiling, is a repeat of Layer 1 except all the joints are mitered.
With the third layer, the coved crown ties it all together.
I usually cope inside corners on crown installations. It’s faster and more accurate than mitering. And if you’re reading this and saying “no way is it easier” trust me, it is. It takes a little practice and know-how to get out of the blocks, but once you’re running, you can run faster and farther. But some crowns can’t be coped and this was the case here. So I very carefully mitered my corners—shimmed them flush once hanging on the wall—and they worked out great.
Normally I’d wait until all the trim was installed to caulk and fill, but because one of the built-ins in this particular room was more like a built-on (we fastened it right to the wall), it would be in the way, so doing it in advance saves time.
Editor’s Note: Mark Clement is author of The Carpenter’s Notebook and Kid’s Carpenter’s Workbook, Fun Family Projects! Find out more at www.TheCarpentersNotebook.com.
