

By Matt Weber
Paint it Beautiful
Painting a room is easily the number one do-it-yourself home project. This is because the color scheme of a room is the most dominant attribute of the living space, providing mood and character and defining the decorative concept that ties together all other interior elements, from flooring to furniture. Most folks, in particular savvy DIY’ers, don’t see painting as a particularly intimidating project … anyone can operate a brush or roller, right? While that’s true, even the “pros” have been known to do a lousy job—just ask any of thousands of disgruntled homeowners who hired a lazy contractor and ended up with a sub-par result. Here’s a look at some basic painting techniques, a few tips to complete a good-looking project, and a few new tools and materials to make things easier.

To Prep is the First Step
Count on spending an entire day prepping the room before you paint. This fundamental phase of the project will determine the ultimate success of the job. Start by removing any drapes, pictures, furniture or anything else you want to keep paint-free.
Next, repair any damage to the surface of the walls. Any damage in drywall should be spackled with compound, sanded and then primed. And new drywall and wood should always be primed. It’s also smart to clean the surface with trisodium phosphate (TSP), which is a heavy-duty cleaner.
Previously painted surfaces that are still in good condition may not need a primer, just clean the surface and “de-gloss” the finish. Painted surfaces in poor condition may need a chemical stripper to remove the old paint.
While wallpaper primers are on the market to paint directly over the paper, it’s generally a good idea to remove wallpaper and prime the subsurface before painting. To remove, you can score the wallpaper, apply a chemical wallpaper remover and then use a scraper to scrape away the softened material. You can also purchase an easy-to-use steam cleaner to take some of the frustration out of removing stubborn wallpaper.
No matter what your situation is, it’s always a good idea to sand the surface smooth and then remove any dust.
One thing to consider is that priming will never hurt anything. If in doubt, prime it. And it definitely helps to use a primer if you’re painting a lighter color over a darker one. For darks over lights, you can use a tinted primer to reduce the number of topcoats you’ll need to achieve the desired color.

Smart Planning
When planning your project, realize that certain colors elicit certain moods and ambience. Painting with light colors can make the room feel more spacious and cooler, similar to the effect of a light blue sky on a sunny day. On the other hand, strong oranges, reds and darker colors can make a room appear smaller, for a warmer, cozier effect.
This color concept plays into two-tone rooms as well. If you’re painting with two colors divided by a chair rail, use the darker color on the bottom. This allows the lighter paint above the chair rail (placed 32 to 36 inches high) to dominate the room for a more open feeling.
The type of paint is also an issue to consider. Interior paints are available as latex-based or oil/alkyd-based. Latex paints typically achieve the most durable finish and best gloss retention. DIY’ers often choose latex paint because it’s easy to work with, dries quickly and cleans up easily with soap and water.
Oil/alkyd paints offer excellent durability, stain resistance and good adhesion, and they can be a great choice for trim in high-traffic rooms where the baseboards might be prone to scuffing. However, clean-up is not easy with oil paint, and you’ll need to wash your paint tools with mineral spirits.
The paint’s finish is your next consideration. When selecting a paint, you’re supplier will ask if you prefer Flat, Satin, Semi-Gloss or Gloss.
Flat paint offers a matte appearance that softens the room and does a good job hiding surface blemishes for a smooth look. It’s a great choice for ceilings, bedrooms, dining rooms and living rooms. But steer clear of bathrooms and kitchens because a flat finish can show water marks easily.

A satin finish has a slight gloss and is a little easier to clean than a flat finish. Satin is a good choice for high-traffic areas such as hallways, family rooms and children’s bedrooms.
Semi-gloss has a more lustrous sheen and is a good, durable choice for areas like kitchens and bathrooms that get cleaned often.
A gloss finish is the hardest and shiniest of the options, providing a handsome, smooth finish for trim, cabinets, furniture and doors.
Additionally, faux finishes are the hot new craze these days. With a few simple tools, you can add grain, patterns, crackling and texture to the walls. Faux painting techniques include color-washing, rag-rolling, dragging, glazing and more. For an in-depth look at faux finish techniques, check out EHT’s online article “Faux-To Finish.”

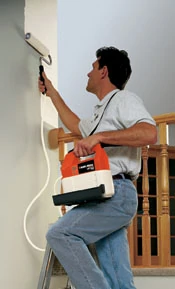
A popular new choice for interiors is textured paint. Textured paint can provide a rich, earthy appearance and it’s great for hiding imperfections in the wall surface. However, textured paint applies a little differently than normal latex paint. For one thing, you need a special texture roller cover or “nap” to apply the paint. The special nap has sponge-like voids that pull the thick paint off the wall, creating the relief in the painted surface. After you’ve primed the wall, just roll it on. The trick is to try to keep a consistent amount of paint on the roller. If your roller is sopping and dripping with paint, it will go on the wall thickly and can produce a more fluid, liquidy texture. However, if your roller only has a moderate amount of paint, the spongy voids of the nap will leave less paint on the wall and give the texture a “drier” more prickly appearance. Consistency in application is the key to success. Also, because it’s so thick, a gallon of textured paint will not last nearly as long as a gallon of standard latex. So be sure to purchase plenty of paint.

Shown above we are applying textured paint.
Paint Like a Pro
Prior to painting, line any existing trim with painter’s tape to help protect it from unwanted paint marks. Also use tape and dropcloths to cover the flooring and any other areas you need to keep clean. After the tape is removed, you can always go back and with a sharp, angled brush to cut in the trim.
A good rule of thumb when painting an entire room is to start at the top. Paint the ceiling first and then cut-in the edges with a small brush. If using latex paint, you’ll get the best results with a synthetic polyester/nylon paintbrush. For oil paint, use a bristle brush. A roller mounted to a pole is great for ceilings and high walls.
Any good roller will work for the walls, and the roller nap you choose will vary in thickness from 3/8 to 3/4 inch. The difference in nap size relates to the finish of paint you’ve chosen. When purchasing, the recommended finish is printed right on the nap package, so you shouldn’t have trouble picking the right one for your paint.
When painting with a roller, the experts at Sherwin-Williams recommend painting in an “N” pattern. For smooth surfaces, cover about a 2-foot square at a time, making an “N” on the wall with the roller. Then cross-roll to spread the paint, filling the voids of the “N” to create a solid square. Finish with light roller strokes in one direction, at a right angle to the cross roll.
Once you’ve completed the wall or room, allow the paint to dry and then apply further coats. Two coats might do the trick. Three coats might be even better. And paint in the right order to avoid unnecessary spills, splatters and clean-up. Start with the ceilings, then the walls, then woodwork, then floor.
With the right prepping, planning, products and techniques, any DIY’er can paint like a pro.
SIDE NOTE
Equipment Check: For a DIY paint job, you’ll need painter’s tape, drop cloths, sandpaper, scraper, spackling compound, putty knife, TSP (trisodium phosphate), bucket, roller, paint tray and a paintbrush. You might also try out an HVLP paint sprayer.
