


In an effort to shape up the curb appeal of one of our project houses, we decided to line a small rock garden with natural stone edging to match the flagstone walls of the home. The old garden border was a combination of black plastic landscaping border and the most unconvincing faux “brick” I’d ever seen. And, most of the plastic brick had long ago disappeared, leaving only a sad little fragment sticking from the ground like a sore thumb. So my first move was to use a pair of Channellock’s to pull up the old edging.


I collected a selection of flat(-ish) flagstones from a creek bed. They ranged in size roughly from 7 to 12 inches long. I was looking for a variety of browns, reds and grays to match the color scheme of the home’s existing flagstone. Choose stones of an approximate shape and size that will best fit the landscape plot, bearing in mind that at least half the stone will need to be buried below grade in order to keep the border sturdy. If you don’t have access to a creek bed, many home-improvement outlets and landscaping supply centers sell natural stone.


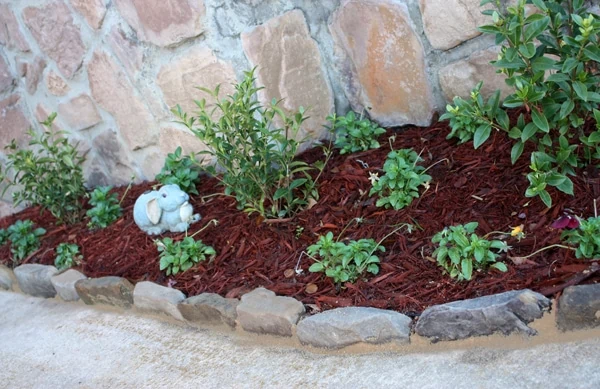
It’s best to have the dirt work of the garden plot completed before installing the edging, otherwise the gardening activity may loosen or unearth the border stones. To prepare the garden plot, we had pulled weeds, covered the area with landscaping fabric secured with metal stakes, planted a few shrubs and flowers and then covered the fabric with cedar mulch.


I cleaned all the mud and moss off what would be the exposed edge of the stones using a recip saw equipped with a special wire-brush attachment.
I laid the edging in a dry run next to the garden to determine stone placement for the best visual design. I then used a narrow-bladed weeding spade to dig a trench approximately 7″ deep and 3″ wide for the stones to be placed on edge. When digging I used a 2×4 board to both guide the digging and protect the edge off the concrete driveway from damage. If you don’t have a weeding spade, a narrow hand trowel will do the job (just more slowly).


As expected, I was unable to find enough stones of perfect size and shape for my border, so I had to cut some to fit. To cut the stones I (mis-)used a 10″ tile saw from Rigid. This is the company’s latest model wet saw (Model R4090), rated “best-in-class” and nicknamed The Beast—and The Beast made a meal of a nearly 3″ thick slab of limestone, so I’d say it earns its name. In some cases I had to cut large stones so I could bury the bottom section and have only 2″ to 3″ of the top half exposed above the soil. In other cases, I used the wet saw to shear off jagged edges so the top edge of the border would be blunt—a safety precaution since the children who lived at the home were still learning to walk and tended to fall down often.
To set the stones, I drove them into the ground along the driveway with a rubber mallet and backfilled with topsoil, compacting it firmly at the base. I tucked the landscaping fabric tightly against the stones to prevent weeds from sprouting.
Once all the stones were in place, I filled the joints around the stones with sand to tamp down the topsoil and help reduce mud during rain showers.
The end result was a marked improvement over the plastic debris that had been lining the garden, and the natural stone worked well as a sensible accessory for the flagstone home.
— M. Weber
For another step-by-step story on landscaping with natural stone, check out the Extreme How-To website.
