

In days past, trim carpenters, or those that did the inside finishing or moulding, were mostly old guys who had graduated from framing to the more intricate cuts. These days with a wider variety of pre-formed trim or moulding, better tools, and skills learned quickly through magazines and other readily available information sources, excellent trim carpenters can be any age, and male or female. Today, more than 75 percent of moulding jobs are done by do-it-yourselfers.
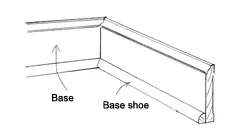
Moulding (also spelled molding) or trim work is a major factor in window and door installation or replacement. Moulding, however, can also be used creatively in a wide variety of other situations to create magic in your décor. Base and shoe moulding at the floor level is common. Choose from basic profiles, or you can get pretty wild with this as well, using a variety of mouldings to create a custom look.
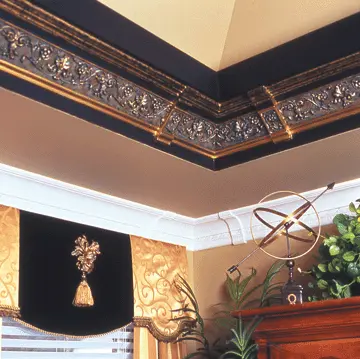
The ceiling and wall junction can also be trimmed in a wide variety of mouldings, including crown mouldings. These can be single-piece or a variety of pieces combined, providing a personal, customized touch. These multi-piece, built-up mouldings are especially effective on large ceilings. Ceiling moulding can be a simple trim piece set away from the crown, or you can create intricate “frame-style” moulding patterns, using rectangles and squares of casing and mullion moulding.

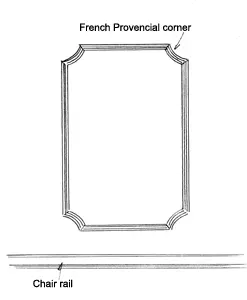
The wall surface can also be dressed up with a wide variety of mouldings. The simplest is a chair rail. This is especially effective in older homes with 9-foot ceilings to help “break-up” the height. Or you can be as elaborate as you desire using multiple styles of moulding to create truly unusual walls. In many instances you can add drama by painting the mouldings a different accent color from the walls. You can also create an elegant “paneled” look, using mouldings of the same material as wood paneling.

Another place where you can get creative with mouldings is around fireplaces and on fireplace mantles.
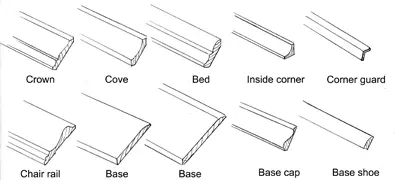
A huge assortment of moulding profiles are available, although the most common are crown, cove, bed, inside corner, corner guard, casing, chair rail, base, base cap, base shoe and panel moulding. All have their specific uses, but many may be applied creatively in a variety of applications.
Mouldings are commonly available in softwoods and some hardwoods. The “big-box” stores carry only the most popular styles and materials. However, lumberyards will have a wider variety both in styles and in wood species.
You can also make your own mouldings with a router, table saw, shaper or planer with moulding head.
Mouldings are available in both solid and finger-jointed lengths. Finger-jointed mouldings consist of shorter lengths of joined wood. This is more economical than solid wood, and a good choice for mouldings that will be painted. Solid mouldings may be painted, stained or finished natural. Mouldings come in lengths from 3 to 20 feet, depending on the species and moulding patterns commonly stocked in your area.
Tools of the Trade
Today’s tools also make moulding application easier. After years of cutting everything from crown moulding to window and door trim with a hand-powered, Stanley miter saw, it didn’t take me long to discover that powered miter saws take a great deal of the effort out of cutting trim and moulding. And for the beginner, they can create better cuts.
A 12-ounce finishing hammer and nail set were my basic moulding installation tools, and they are still just as viable, especially in those hard-to-reach areas. A brad nailer or finish nailer, either air-powered or cordless can, however, make the chore easier and in the case of first-timers, prevent those “hammer tracks” that can ruin a great moulding job.
Another valuable tool is a stud finder, such as the OneStep wall scanner by Zircon. These make it easier to locate studs for wainscoting and other wall applications.
If installing a wainscoting, a laser level can take the hassle out of finding level around an entire room.
In some instances you may prefer to glue and/or staple light mouldings to areas such as walls and ceilings. A caulking gun and construction adhesive is used for this chore.
In many instances it’s easier to finish or paint the moulding before application. A paint applicator such as the Black & Decker Quick Painter makes quick and easy work of this chore.

Installation Tips
To determine the amount of mouldings needed, list the rooms, types of designs to be used, and the profiles chosen. Measure the length of each wall or moulding application and round up to the nearest foot. On moulding ends that are to be mitered, add the measurement of the width of the adjoining piece to each end. I like to add at least another inch for miscalculations.
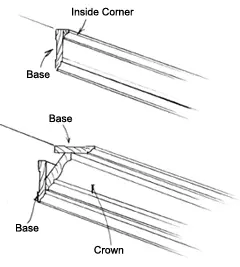
Most mouldings are made of softwoods such as fir or pine. Handle them carefully and don’t allow them to become scratched, dented or dirty. Before installing the moulding, place it in the room for 24 to 48 hours to allow it to acclimate to the room’s humidity and temperature. And remember: Always measure and cut to the longest portion of a 45 degree miter cut.
Check out the moulding selection at your local building supply dealer. With a handful of moulding and a little work, you can create magic with your home’s décor.
SIDE NOTE
Advantages of Urethane Molding

As an alternative to wood trim, urethane decorative mouldings are available in woodgrain stainable versions and solid paintable pieces. They can be installed as chair rail, cornice and crown mouldings to give the room a more complete look. Urethane mouldings from companies such as Fypon range from simple 2-inch tall pieces to elaborate built-up, single-piece combinations that can reach as tall as 14 inches.
One big advantage of these fancy, large, one-piece profiles is the ease of installation. To achieve the same intricate look with wood trim, one would have to install multiple sticks of smaller moulding with varying profiles, building up to the overall final shape, piece by piece. However, with urethane you can cut and install a single piece of large, beautiful crown dentil moulding using standard wood tools—and do so in a fraction of the time it would take to build up the same profile with individual wood trim strips. You can combine multiple complex urethane pieces for a dazzling art-deco design.
Urethane also resists mildew, insects, warping and splintering, so it can be used indoors or out. For example, Fypon pieces are made of high-density materials with a closed cell structure that prevents water penetration and absorption. Each piece has a consistent quality and finish that requires no additional priming or sealing. In fact, each piece comes pre-coated with a double-primed, exterior-grade ultraviolet stable coating. Once urethane moulding is installed, it can be painted, stained and faux finished.
Check Out More EHT Crown Moulding Stories!
For Detailed Advice on How to Measure and Cut crown, click here.
For a Look at How to Install Basic Crown Molding, click here.
For a Step-by-step Guide to Installing PVC Crown, click here.
For 13 Pro Tips for Crown Molding and Trim, click here.
