

Is your basement nothing more than an unfinished storage area? That’s the case with many homeowners who consider their basement to lack the warmth and coziness to make it a comfortable living space. When it comes to cold basements, you can blame the floor. The porosity of a concrete floor can make it cold and damp—unwanted characteristics that can be felt through tile, carpet and hardwoods. Simply put, cold basements—even if they’ve been finished—often don’t get as much use as the other more comfortable areas of the house. That’s a lot of space going to waste. Today, floating subfloor systems offer homeowners a way to stifle the cold and construct a warm, pleasant place for a game room, office area or home theatre. These systems offer a two-pronged approach to keeping concrete floors dry and warm.
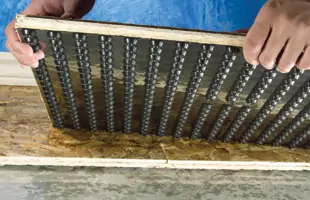
First, the plywood or oriented strand board (OSB) subfloor floats on a corrugated or “cleated” waterproof underlayment, so the wood never actually touches the floor. The underlayment material can be made of Styrofoam or heavy-duty polyethylene, the same material used in corrugated plastic drain pipe (one of the toughest plastics available). This underlayment creates an air gap above the concrete. Combined with the wooden panels, the air in this space provides a thermal break that acts as insulation to keep floors and rooms warm. These systems can warm a room as much as 10 degrees.
Second, that same layer of plastic provides a moisture barrier against the dampness that naturally rises through concrete slabs. Thanks to the channels in the underlayment, any moisture that does collect can easily drain and evaporate. This protects furnishings and inhibits musty smells and mold growth, ensuring a healthy living space.
Basement Benefits
Floating subfloors are also durable and versatile. The engineered wood core won’t warp, split or peel. The systems are also strong enough to support the heaviest furnishings, such as exercise equipment, pool tables and pianos. And as far as finished floor surfaces, use any flooring solution you want. Simply prepare your new floor as you would any other. These systems allow the option of choosing from carpet, laminate and engineered hardwood. Vinyl tile can be installed in conjunction with a 1/4-inch plywood underlayment. And ceramic tile can be used with a cement board underlayment to provide the utmost strength and sturdiness. (See the manufacturer’s instructions for floor-installation guidelines and warranty specifics.)
These floating systems are also touted as being “ergonomic.” This term refers to the slight “give” in the panels as people step on them. The panels slightly cushion footfalls as the channeled plastic distributes the weight, providing a comfortable, resilient walking surface. Walk on bare concrete and compare it to walking on a floating sublfoor—you’ll see the difference.
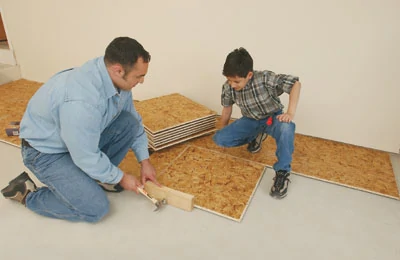
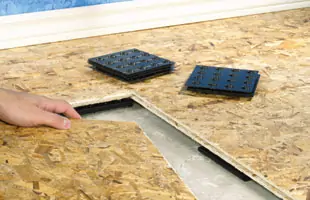
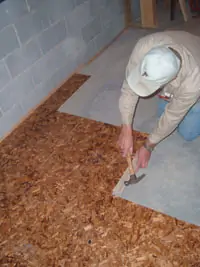
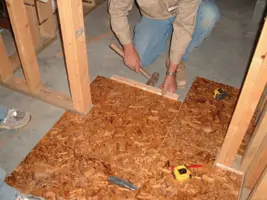
Another big benefit for DIY’ers is the ease of installation. While some systems come as rolls of plastic underlayment, most systems are available as 2-by-2-foot interlocking tongue-and-groove panels that have the plastic underside pre-attached to the wood. Just measure the floor and plan your layout in the same manner as laying tile, then tap the panels together with a hammer and wood block. No fastening or gluing is required.
Recently, we installed a floating subfloor system at my friend Robby McConnell’s house. Robby and I have been buddies for years, and he’s now expecting his first kid. With the new family member on the way, he felt it was time to expand his living quarters to his unfinished basement. I told Robby about the floating subfloors, and he chose the DRICore brand to install in his basement. Here’s how the project went down.
Getting Started
The first step is to check the basement for any preexisting problems. Inspect the foundation and repair any source of moisture penetration. Robby had a new solidly built house, so no repairs were needed.
Prior to installation, allow the panels to acclimatize for at least a full day in the room where they’ll be used by stacking or laying them on the floor with the plastic surface down. This allows the panels’ moisture content to adjust to the environment of their new home.
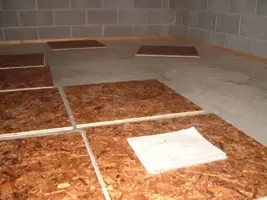
You’ll also want to test the slab to make sure you aren’t dealing with excessive moisture problems. To do this, tape a 1-by-1-foot square of plastic onto the slab, sealing all edges. Wait a day, and if the plastic collects water droplets, the floor should probably be treated with a concrete sealer.
Sweep and vacuum the concrete and remove any ridges that might interfere with the installation. Dips in the slab can also be a problem. The DRICore system comes with a leveling kit, which consists of shims to adjust uneven areas that are less than 1/4 inch. But if the floor dips any more than that, use a liquid self-leveling compound to ensure a flat, even surface.
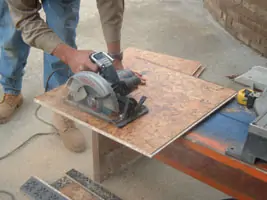
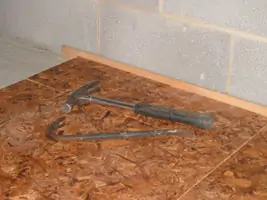
Once the slab has been prepped, make sure you have all the tools and materials on site. This includes: subfloor panels, 1/2-inch spacer boards, leveling kit, hammers, pull bar, square, circular saw, spiral saw or jigsaw, wood blocks, chalk and reel, tape measure and pencil. You’ll need a dust mask and safety glasses when cutting panels.
Planning the Layout
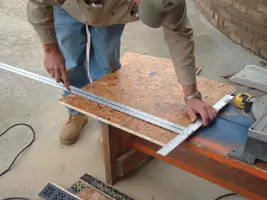
If you’ve ever laid out floor tile, then you know how this works. Measure the length and width of the room from a starting corner. Divide the measurements by 2 feet (width of the panels). You want to ensure the last panels in each row are greater than 6 inches. If this isn’t the case, then adjust your layout until it is. Also, keep in mind that the panel joints should be staggered from row to row. This means at the intersection of each wall, the size of the edge panels will alternate from row to row. You’ll find that sketching a rough layout on a piece of paper will help you visualize your game plan. You can also loosely lay the panels down to test a couple of rows.
Another consideration: Not all walls are square. Use a framing square to test your starting corner. If you’re not working with a 90-degree angle then you’ll have to cut the wall edge of the first row to make sure the succeeding rows can lay square against it.
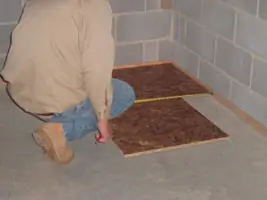
Once your layout is complete, snap a few lines on the slab to mark the locations of the first few rows. This will help guide the staggered joint locations until you get the first few panels installed.
The installed floor will also need a 1/4-inch expansion gap around all perimeter walls and room obstacles. You can use 1/4-inch strapping from your local lumber dealer. Simply place these straps along the edge and butt the panels against them.
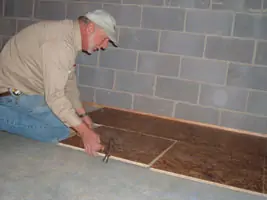
Laying the Floor
With the straps in place, place the first panel in your starting corner. Depending on the size of the room and your resulting layout, this first panel/row may or may not have to be cut to size. If it’s not necessary to trim it down, then you’re off and running. Just align the next panel and use a hammer and wood block to tap together the tongue-and-groove joint. Otherwise, cut the second panel to the appropriate row size and follow the same procedure. Install the panels tightly to avoid any separation in the seams. The first few rows are the most important because they’re the foundation for the rest of the installation.
Cut the first panel of the second row so the joint is staggered at the original midpoint of the first panel. Each joint in the second row should align with the midpoint of each panel in the first row. Likewise, each joint of the third row should match the midpoint of the second row panels. Row 1 matches Row 3; Row 2 matches Row 4, etc. Continue this pattern as you place and join the field of the subfloor.
Make sure the panels rest solidly on the floor as you progress. To make height adjustments in uneven areas, slide the shims from the leveling kit into place beneath the plastic cleats. In some places, you may need to stack as many as four shims together to get the right height.
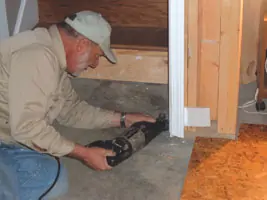
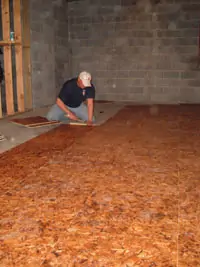
Work from one side of the room to the other, one row at a time. When you reach the opposite walls, you’ll need a circular saw to cut many of the panels to size. Plus, because of the wall, you won’t have hammer clearance to tap together the joint. At the edge you’ll need to use a pry bar or pull bar to join the panels. Odd-shaped panels and small cutouts can be made in panels with a spiral saw, such as a Rotozip, or a jigsaw.
Once all the panels are in place, your subfloor is complete. You’re now ready for new wall framing—or a brand new finished floor.
Editor’s Note: Special thanks to DRICore and David McConnell for help with this project.
SIDE NOTE
Floating Subfloor Buyer’s Guide
DRICore, the product installed in this article, is easy to assemble by press-fitting the tongue-and-groove panels. The engineered wood panels remain flat and stable in high humidity, and the durable polyethylene moisture barrier is raised on 1/4-inch cleats to allow air moisture to flow and evaporate. Learn more at www.dricore.com
Platon flooring membrane creates an impenetrable vapor barrier while creating an air gap beneath. The plastic membrane is sold in rolls, which the installer unrolls and cuts to fit the room. The lengths of membrane are joined with “Roof & Gutter” caulk. The installer pre-cuts 5/8-inch T&G boards to fit the room, staggering the joints every 4 feet. The perimeter of the subfloor is then secured to concrete with Tapcon screws 24 inches on center. Check out the Platon flooring Protector at www.systemplaton.com
Subflor ADVANCE from Supra Floors features an OSB surface manufactured with “MDI” water-resistant natural resins and waxes. The system is available as 2-by-2-foot T&G panels, which have a polyethylene underside with 5/16-inch corrugated channels to elevate the floor and allow moisture to flow. The company also offers Subflor SUPREME, billed as the first all-in-one flooring for concrete. The SUPREME product uses the Subflor moisture-barrier system in conjunction with finished floor panels available in two colors, aires (red) and calypso (white).
