


When contractor Steve Roth decided to give a facelift to an old home, he wanted to “mix and match” different textures on the exterior of the house to create unique curb appeal. Roth considered several options and then decided on pale yellow vinyl siding from Crane Performance Siding and an accent wall made out of panelized brick.
“The new Performance Brick panels that have just come out on the market make it fast and easy to get the look of real brick in about a quarter of the installation time,” says Roth. “Best of all, these panels are environmentally friendly. They’re made of recycled gypsum reinforced with high-density polymers with the color blended throughout each panel.
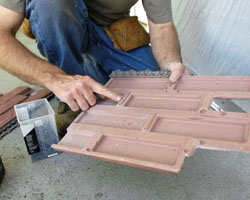
“The natural surface texture of the Performance Brick is really incredible. I’ve never seen anything before that so closely resembles the look and feel of real brick.”
Measure the wall and prepare the aluminum starter strip.
Smart Design
One factor that led to Roth deciding to install the moisture-resistant panels was the Fast-Track system developed to connect the overlapping and interlocking panels. New technology provides up to 3/4-inch airspace behind each panel to allow for air flow and water drainage, should any moisture infiltrate the decorative mortar after it is applied to the panels.
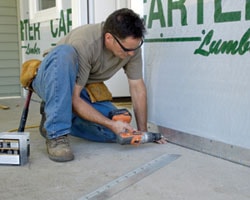
A weather-resistant barrier and proper flashing should be in place before installing. Screw the starter strip to the wall every 4 to 6 inches.
The Fast-Track system is attached to the top of each panel and used as a screwing flange. The system also serves as a spacer and ledge for the next row of panels to rest in, providing added installation strength. A unique integrated weeping system is built into each panel to prevent the buildup of moisture behind the panels and increase the insulating properties behind each piece. The system also allows the panels to “float,” eliminating problematic expansion and contraction issues in the future.
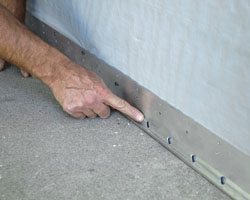
Weep holes are incorporated into the starter strip in case any moisture infiltrates the decorative mortar after it is applied to the panels.
For this fast accent wall project, Roth used both main and half panels. Full corners, corner returns, soldier rows, soldier corners and brick ledge are also available in the product line for projects requiring more than a straight wall. Roth selected the Darlington Rose profile for his project, but seriously considered the Cabernet Red, Manchester Brown and Pearl Grey color options. “I felt the Darlington Rose color most closely replicated the traditional brick color found on homes in our area,” says Roth. “The other colors are also appealing, and on future projects I plan to take advantage of the custom color match system available from the company to create one-of-a-kind brick panels.”
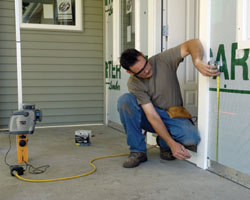
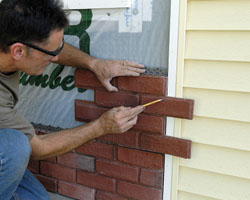
Locate and snap a horizontal chalk line at the top of each course of brick. This will help maintain straight courses of panels up the entire wall.
A major advantage of this synthetic panel product is in time savings. It took Roth just a few hours to install the entire accent wall, saving him days of work if he had opted for using individual bricks. To install the panelized brick products on the exterior feature wall of the house, Roth started from the bottom up, closely following the manufacturer’s instructions.
New technology provides up to 3/4-inch airspace behind each panel to allow for air flow and water drainage.
Step-by-Step
Step 1—Install the Performance Brick starter strip on the bottom of either an OSB or plywood substrate. Using a line level and chalkline or a laser level, make certain the starter strip is straight and level. Attach the strip every 4 to 6 inches with fasteners.
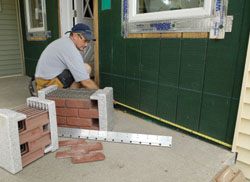
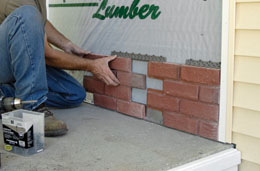
Begin from the bottom rightmost corner, installing panels from right to left.
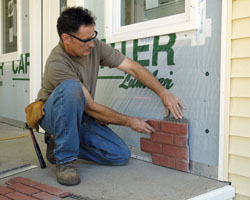
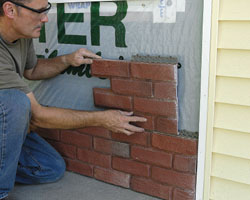
Step 2—Start the installation at the bottom right corner of the project with the panel situated down into the starter strip channel.
Place the first full corner or right return corner on the wall, seating it properly in the starter strip.
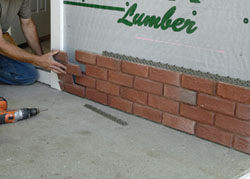
Step 3—Install the main panels so that they slide together into the panel previously installed. The Fast Track strip will be at the top of each panel, making it easy to continue installation upwards of all panels on the wall. Lock the panels together and to the substrate using fasteners.
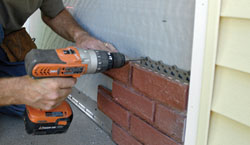
Fasten in place.
Step 4—Repeat these steps for the remaining panels, moving from left to right and from the bottom to the top of the wall. Trim the Fast Track system to the size needed to support the installation of the panels.
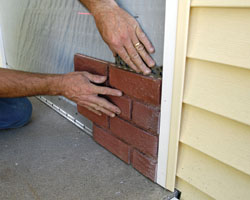
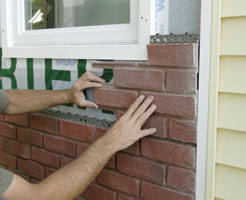
Place the first main panel onto the starter strip, aligning it evenly with the first panel. Slide the main panel to the right so it overlaps the corner and the two pieces are tight against each other.
Step 5—For areas where a main panel meets a door or window, and an uncovered space is created by the staggered brick pattern, use a half panel. The half panel acts as a spacer and changes the distance of the next main panel in the wall opening. For Roth, this meant trimming out the product and the fastening strip when he reached the doorframe.
Then slide the Fast-Track to the right, attaching it to the corner and connecting the two panels together. The fast-track should be centered on the seam. Screw the Fast-Track to the wall.
Step 6—The overhanging main panels can now be measured and trimmed to size. Make certain to caulk the seam where e panel meets the wall opening (or the brickmold) to prevent water infiltration. The seam can also be trimmed with a two-piece J-channel available from Performance Brick.
Continue working to the left as panels are needed. At the left corner a Fast-Track will need to be trimmed and installed on the last panel.
Step 7—Once all the pieces are secured to the wall, apply mortar to enhance the aesthetic quality of the project. Use a bakers bag, PointMaster tool, Quickpoint hopper gun or similar devise to apply the mortar first to the vertical joints and then to the horizontal joints.
Install the next row up the wall in the same manner.
Step 8—After all the joints have been filled and the mortar is firm, a brick jointer tool can be used to strike and finish all the joints. Finally, brush the finished wall clean.
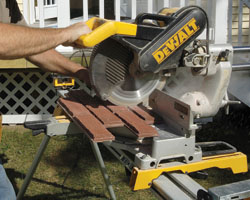
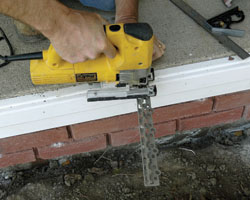
Performance brick panels are manufactured in fixed widths. When a shorter panel is needed, the panels can be trimmed using common woodworking tools, such as jigsaws, miter saws or handheld circular saws.
Built to Last
Mold-, water- and fire-resistant, Performance Brick panels are made to replicate the Old World look of handmade architectural brick. The “no repeat pattern” provided Roth with a one-of-a-kind exterior for his house renovation project.
Cut the panels to fit and fasten securely.
“These low-maintenance panels are the perfect complement to the cypress- and wheat-colored Crane Market Square vinyl siding and the Fypon urethane trim on the exterior of this home,” says Roth. “They’re non-porous in nature so they resist moisture, which prohibits the sustained growth of mildew, mold and algae. Best of all, the panels are resistant to freeze/thaw conditions, so I can install it 12 months a year on my future projects!”
A jigsaw is useful for notching panels to fit around windows.
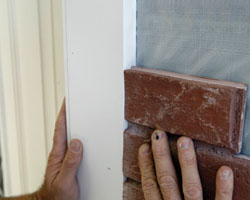
The seam where the panel meets a wall opening (or brick molding) should be caulked to prevent water infiltration. If desired, the seam can then be concealed with a trim piece.
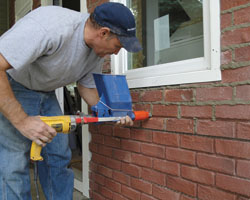
A standard N-Type mortar is recommended for use with Performance Brick. An 80-pound bag of mortar mix will provide about 400 square feet of coverage. Completely fill all joints with mortar.
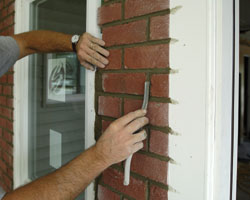
When the mortar has set, use a jointing tool to strike all joints, starting with vertical joints and then the horizontal joints.
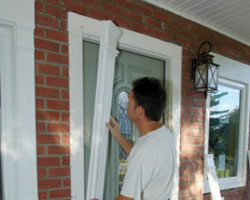
The addition of exterior trim gives the new brick accent wall a nice, finished look with great curb appeal.
