Most homeowners are under the impression that solid surface countertops are beyond their abilities and that many specialty tools are necessary. The following “How-To” article dispels these assumptions. Making precise measurements and taking your time before cutting the material will facilitate getting professional results.
Solid surface material is heavy so it is best to cut and shape it while it is stationary rather than trying to push it through a table saw. The following suggestions will help to accomplish the task.
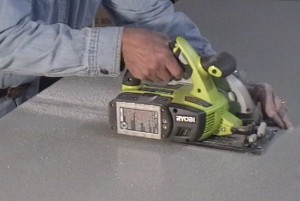
Set up saw horses with a soft wooden top to them. That allows the saw to cut through the material and into the top part of the wood on the sawhorse while the material remains in place. Ensure the saw horses are level. Adjust the depth of cut on your circular saw so the blade extends about 1/8” below the countertop material. Use your safety glasses and make your cut.
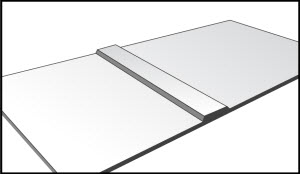
Mirror cutting for seaming 2 pieces
The edges to be joined are machined at the same time which provides a perfect fit where the seam is almost invisible even before the two pieces are glued together. Use a 1/2″ shank double fluted router bit. Securely clamp the two pieces to be seamed 1/4″ to 3/8” apart so they cannot move. Securely clamp a straight edge to one side so the router can cut down the middle of the opening in one continuous movement without stopping.
Make a Straight Cut using a Circular Saw and Router.
Make a rough cut with the circular saw and leave about ¼” of material to be removed with a router as the finish straight cut.

Installer’s tip: for cutting the edge of a surface for later seaming ONLY USE the mirror cutting method as described above—unless you have a $30,000 panel saw or CNC machine.
Installer’s tip: apply a dusting of corn starch to the surface and straight edge to allow the router to slide smoothly.
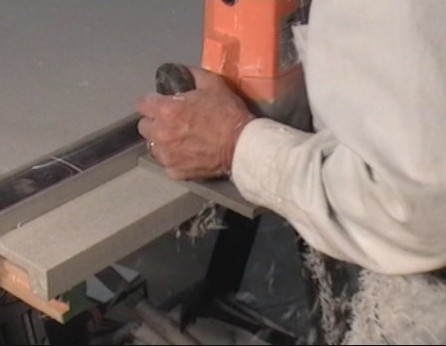
Create a square base for your router that replaces the one that came with the router. A scrap of solid surface works very well. Cut the square base so as to position the router bit so it cuts 4 inches from one edge and when turned around it will cut 3-15/16” from the bit. Having two dimensions for the base means you can make a cut against a rip fence and make a second cut of a slight bit more by turning the router around. This means you do not have to move and reposition the guide fence in order to remove an additional small amount of material. Use a double fluted ½” router bit and move the router from left to right at a moderate even feed speed without stopping.
Making curved cuts A template and a router are used for curved cuts. A saber saw can be used for the rough shape but not the final cut because it will leave a rough edge where stress cracks can begin. Use a template for all inside and outside corner cuts.
- Create a template from wood or a solid surface scrap.
- Make size adjustments keeping in mind how you will guide the router against the template
- Select router bit and bushing
- Cut around template
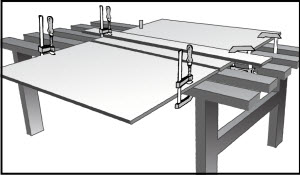
Gluing Two Pieces Together
Make and heat glue clamping blocks that are about 1”x2” onto the 2 pieces to be glued.
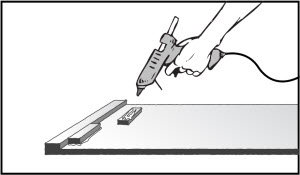

Before applying glue, attach one or two, 2” wide strips of plastic tape under the area of the glue seam for protection from glue drip through. Do a test positioning of the sheets so they will mate correctly and then separate them by about 1/2” in preparation for adding adhesive.
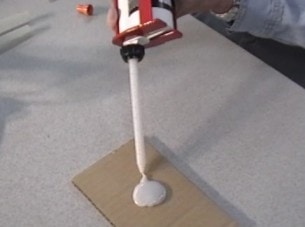
Installer’s Tip: Always squirt a small amount of material from a new cartridge before adding the mixing tip to be certain that both parts of the adhesive flow.
After the adhesive tip is attached squeeze a bit more through the tip and begin applying to surfaces to be bonded. After you are done, leave the tip in place.
Apply adhesive in two passes, one pass on each of the mating surfaces. This will eliminate “soft spots”. If there is a place on the first pass where the adhesive was not mixed correctly, then the second pass will not have that happen in the same location and the catalyst will mix enough to cause hardening.
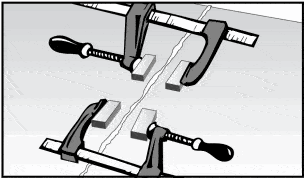
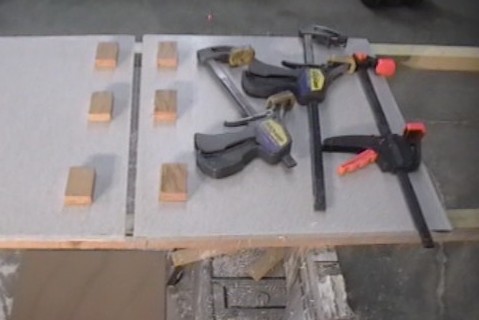
Apply clamps to the blocks and tighten until seam is snug. DO NOT OVER TIGHTEN as this will cause a weak joint.
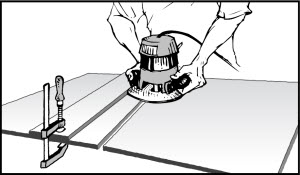
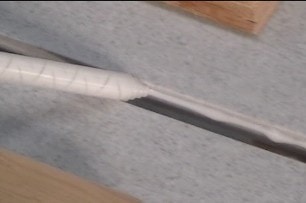
Sand the underside of the seam in preparation for adding the seam plate. The plate is solid surface of the same color or a scrap of a lighter color. The seam plate is a 4″ wide piece with a 45 degree angle cut on both sides to minimize the starting of a crack. Cover it with adhesive and apply over the seam with some pressure.
Finish the seam by trimming the adhesive build-up by using a router on skis. A ski router has two strips of solid surface glued to the router plate and you lower the bit so it is just above the surface and then you can route away the buildup. Then sand the seam and feather either side out about six inches using 120 grit abrasive. Next sand out to about 12 inches using 180 gritand then sand the seam area to blend into the final finish. FINISHING THE SURFACE
Finishes range from matte to satin to degrees of polished. The procedures are pretty much the same no matter the finish. Finish sanding begins with 280 grit abrasive discs on a random orbit sander. The difference in the procedures is how fine the final grit is which will dictate the finish sheen. A glossy polish finish requires the final step of compound and buffing pad.
Use abrasives with 120 grit and 180 grit to remove heavy scratches and return the surface to one similar to the flat finish provided by the manufacturer. FINISHING THE SURFACE
For a matte finish on light colored countertops use 280 grit and maroon Scuffbrite pad. On dark colors to create a matte finish use 280 grit, 400 grit and maroon Scuffbrite pad.
If you desire a satin finish, use 280 grit, 400 grit and gray Scuffbrite pad.
A polished finish; the degree of gloss appearance will depend in part on the material color and composition. Use 280 grit, 400 grit, 600 grit and white Scuffbrite pad for a moderate sheen polish and then for a higher sheen use the green High Polish compound and the Buffrite wool pad.
Surface maintenance procedures are dependent on the type of damage. Cuts and scratches can be sanded out with 120 grit and then 180 which will approximate the finish of the original piece. Then follow the procedures above to match the final finish.
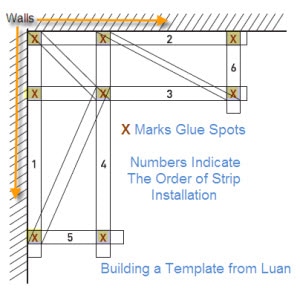
Making a Template Using Luan Wood Strips