Most solid surface countertop materials can only be installed by installers licensed by the manufacturer or distributor. One of the main reasons is traditional solid surface countertops are fabricated by building up 1/2-inch-thick materials with underlayment to create the appearance of thicker materials, then cutting and gluing-up a front edge, much in the same manner as a plastic laminate top over a plywood subsurface. Both procedures are labor intensive.
Love the look of Corian®, but don’t love the cost? Well DIY solid surface countertops can be an extremely affordable and elegant option with material from SolidSurface.com. Using basic woodworking skills and tools, you too can install your own custom solid surface countertop, desktop, bathroom vanity, laundry prep areas, shower walls, or other surface of your choosing.
EOS countertop materials, available from EOS distributors, are available in thicker sheets, 2-centimeter (.79-inch) and 3-centimeter (1.20-inch) thick, solid countertop materials. With the 3-cm thickness, first cut the shape of the countertop. Then simply form the edge profile with a router and you’re finished.
The 3-cm top provides a finished solid surface countertop without any complicated build-up procedures. The company also sells sinks, adhesives and tools. The materials are shipped by common carrier, and you’ll need help in unloading as well as a pair of snips to cut the banding material. The 3-cm solid countertop is heavy. In the project shown, it took four people to lift and handle one 30-inchby- 10-foot section, which weighed around 250 pounds. You will need a hammer, tape measure, level, scriber, scratch awl, utility knife, portable circular saw, straight edge, portable electric drill, jig saw, hole saw, a power sander preferably a random orbit sander, sandpaper and a router. The router and appropriate bits are the most important tools needed. The router should be a heavy-duty model. A 1/2-inch collet router is the best choice. You will also need a guide bushing for the router, a pattern bit with a top bearing guide, and a round-over bit. If you intend to install a solid-surface sink joined to the countertop, you’ll also need a specialized sink-hole cutting bit. A circular saw blade designed for cutting solid surface materials is also needed. A laser level can be a great help in establishing a level line, especially for L- or U-shaped countertops. You will need ear, eye and especially dust protection. The materials create a very fine dust that goes everywhere. You will also need a pair of sturdy sawhorses, or a large flat surface at easy working height to build the support platform on.
Creating and installing a large, complicated countertop like the one shown does take some skill, especially in using a router, but serious do-it-yourselfers, such as Extreme How-To readers, should be able to tackle the chore. It’s important to take your time and make sure of all measurements and cuts. The materials are fairly expensive, and a wrong cut can be disastrous. It is also important to have help when lifting the materials. The project shown includes removing an old plastic laminate top with stainless steel sink and creating a top with a solid surface sink.
Solidsurface.com is a supplier of discount and premium solid surface sheet material, sinks, pre-made vanities, adhesives, and other supplies related to working with solid surface materials.
In addition to the countertop materials, you’ll need adhesive and corrugated plastic to create a lay-out pattern or job-site template. The plastic is included with the solid surface materials from Solid Surface Countertops. Other materials include 2-by-6 and 1-by-4 framing materials to create a form to hold the countertop material during fabrication. One-quarter-inch hardboard is also necessary to create a cutting pattern and router template.
First Steps
If the countertop is to replace an old existing top, the first step is to remove everything from the interior of the cabinets and then carefully remove the old top. It may be fastened in place with screws up through cleats into the top, with nails down through the top into cleats or dividers, or it may even be glued in place. Remove as carefully as possible in order not to damage the cabinet framework.
With the top removed, lay a sheet of template plastic over the cabinet. This is used to create an exact shape of the countertop. It’s much easier to change this template than the actual countertop. This allows you to establish the fit of the walls and the overhang at the front edge. The material is semi-transparent so you can mark the location of all your cabinet sides, dividers and corner bracing. If the countertop back edge is adjacent to a straight wall, and any small gaps can be covered with a backsplash, mark the cut line with a straight edge. If the walls are crooked, measure the widest gap from the wall. Then use dividers, a pencil compass or even a wood block of the same measurement to scribe the back edge to the wall. Using a utility knife, cut the template on the scribed line to fit the wall. Slide the cut template against the back wall and make sure it fits properly. Then mark the front overhang and shape of the countertop. In this case, one leg of the L had a narrower, rounded shape.
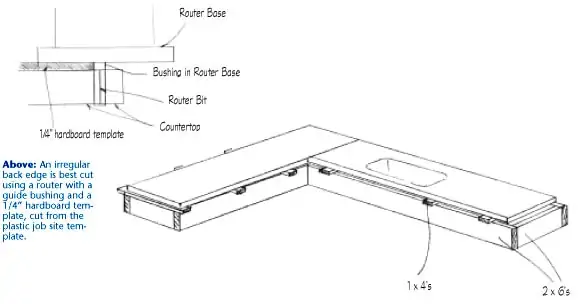
Build a fabrication platform such as that shown in the drawing to support the solid surface during fabrication. The fabrication platform should match your countertop. The platform should be as level as possible, well supported and at a good working height. Place the jobsite plastic template on the sheets of hardboard and mark the scribed back wall pattern on the hardboard. Cut the hardboard, following the scribed line, using a jig saw. Then place the hardboard template against the back wall to make sure it fits. Adjust as needed.
The countertop must be installed on an absolutely level surface, and very few cabinets are level. Use a 4-foot carpenter’s level to determine level. A laser level makes this chore easy. Add wooden shims to the cabinet base top edges to create the level support surface needed.
Cutting the Top
Place the countertop material on the fabrication platform. Place the hardboard router template on the countertop material and mark the shape. Rough cut the solid material a bit larger than the router template. Use a straight edge clamped securely in place and circular saw with a blade for cutting solid surface materials.
Note: During construction of this top we tested Eurekazone’s EZ Smart Guide System with the portable circular saw (eurekazone.com). The system utilizes an extruded aluminum guide strip that can be clamped to the work surface with special clamps that fit in the bottom ends of the guide strips. A special guide shoe is attached to the saw, and perfectly straight and smooth cuts are made quite easily.
If the countertop is L- or U-shaped, or longer than 10 feet, a matched joint must be created. Place the two pieces on the fabrication platform so the two edges that are to be matched are 1/2 inch apart. Make sure the pieces are level with each other and then clamp both pieces in place. Use a router with a 3/4-inch straight-cutting router bit. Clamp a straight edge in place so when you rout through the joint. You will be cutting a little off each side of the gap as you follow the straight edge with your router. The gap created after the cut should be 3/4-inch wide, and when the two pieces are pushed together the seam should match perfectly.
On L-shaped countertops the inside corner must have at least a 1-inch radius. If it is cut square, a stress joint is created that can lead to breakage. The matched joint must also be at least 3 inches from the inside corner, the main reason the sheets are 30-inches wide. Use a hardboard template and a router with a guide bushing and straight cutting bit or top bearing bit to cut this radius. Note, the countertop should not be joined over a dishwasher or around the sink.
The next step is to cut the back edge to match the wall. Again use a hardboard pattern and either a guide bushing in your router and a straight cutting bit or top bearing bit. In either case the hardboard template is clamped securely in place and the router bit or guide bushing guided along the template edge to make the cut.
Next, rout the front and, if desired, the end profiles. Use your choice of profile bit to achieve the edge profile you desire. The top shown was profiled using a roundover bit with a bottom bearing, riding the bearing against the bottom edge of the cut. If you have a matched joint, stop the edge profile about 1-1/2 inches from the joint. You will finish cutting after you have seamed the pieces together. Also, stop the edge profile on the ends or face 1-1/2 inches from where a back splash is to go.
Placing the Sink
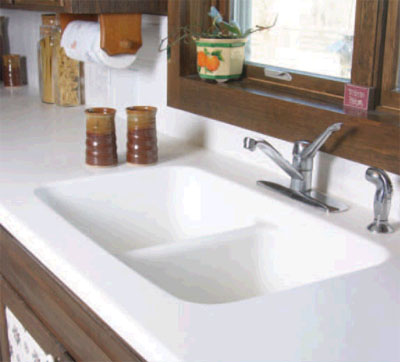
The next step is the sink. A stainless steel or other material sink can be installed in the traditional manner. A solid surface sink, however, creates continuity and adds to the beauty of the countertop. It is, however, heavier than stainless steel and more difficult to install. It requires attention to details in installation. To install a solid surface sink, turn the top upside down on your fabrication platform. Make a template of the sink rim and then place the template on the countertop in the proper location. Be sure the sink’s outer rim will clear the inside of the cabinet top edges by at least 1/2 inch, and leave space at the back for faucet installation. This spacing can easily be checked by placing the original template over the sink template. The original template should have the location of all cabinet edges, inside and out and the location of any corner bracing in the sink base marked.
When you are sure of the sink location, place it in position, upside down on the top. Do not mark the sink outline with a pencil or pen. The adhesive will pick up the color and spread it as much as 2 inches in your seam. Place small wooden glue blocks around the outside edges of the sink, using hot-melt glue to hold them in place. Lift the sink in and out a couple of times to make sure the glue blocks don’t move. Once you’re satisfied you can position the sink without moving any blocks, lightly sand the top of the sink and the bottom of the top with 80-grit sandpaper. Vacuum off all dust and clean both surfaces with denatured alcohol.
Apply adhesive to the sink rim: one bead to the outside top edge, one to the inside edge and one between the two. Place the sink down between the glue blocks and weigh it down with two bags of sand or other heavy materials that won’t shift and move the sink. Allow the adhesive to set at least a half hour and then remove the glue blocks and turn the top and sink assembly back over .
Note: Your fabrication platform must have an open area for the sink. The top and sink lip edge is then cut using a router and special bit. First a starting hole is bored using a 1-3/8-inch hole saw. Very carefully locate this starting hole, making sure it is inside the sink and away from the edge and center divider. A mistake here can be very costly. Then use the router and a straight router bit with a 1/8-inch oversized bottom bearing to create the sink cut-out. To prevent the cut-out from dropping down and breaking away with the last of the cut, use a couple of support strips fastened to the cut-out with hot-melt glue and stretching across the countertop to support the cut-out. With the cut-out removed, use a 1/2-inch round-over and 10-degree combination bit with bottom bearing to finish the cut.
Then place the countertop on top of the cabinets and glue any seams. To glue the seams, place the top on the cabinets as level as possible and push the pieces together to check for fit. Place two wood blocks on each piece about 2 inches from the seam using hot-melt glue. Separate the two pieces, and using a sanding block with 80-grit sandpaper, slide the sandpaper block from front to back one time on the ends to be seamed. Vacuum off all dust and clean with denatured alcohol. Apply adhesive to both pieces and push back together making sure they are in line. Place clamps across the wooden blocks to pull the seam shut. Don’t over-tighten the clamps; it takes less than 10 pounds of pressure to make a good seam. Test the seam with your fingernail. If your nail can make a depression in the seam, the glue is not dry. After the seam is dry, sand the excess adhesive off, and finish cutting the profile edge on the seam joint.
Raise the countertop and place small dots of pure silicone adhesive on the top of the cabinets about every 6 inches. Do not use a continual bead of caulk. Using a random orbit sander, and progressively finer sand paper, sand to the desired finish. Start sanding with 120-grit, finish with 220-grit, then use purple and then gray Scotch Brite pads that are available from auto body repair shops. Locate and bore the holes for the faucet, install sink baskets and connect the plumbing and drain.
Solidsurface.com is a supplier of discount and premium solid surface sheet material, sinks, pre-made vanities, adhesives, and other supplies related to working with solid surface materials. 888-715-3007


