

How To Build Stairs – a Step-by-Step DIY Guide to Constructing Staircases
There are two different classes of stairs. The first class is a mill-made stair, which is usually fabricated in a mill shop and shipped to the job site as a kit, ready for assembly and installation. The second class, a carpenter-built stair, is just that — a stair built on site by a carpenter. This type of fabrication is less expensive and allows the stair to be covered with carpet.
A carpenter-built stair can be dressed up with a hardwood or paint-grade skirt board. And simple wall-mounted railing is a popular option to complete either type of stair.
When building a stair, functionality is the most important consideration. Extreme accuracy must be used for a safe design. Before beginning construction, you should consult not only the national building-code requirements, but also the local building-code requirements. Some municipalities have stricter codes than others, and checking first will eliminate the need to rebuild later.
After determining the correct code requirements for your stair, consider the stair’s design aspects. Remember, the construction materials that you use will dictate the outcome of your finished product, and quality materials will produce a quality job. Do not mistakenly think that because the material will be covered with carpet and no one will see it, the quality of construction materials doesn’t matter; it does. When you use a lower grade of material that contains knots and voids, the stair may encounter cracking at a later date. Most lumberyards carry stock used specifically for the construction of stairs.
Layouts and Calculations
After you have determined the proper codes to follow for your municipality, you are ready to begin the layout and calculations of your stair. Grab a pencil and commit your plans to paper, sketching a rough blueprint of your staircase.
For the purpose of this example, this project will be a straight stair. The building code that we are implementing for this project is BOCA 96 for residential use. This code states that you may have a maximum riser height of 7 3/4 inches and tread run of no less than 10 inches.
First determine the size of your stairwell, making sure to allow for the proper headroom to accommodate the stairs. Headroom is very important; you need to be able to ascend and descend the stair safely. Many a stair has been torn out due to incorrect calculation of this item before the stair is built and installed. There is nothing worse than having some common stair-building sense knocked into you by bumping your head. For this example the nosing will be a standard 1 1/4 inch, the tread run will be 10 inches each, and the headroom will be 6 feet, 8 inches.
Assuming the distance from one finished floor to the other (total rise) measures 118 inches, find out the number of risers needed by dividing the total finish rise by 7.5. The resulting number equals the number of risers. Then divide that number into the total finish rise.
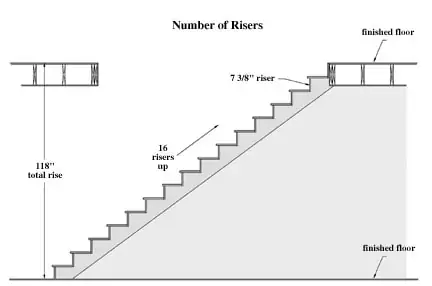
Example:Total rise 118”/ 7.5 = 15.73 — round up the total number of risers to 16
Total rise 118”/16 risers = 7 3/8” each rise
Knowing the number of risers tells you the number of treads — 15 (the sixteenth riser will be positioned approaching the upper floor with no tread on top). The run of the stair will then be 15 treads at 10 inches per tread, or 150 inches of total run. To determine the actual total length of the stair, you must add the nosing of the bottom step and the thickness of the top riser.
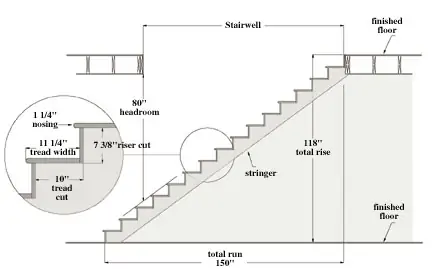
Example: Total tread run 150” + 1 1/4” nosing + 3/4” top riser = 152” total stair length
Next, calculate the length of the stairwell, or the width of the upper floor’s vertical shaft in which the stairs are located. This is a two-step calculation.
First, account for the required headroom and the upper-floor construction, including floor-joist height, floor thickness and drywall thickness. For the purpose of our example we will calculate the upper-floor construction to be a total thickness of 12 1/2 inches. This figure (12 1/2 inches) added to the desired headroom height of 80 inches will total 92 1/2 inches. Take this dimension and divide it by the riser height.
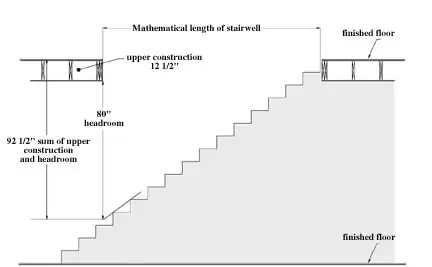
Example: 92 1/2” / 7 3/8” = 12.542
The answer you get (12.542) is the number of treads needed in the clear opening to make headroom. This would mean that you now have 2.45 treads that are located under the header. By multiplying 12.542 (number of treads in clear opening) by 10 inches (tread depth dimension) and adding 1 1/4 inch for the nosing and 3/4 inch for the top riser, you will achieve the stairwell length needed for the proper headroom. The result for our example is 127 7/16 inches for stairwell length. Most stairs that are located between two walls have a finished width of 36 inches. To accommodate this finished width you will need to make your rough opening 37 inches.
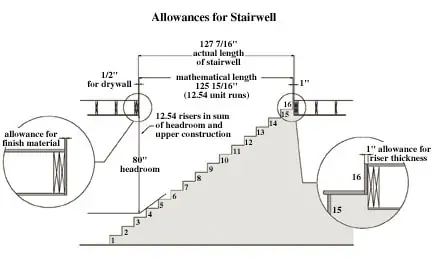
The end result of our layout procedure is: 10” run, 7 3/8” rise, 127 7/16” stair well length, 37” stair well width, 36” stair finish width.
Cutting the Stair
Now that we have directions on paper as to how to build our stair, it is time to begin cutting. Carpenters always measure twice and cut once, a good rule to follow when cutting stairs. Stair building can be expensive; you only want to purchase the materials once, so purchase and cut wisely.
When you start the project, make sure your work area is clean and well lighted. Working in comfortable surroundings makes a difficult task a little easier.
How To Build Stair Stringers
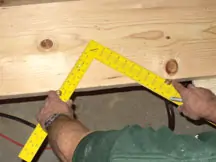
Lay out the stringers to begin the actual stair project. Do this by setting the rise and run of the stair on the framing square. The framing square clamps should be adjusted to 7 3/8 inches by 10 inches. Next, mark off the number of treads and risers that are needed for this stair. Always start with the first riser and end with the top riser, and draw in the second floor line. At this point it is helpful to count the number of risers so there isn’t a layout error. Repeat this procedure for all three stringers.
After you have marked the treads and risers, it is time for the final adjustments to the stair stringer. As with any well-planned work of art, tweaking the design may be necessary. In order for all of the risers to be in code-compliance, adjusting the top and bottom risers may be necessary. In our example when a 1-inch-thick tread will be added to the bottom tread cut, our bottom riser will be 1 inch too high. The opposite is true at the top. When we add the top tread, its thickness deducts 1 inch from the exposed riser height. To correct this situation we will deduct 1 inch from the bottom riser cut at the floor-level portion of the stringer.
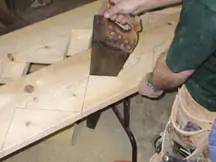
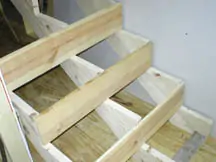
After you have successfully laid out the stringers, cut off the triangular portions. A power saw is the best tool for this task, but be careful not to cut beyond your marked layout lines, which will weaken your stringers. The final cutting of the triangles can be cut out with a handsaw. After all three stringers are cut out, place them together to make sure they all match. Three perfect matches are what you want to achieve. Anything less than three perfect stringers and you may want to consider going back to the drawing board.
With three good-looking stringers on your bench, you can now take the left and right stringer and position them on top of the 1-by-12-inch skirt boards. On each skirt board, trace the cut where the stringer meets the floor and the top riser. Cut these lines out and also make a plumb cut on the bottom of this board at the height of the baseboard. Attach the skirt boards to the two stringers. These two stringers are now finished and can be nailed on top of the drywall. If no drywall is in place, fill out the stringers to the thickness of the drywall. Always, always, nail or screw to the studs. The center stringer is now ready to be mounted to the top header and attached to the blocking at the floor.
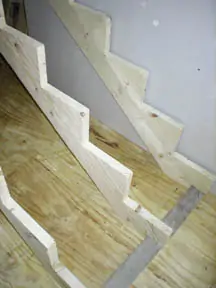
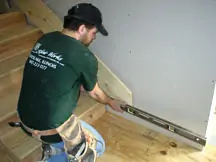
Now that your stringers are in place, it is time to double-check all of your cuts. Check the tread cuts for level and plumb. Check your measurements in every direction, left to right and front to back. Check the top and bottom riser–does it allow for the finish tread height? The top riser should offer a tread thickness of more than 7 3/8 inches and the bottom riser should be tread thickness less.
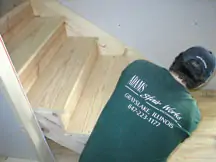
If after you have double-checked all of your cuts, and you are satisfied that you’re on the right path, it is time to rip the risers to the correct heights and nail them into place. Don’t forget to glue and nail them for long-lasting durability. Your treads should be 11-1/4 inches so they will not need to be ripped, just cut them to length, glue and nail into place.
Nail the treads and risers to the stringers. Install by nailing through the back of the risers and into the treads, always using cement-coated fasteners.
Stair Inspection
Your stair is now complete except for the wall or handrail. Because our example stair is located between two walls, we will need to put a wall-mounted handrail in place to meet code compliance. Mount the handrail at 34 inches above the leading edge of the tread. It should be 198 inches in length and contain a wall rail bracket screwed into a stud or backing, every 4 feet. In the case of an open rail section to one side of the stair, it is easiest to mount the balusters on an angle cap.
You are now ready for inspection!
Stair building is an art. Do not expect to be able to learn it all in just one article. Many experienced carpenters have difficulties building stairs. So if you’ve pulled your hair out a little trying to achieve a quality stair project, you’re in good company. Be patient and with a little practice, you’ll be making your way up in the world on the steps you’ve just built.
Side Note 1:
STAIR-BUILDING TIPS
1. To create a softer edge where the carpet breaks over the tread edge, route the edge with a 1/2-inch round overbite prior to installing the treads into the stringers.
2. If your material is splitting, predrill your holes. This can also help prevent squeaking in the future.
3. Glue blocks can be placed at the underside between the tread and riser intersection.
4. Another very important but sometimes overlooked item is to seal the underside of your stair. This will prevent the stair from squeaking and warping.
Side Note 2:
STAIR-BUILDING TERMINOLOGY
Riser: Vertical surface between two treads.
Carriage stringer: Support for the treads and risers; usually cut to have the treads sit on the horizontal plane and the risers nailed to a vertical cut.
