

By Charlie Self
Cultivating Garlic in a Raised Bed
Garlic bulbs are available everywhere, but the pleasure of growing your own is great. It is no surprise to find that garlic is related to the onion genus, and that there are many flavor variants, depending on bulb type. Overall, various seed companies make available a large number of varieties. Two sub-species of garlic exist: soft neck and hard neck. For most of us, the best bet is a hard neck variety, which produces tall scapes that eventually flower (actually forming tiny bulbils, or mini-bulbs).
The cloves we planted for this article are what a friend calls “German hardy hard neck” garlic, and produce exceptionally tasty bulbs. The garlic seen in grocery stores is usually a softneck variety, with a lot of papery “skin” on its outside, and on the outside of the individual cloves. That clove skin makes it harder to peel the garlic cloves.
Garlic is easy to grow; it stores well after growing, and a small, defined space produces enough for most families for a year, with plenty to plant for the next crop. Our German hard neck variety was a gift from a friend who lives 700+ miles north of us, but it thrived here in Virginia in the foothill area of the Blue Ridge Mountains. It is best to find a variety that fits the climate of your own locale. Checking various gardening catalogs, or web sites, helps a lot. As an example, Burpee’s (burpee.com) offers 16 different garlic varieties.
Assembly
We began here by assembling the box, or container, aimed at holding 28-30 cloves. That demands a 4-by-4-ft. container, about 8 to 10 in. deep. Because there were no pressure-treated 2x8s or 2x10s in the shop, we used leftover 2x6s and 2x4s, with two cleats set in from the ends holding them together to form a box that is actually 9 in. tall. I decided to support the corners with pieces of 1×4 pressure-treated lumber, cut at 45 degrees and nailed across the top corners. They can also be placed underneath the box. The rest of the box was screwed together for durability, using stainless screws. We expect to use this container for years to come.


We selected two fairly straight 8-ft. 2×6 boards, plus two 8-ft. 2x4s, plus about 6 ft. of 1×4 boards, all pressure-treated.


We trimmed the 2x to 48-in. lengths, after squaring the ends. Assembly began with the 1-by-9-1/2-in. cleats, using 2-in. long galvanized finish nails. When all four sides were made, we assembled the first corner—a Black & Decker WorkMate is great for this, as it easily stands a 4-ft. long board on end so you can screw another into it. Some kind of support is needed at the other end to make sure it all holds together. Over the years, I’ve collected an extra WorkMate which eases the support job. When you get three sides assembled (two corners), adding the final side is easy. I used long pipe clamps to make sure boards stayed in place, too. When I drill pilot holes, I’m not happy when the positioning changes.


Once the four sides were assembled, I cut short corner braces of 1×4 material. Cut the ends at 45 degrees, and nail with 8d or 10d nails into the tops of the side boards, at each corner, as shown.


Next up, we picked a sunny space, on ground that drains well, and placed gardening cloth—perforated plastic—to help keep weeds and underground pests in check. We then tipped the box into place, and loaded in 10 bags of topsoil.


A check showed that the pH was just what garlic required, so we left it be on the old basis of “if it ain’t broke, don’t fix it!”
Make certain of your drainage. If garlic isn’t in well-drained soil, it is susceptible to rot.

Planting
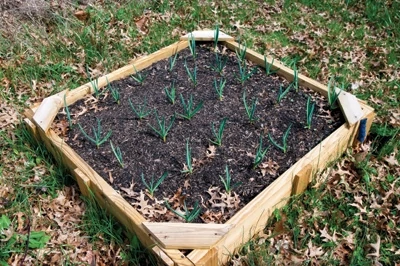
For this area of Virginia, about 65 miles north of the North Carolina line, the best time to plant was late October. We missed that by a couple of weeks, getting the entire job done late in November. Our late planting doesn’t seem to have created a problem: The cloves germinated well, and a few weeks later, we saw the first scapes push past the leafy mulch we added. The mulch is considered necessary for colder month survival and growth, so, with our late start, we added a few extra inches of oak leaf cover.
Planting can be done on nearly a year-round basis in cooler areas, but in warm temperature climates, it is best done in fall—or very early spring—just as winter breaks. I’m not sure when that would have been this year, as we had the warmest March on record. We planted shortly before Thanksgiving and plants should be ready in June. Planting in October might have brought us a crop sometime in May. The bulbs are ready for harvesting when the scapes form a sort of serpentine circle around their own stems.
Two crops a year are easily possible in several warm temperate growth zones, though places like far upstate NY do well with a single crop a year. (We do, too, but that’s a matter of need more than possibilities.)


As the photos show, the cloves we used are close in length to an AA cell battery. Garlic cloves are planted root end down, about 1/2 to 1 in. below the soil at the clove top. That means a planting depth of about 3 (AA cells are about 2” long). Cover, and go on to the next clove’s spot. Leave at least 4” between plants, with 6” preferable for best growth.


Cover with mulch. A leaf mulch, such as our pin oak leaves, works well. When the scapes reach the light in spring, pull off the mulch.
Make sure the soil doesn’t dry out in the occasional dry spells, but other care isn’t usually necessary. When the tops—the scapes—start to dry out, pull the garlic, wash gently, and place in a warm, dry area so that the bulbs can dry and stabilize. Either cut tops to within 2 in. of the bulb, or leave the dried scapes in place, and use them to hang the bulbs in the kitchen, pantry or other dry storage area. After a few months, check the remaining bulbs and cull any showing signs of softness.
Remember to save enough for the next crop.


Other Gardening Related Articles
- How to Grow Vegetables in the French Intensive Gardening Style
- Start-Up Tips for the “Green” Gardener
