

By Matt Weber
Build a Freestanding Cantilevered Deck Supported by Parallel Beams.
Around Alabama, where EHT is headquartered, most decks are connected to the side of a house with a ledger board fastened to the rim joist of the house. When done correctly, this is a strong and code-compliant method of building. But, when flashed or fastened incorrectly, this connection can pose potential problems, such as providing a prime location for water to collect against the house wall and ledger board, ultimately contributing to rot.

As an alternative to the ledger, the deck I recently built is a freestanding structure, basically a giant platform built right next to, but not connected to, the house wall. The house in question had two stories with a finished basement on the bottom level. The finished ceiling of the basement prevented access to the interior side of the rim joist. Unless I was to tear out the ceiling, I wouldn’t be able to add nuts and washers to through-bolts on the interior side of the rim joist. And, if I couldn’t fasten the ledger with through-bolts, then I’d have to use lag screws. Although some heavy-duty lag screws are strong enough to attach ledgers to rim joists, if the wood were to eventually rot, then no matter how strong the lag screws, they could potentially pull out of the rotted wood. So, I figured that by building a freestanding deck, I could avoid these potential hazards altogether.

Stakes and string will help keep your deck layout lined up.
Think Big
As with every major construction project, always consult local codes, and if you have any questions, consult a building inspector. I pulled a building permit for this job and in doing so became friendly with my local inspector who was a great help suggesting building techniques and keeping this rather large deck code-compliant.
This freestanding deck surface was 40 feet by nearly 12 feet—we’re talking about a big platform—but thankfully it wasn’t very high, which is a major concern with a freestanding deck. The higher the deck is from the ground, the longer its support posts will need to be and the more likely the deck will be unstable. Thanks to an uphill slope at the rear of the house, the deck surface was only 5 feet high next to the house but closer to 3-1/2 feet on the far end. Building the deck close to the ground helps keeps the “wobble” out of the completed structure.

In lieu of the ledger board, I constructed this as a cantilevered deck where the joists were supported by large two parallel beams (also called girders) running parallel to the house wall. The beams were supported by 6-by-6 support posts J-bolted with post-anchor hardware to concrete pier footings.
Whatever you do, don’t skimp on materials (i.e. using 4-by-4 posts) when building a freestanding deck. In fact, for this kind of construction it’s best to over-build the deck. For example, I constructed each beam from 2-by-10 boards laminated together to form a big, brawny 4-by-10. And, although the span ratings for the beam gave me 8 feet of play between posts, I generally kept the posts no greater than 7-1/2 feet apart for extra support. That rule held true for the distance between the two beams as well, with the two rows of support posts spaced about 7-1/2 feet on center from each other. The bigger, beefier and more closely positioned your framing members are, the stronger your deck will be.

To cut a 6×6 post, I cut each side with a Skil saw and finish the middle with a reciprocating saw.
Support Beams
I started construction of the deck by laying out the area with stakes and string. I then ran two new rows of string within the perimeter, staking the location of each support post. I used a powered auger to dig the 2-foot post holes and slid cardboard footing tubes into the holes to retain the concrete. With the tubes in place, I again pulled some more string over each row of post holes, stretching it tightly and staking it on the far ends of each row. These new string lines placed over the footing tubes provided the straight lines I needed to center each tube in the hole and backfill around them to secure their alignment and position them parallel to the other row. Keep the openings of the tubes about 2 inches above the ground so they shed water.

Next, I filled the tubes with a few inches of gravel and fast-setting concrete, struck off the tops flush with the rim of the tubes and inserted 8-inch J-bolts into the center of each pier footing. Don’t leave the exposed threads of the J-bolts sticking too proudly out of the footings or they won’t fit into the post-anchor hardware and you’ll have to cut them to size. (Learn from my mistake.)

I fastened Simpson post anchors to the J-bolts of the pier footings, which keeps the posts elevated above the ground.

Determine the anticipated height of your deck, then measure downward, subtracting the thickness of the decking and the height of the joists and beam. Transfer this measurement to the posts to determine where to cut them to accept the beam.
I used adjustable galvanized post anchors (Simpson Strong-Ties item AB66) to fasten the post over the J-bolts, which keep the wooden posts elevated so they don’t absorb standing water. When setting the posts, run some new string to keep things in line, fastening the posts in the hardware square and plumb, with the post faces lining up flush with the string.

The Post-Pod from Cepco Tool makes a handy brace when setting and cutting posts
Note: Hammering nails through the hardware and into the posts can really knock things “out of whack” in regard to your footings and J-bolts. For this job I used Paslode’s new Positive Placement Metal Connector Nailer, which is a pneumatic nailer with a special guide tip designed to shoot the nails right into the tiny holes of the Simpson hardware without the imprecise impact of a hammer. This new nail gun made building the deck a heck of a lot easier.

I installed galvanized hardware at the front and rear of the beam when fastening to the posts.
I was installing 4-foot 6-by-6’s as posts, but they’re still tall enough to lean, so brace the posts with scrap lumber as you proceed.

I laminated the beams together using a combination of construction adhesive and RSS screws from GRK Fasteners.
Once the posts of each row were fastened securely, determine where they should be cut to accept the beam. This is a matter of basic math, finding the anticipated height of the deck (in my case, less than an inch below the home’s upper-level subfloor) and working downward, subtracting measurements for the thickness of the deck boards, the height of the joists and the height of the beams. I marked the first and last posts of each row at this height and then snapped a chalk line across the other posts to indicate where to cut.

RSS screws from GRK Fasteners help the construction adhesive to hold the beams together.
You have a couple of options when it comes to mounting the beams to the posts. You can cut the posts completely through and use galvanized braces to hold the beams on top. Or, you can notch the posts and fasten the beam with a couple of through-bolts at each post. I opted to use the metal Simpson braces, which you can pick up at Lowe’s or any number of other hardware stores—Simpson has more or less cornered the market on framing hardware, at least down here in the South.

I temporarily clamped on a couple of scrap boards to hold the beam on top of the posts while fastening the connections.
Note: Cutting the posts is a critical phase of construction. Use a string level, a laser level, or a hand level attached to a very straight board to keep an eye on your cutting heights and to make sure everything is level from post to post and beam to beam. Every measurement at this point determines the flatness and level surface of your deck.
Additionally, in some cases it may be advisable to engineer a slight slope to the deck that pitches downward away from the house, especially if your decking material is a seamless system which could collect water. However, I was planning to install 2-by-6 treated lumber as deck boards, which naturally shrink as they dry and create plenty of space for drainage between the joints. So, I built a level deck.
Next, I installed the beams, one 2-by-10 at a time, using some clamps and scrap lumber as makeshift braces to hold the lumber atop the posts while I made the connections. With at least one end of the board fastened to the metal post hardware, I laminated another board against it using some heavy-duty RSS screws from GRK Fasteners along with plenty of construction adhesive sandwiched between them. Again, I may be over-building here, but I wanted this deck virtually bomb-proof. RSS screws are really gnarly fasteners, with many times the holding power of nails or regular screws. Once driven, they aren’t going to budge. And, if there are any bows or warps in the lumber, the RSS screws are powerful enough to bite the lumber and pull it flush with the mating board. I drove two RSS screws slightly offset every 16 inches along the beams.

With a 40-foot run for each beam, it was necessary to splice the boards together. When doing this, always locate the splice over a post to eliminate any weak spots in the beams. I also ran the beams a bit long on each end, with plans to cut them to size later.


I covered the tops of the beams and joists with joist tape to shed water and prevent rot.
Another extra step I took with both the beams and the joists was to flash the tops of the framing members to shed water. This is a commonly overlooked step, but a great way to prevent accumulation of water which can lead to rot and overall weakening of the construction. Plus, application is so easy that it’s well worth the extra effort. I used joist tape(butyl tape), which comes in rolls, either 2 or 4 inches wide, which you roll out just like duct tape over the tops of the joists. The product is a self-adhesive asphalt mastic that creates a waterproof membrane and self-seals around screws and nails, blocking a primary pathway for water infiltration into deck joists.
Joist Installation
I was building with 2-by-8 joists running perpendicular to the house wall. Use the 3-4-5 rule or a large framing square to make sure you lay out the first joist square to the house. I then measured and marked the location of the following joists on 16-inch centers across the tops of the two beams.

Shown here is the L-shaped jig I screwed to the ends of the joists during installation to serve as a spacer against the siding.

The joists were connected to the beam with Simpson hurricane ties. Paslode’s new Positive Placement Metal Connector Nailer has a special guide tip designed to shoot nails right into the tiny holes of the metal hardware, which greatly simplifies installation.
When installing the joists I kept the ends about 3/4-inch away from the house siding to allow plenty of room for drainage and hopefully avoid debris accumulation. To do so I fashioned a simple L-shaped jig from scrap wood that I screwed to the end of each joist during installation. The jig gave me the consistent joist spacing I needed against the house.
These joists were catilevered, meaning they overhung the beams on each side by roughly 2-1/2 feet. Instead of fastening the ends with joist hangers as with the ledger-board method of construction, the joists were connected over each beam with Simpson Hurricane Ties, which keep them upright and stable in all directions. Again, I ran the 12-foot joists “wild,” snapped a chalk line over the ends after installation was complete, and trimmed them all to a matching length.


After the joists are installed, add diagonal bracing between the posts and joists to stabilize the deck. Use a recip saw to cut the bracing flush with the tops of the joists.
Rim Shot
I capped the exposed ends of the joists with a 2-by-10 rim board, positioned with its upper edge about 1-1/2 inches above the tops of the joists to conceal the thickness of the nominal 2-by boards I was planning to install as the decking. To fight the tendency of the rim joist to twist, bow or cup, I drove four deck screws through the rim board and into the ends of each joist. (Once the decking was down I would drive a fifth screw through the rim and into the edge of the decking).
I was forced to splice together the rim board as well. Center the splices over a joist, predrill holes for the screws to avoid splitting the wood, and drive the screws into the joist ends at an angle. For a belt-and suspenders approach I also glued the splices in the rim board with construction adhesive.
Note: There are many different ways to build a deck. This design would eventually have similar 2-by-10 boards attached to the sides of the deck as fascia. For this reason, I made sure to leave at least 1-1/2 inch of rim board extending beyond the corners of the deck to conceal the end-grain of the two side-mounted fascia pieces. It always helps to plan ahead.

Snap a chalk line across the ends of the joists and cut them to a matching length.

Brace for It
At this point I gave my construction a little tug here and there, and I was happy to see it was fairly stable at this point, but not completely satisfactory. For extra stability I ventured beneath the framing to nail in diagonal 2-by-4 bracing from below. The bracing ran from the support posts to the joists, and I tacked three or four framing nails at each connection to prevent movement.

When installing the rim board, use several fasteners per joist to prevent the board from cupping or warping.
Depending on where the posts were located in relation to the joists, I nailed from the side of the posts to the lower edge of the joist, or from the face of the post to the side of the joist. In some cases, the posts fell right between two joists, so I had to add some 2-by-8 blocking between the joists to give the braces a solid place to terminate. It does take some extra work, but you’ll be glad you invested it. I was amazed by how sturdy the bracing made the deck frame, knocking out practically any wiggle—and this was before the decking was installed which would tie everything together into a rigid and steadfast structure.

Left: Code requires a minimum of two 1/2″ galvanized through=bolts driven through the full thickness of a 4×4 handrail post (no notching of the posts allowed). Right: For a rock-solid handrail system I included Simpson’s Post-to-Deck Framing Bracket. This may require installation of extra blocking, but the added safety is worth the effort and expense.
Guardrail Posts and Decking
Before installing the decking I added the 4-by-4 posts that would eventually support my handrail system. I made a mark on each 4-foot post at 36 inches, the length of the post that would extend above the decking surface. I then clamped the posts in position and used a spade bit to predrill two holes through the rim board (or joist, depending on location of the post) and all the way through the full 4-by-4 thickness at the bottom of the posts. I then drove galvanized 1/2-inch hex-bolts through the posts and tightened securely with nuts and washers.
But that’s not all. For a truly rock-solid handrail, Simpson Strong-Tie offers a galvanized Post-to-Deck Framing Bracket that not only fastens to one of the two through-bolts, but also connects flush to an adjacent framing member with galvanized screws. To use these brackets I did have to install additional blocking in the locations where the post didn’t happen to fall right at the intersection of the rim board and a joist, but it was worth it. Not that I would encourage my younger family members to swing from the handrails like orangutans, but it’s bound to happen and these brackets will give me peace of mind.


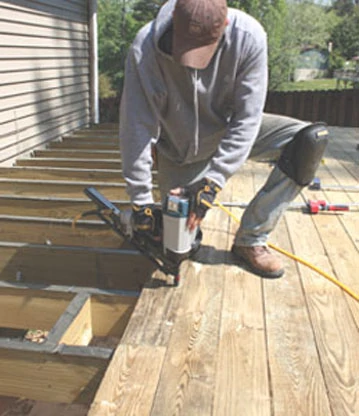
I used a jigsaw to notch the first row of decking to fit around the posts, then completed the walking surface using treated 2×6’s as deck boards.
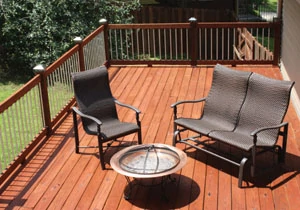
Finally, I was ready to install the treated 2-by-6 deck boards which would be stained and sealed after a month or two of drying time. Once the floor was down, the interconnection of the bracing, decking, framing and hardware worked together to create a war-ready deck platform that would barely budge at all—just what I was looking for with this freestanding deck. Now, to finish up the handrail system and build some stairs for access, which you can read about here: https://extremehowto.com/take-a-wood-deck-rail-to-the-next-level/
Side Note
Treated Wood, Tried and True
Decking comes in all sorts of materials these days, from wood-plastic composites to PVC to aluminum decking. I’ve installed some beautiful composite decks as well as easy-to-install PVC decks, all with great success. And I’m not taking sides in regard to which material is better or worse, as I think there are advantages to each material, depending on the deck application and the personal taste of the homeowner.
However for this project, I chose Wolmanized Residential Outdoor pressure-treated lumber not only for the framing, but the decking as well. For aesthetic reasons, I wanted the deck to match the natural look of the surrounding wood fence I had built the year before, and I had a plan to use the same tone of wood stain to tie in a uniform color theme to the elements of the backyard. All 2-by-4s (for handrails) and 2-by-6s (for decking) are No. 1 grade southern pine. The 2-by-8s and 2-by-10s, used for joists and beams, are No. 2 grade southern pine. The 4-by-4 and 6-by-6 timbers are specified for ground-contact use, and all the wood was treated with the same preservative, copper azole type C preservative, which is the most common preservative for backyard projects.
When building your next deck, you’ll definitely need to use treated lumber for the framing, but using treated wood as the decking also has big benefits. It offers a genuine natural appearance, it’s comfortable underfoot, it’s strong and durable, economical to purchase and easy to work with. It’s also fairly simple to maintain and serves as a renewable, earth-friendly material. To me, these characteristics meant treated lumber was the right choice for this deck.
