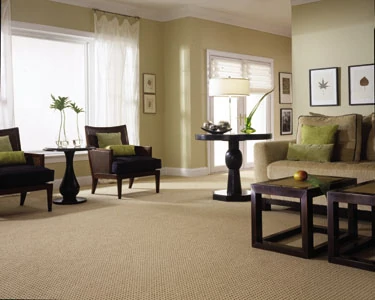
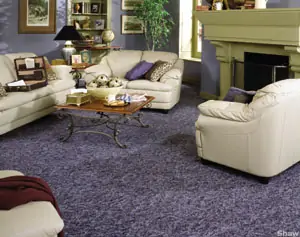
Choosing carpet as the flooring for your home offers some unique advantages over other materials. The selection of styles is practically endless. New technology makes carpet easier than ever to care for. And when it comes to comfort, carpet just feels better than stone, tile or hardwood. To quote The Big Lebowski, the right carpet can “really tie the room together.”
When it comes to choosing colors and tones for a carpet floor, you’ve got one whopper of a menu. The choices have never been greater, and narrowing the selection can seem downright daunting. The right carpet can give the room a sense of warmth and comfort or a more formal and elegant feel. There are two basic outlooks to color selection. The “feature” approach treats the color choice as a major influence on the interior décor. The “background” approach incorporates the color choice into the rest of the room’s decorative choices, complementing the overall style of the room.
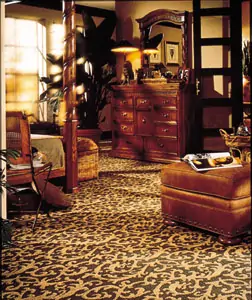
The vast array of patterns offers further stylistic options. Large areas of pattern can appear to “draw together” a room, but solid-color carpets can seem to stretch the size of the space. When choosing a pattern, interior decorators take their cues from other elements in the room. Detailed, classical patterns often complement dark, polished wood furniture, while brighter colors and simpler patterns make a good match for more contemporary décor. Also, be sure to take the room’s size into consideration. Most professionals recommend at least eight to 10 repeats of the motif to give the pattern its decorative rhythm. Keep in mind that large items of furniture will hide a lot of the design.
There is also a huge variety of textures available, from a subdued, shallow plush or Saxony carpet to more intricate sculpted effects. The choice of texture really adds to the character of the room. A lush, thick carpet in natural tones is a comfortable choice for many homes, making your floor a nice place to sit, play and relax. And it’s hard to argue that there’s anything cozier when you’re shuffling around the house on bare feet. “Cut-pile” carpets, on the other hand, have the highly finished surface seen in many professional buildings for a more reserved and unified texture.
Sound absorption is another nice feature of a carpet floor. If you have children and a hardwood floor, you know that little feet don’t always pitter-patter — they also pound-pound! And the soft underfoot properties of carpet can really detract from the racket.
Stain resistant technology is another popular feature of today’s modern carpets. You’ve probably seen the many television ads from companies such as DuPont that show spilt wine glasses and fumbled blueberry pies that clean away “magically” thanks to StainMaster technology. While the need for a little elbow grease has yet to be eliminated, removing spots from carpet is notably easier with this stain-resistant technology that works to both repel liquid at the surface and also prevent spills that may soak in from becoming permanent stains. Regular vacuuming, quick attention to spills and professional cleaning every 12 to 18 months is all it takes to maintain a carpet’s appearance.
Prep Steps for a New Carpet
Once you’ve settled on a carpet that works for your home, it is critical that it be installed correctly. A poorly installed carpet will stick out like a sore thumb; it will also wear quickly and may negate the manufacturer’s warranty.
If hiring a professional, be sure you fully understand the services offered by the retailer and have a clear understanding of what you need to prepare for the project. Additional charges may surface for “extras” such as furniture removal, removal of existing carpet and cushion, and disposal services. Ask the retailer for a fully itemized quote, and make certain that your installer will adhere to the Standard for Installation of Residential Carpet, CRI 105, for all aspects of installation.
You can determine a rough estimate of how much carpet you will need by measuring the room yourself. If you have a tape measure, ruler or yardstick, measure the length and width of the room in feet. Remember that carpet is generally sold in units of square yards or square feet, and you’ll often have to cut the pieces down to size. This means you will likely have to waste carpet or buy extra pieces to fill in bare spaces. The dealer you choose will ultimately send a professional to take exact measurements, but you’ll need a rough idea when you go carpet shopping. To facilitate this process, Stainmaster.com features an easy-to-use Carpet Calculator that allows you to type in the room’s dimensions in feet, and the calculator gives you a carpet estimate in square yards. The Carpet Calculator adds 10 percent to your totals to account for closets and room irregularities.
Once the carpet has arrived, check its texture, color and style for any visual defects. And prior to installation, complete any other ongoing projects such as painting or wallpapering. Vacuum the old carpet to minimize airborne dust, and after removing the old carpet and cushion, vacuum the subfloor.
In some cases, the padding and tackless strip beneath the carpet can be reused. But an old carpet that is in bad shape is a sign that the pad may have deteriorated as well. If the carpet is at the end of its life, the underlay pad probably is too.
Make sure the floor is dry and clean. If you’re installing over concrete, conduct a moisture test to make sure there are no signs of water problems. Excessive moisture can damage the new carpet.
Laying the Underlay
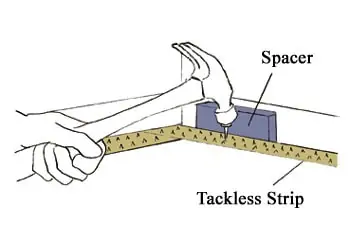
The first step is to install new tackless strips. Tackless strips are wood or metal strips fastened to the floor near the walls of a room. They contain either two or three rows of pins on which the carpet backing is stretched and secured. They’re called “tackless” because they eliminate the need for tacking carpet from above.
Cut a length of tackless strip to fit each wall. Nail the strips around the perimeter of the room. Allow a space between the wall and each tackless strip that equals roughly 2/3 the thickness of the carpet (using spacers makes this easier). Fasten the strips to the floor with masonry nails if installing over concrete. The pointed pins in each strip should always face the wall. The strips should also meet each other at the corners with no gap.
Next, lay the underlay pad. The role of the pad is to improve underfoot comfort, absorb impact on the pile and accommodate imperfections in the floor. It also helps with sound absorption and thermal insulation. Underlay pads are available in felt, foam and rubber, and your retailer can advise on an appropriate material based on your carpet selection.
Cut the padding in strips that fit the length of the room. Each padding strip should cover the tackless strips. With the “waffle” side facing up, lay out the underlay, stapling along its edges, just inside the perimeter of the tackless strip, every 5 to 6 inches. If the pad is going over concrete, you can cement the pad in place.
The edges of the pad should butt together to form an even seam rather than overlap. Trim away any excess underlay that covers the tackless strips and cover all seams with duct tape.
Carpet Installation
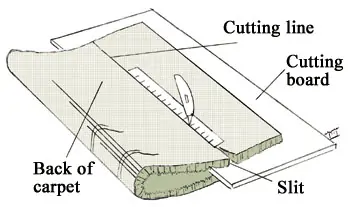
Cut pieces of carpet that will join together to cover the floor 4 to 6 inches longer than the room’s actual dimensions. After measuring the carpet, flip over the excess and trim it to fit. Use a utility knife to trim the carpet, cutting from its backside. Use a cutting board and a straight edge to guide the cut. The carpet should overlap the walls or edges of the room on all sides to allow for trimming.
If using a patterned carpet, be conscious of the pattern’s rhythm; you’ll have to measure and lay the carpet carefully to match the pattern’s motif. Be sure when laying the carpet that its pile is running in the same direction. Also, carefully consider the placement of seams. Try to locate carpet seams in less noticeable areas, but don’t expect the seams to be invisible.
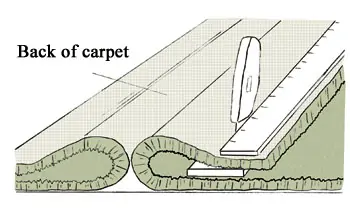
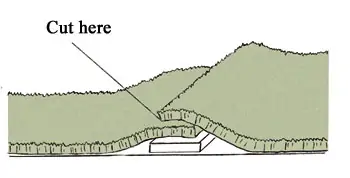
At the seams, overlap the edges of the carpet, but leave a few inches of excess where the other end of the piece meets the wall. Fold back the carpet at the overlapped seams and trim a straight edge. Snapping a chalk line will help guide the cut to ensure a straight seam. Next, overlap the new straight edges. Using the top piece as a guide, cut the bottom piece to form a flush seam.
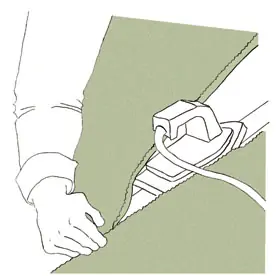
Once the seams are cut, place a strip of adhesive seaming tape beneath the pieces of carpet, centering it below the seam. The adhesive side of the tape should face upward and the seams should butt together. Use a Carpet Iron to heat-activate the adhesive by gradually pushing the iron down the tape. A Carpet Iron is a specialized flat-headed iron; don’t try to match seams without one. Once the glue has melted, press the carpet over the seams and seal it together with a rolling pin.
To attach the carpet at the edges, you’ll need a carpet Knee Kicker. This tool ensures a snug fit at walls and corners, but be aware that it can be pretty tough on the knees. Starting in a corner, hook the carpet to a tackless strip. Sink the teeth of the Knee Kicker into the carpet about an inch from the wall. Then kick the cushioned end of the Knee Kicker to push the carpet forward and fasten it to the tackless strip.
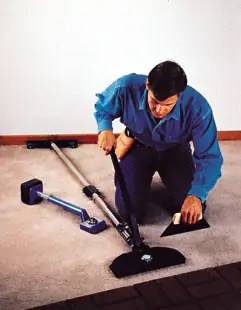
You’ll need a Carpet Stretcher to finish the installation. Once one corner is fastened, use the Carpet Stretcher to pull the carpet to the opposite wall. A Carpet Stretcher is especially critical for continuous lengths of carpet of more than 10 feet. Put the base of the Stretcher at the corner where the carpet is fastened. Use a piece of scrap carpet to pad the wall. Sink the teeth of the Stretcher into the carpet at the opposite wall, about 6 inches from the edge. Press the lever on the Stretcher, pulling the carpet into the unfastened corner and attaching it to the tackless strips. Then use the Stretcher to fasten the corner opposite from the first corner installed. Once all the corners are fastened, work your way around the room, stretching and “kick-fastening” the carpet along the walls, alternating sides and corners.
A knee-kicker is not very expensive, but a carpet stretcher can be, it and may not warrant an outright purchase for a one-time job. Fortunately you can rent this equipment at many flooring stores and Home Depot.
A Carpet Stretcher (in use) and a Knee Kicker (blue tool) help acheive a flat, professional-grade installation.
Finishing Up
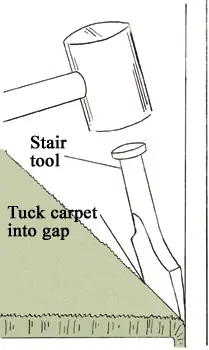
Once the carpet is fastened at all edges, use a carpet-trimming knife to trim the excess at each wall. Smooth out the rough edges by using a stair tool and hammer to push down the edges of the carpet between the wall and the tackless strips. At doorways, trim the carpet to center the edge under the closed door and install a gripper edge or metal strip to hold the carpet.
Carpet installation is a challenging job and requires some real elbow grease. But if you can procure the right tools and have the patience to do it yourself, installing a new carpet floor can add new character to virtually any room in the home.
Editor’s Note: Special thanks to the Carpet and Rug Institue for help with this article.


