

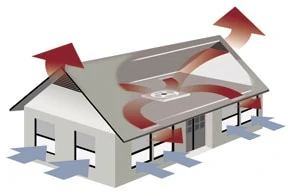
Depending on your climate conditions, a whole house fan might be a shrewd move for your home cooling system. A whole house fan harnesses nature’s own cooling ability, creating a breeze inside the house much like a refreshing breath of air on a hot summer day.
A simple and inexpensive method of cooling a house, a whole house fan operates by drawing cool outdoor air inside the windows of the house and exhausting hot interior air through the attic to the outside. It can be used as the sole means of cooling a home, or to reduce the need for air conditioning.
Simply control the air entering the house by opening windows in the rooms being occupied at that point in time. If windows are open only in one room while the fan is operating, that room will bring air inward briskly, having only one inlet to accept the air pulled by the attic-mounted fan. Opening more windows in different locations distributes the air intake accordingly. The best method is to open just enough windows to provide a breeze you find comfortable.
In addition to the excellent ventilation that can change the air in the house and vent odors quickly, the energy-conserving benefits of using a whole house fan may attract homeowners with high power bills due to extensive warm-season cooling. Humidity and outside air temperature dictate when the house fan would be favorable over air conditioning. If both a whole house fan and air conditioning are available in the home, then seasonal use of the fan may offer the optimum combination of cost and comfort.
According to the U.S. Department of Energy, using a whole house fan, which has a motor in the 1/4- to 1/2-horsepower range, uses between 120 to 600 watts and costs around $0.01 to $0.05 per hour of use. This is a cost savings of $0.15 to $0.24 per hour of use, as compared to a typical central air conditioning system or an 18,000-Btu-per-hour window unit.
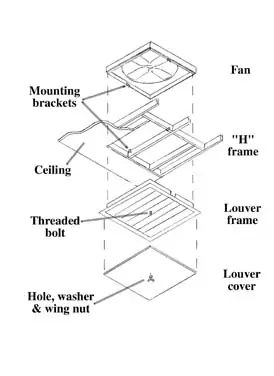
Fan Installation
Many new-model whole house fans are designed for installation with minimal alterations to attic framing. Some models are manufactured to fit over and around attic trusses placed on 24-inch centers. Some new models are designed to fit between trusses on 16- or 24-inch centers. Different options, sizes and design configurations are available for whole house fans, so there’s plenty to consider during both the selection and installation process.
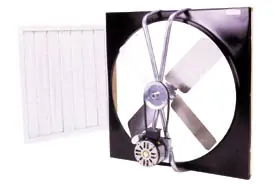
Most whole house fans use from 265 to 700 watts and are typically sized to move 2,500 to 6,800 cubic feet of air per minute, depending on the size of the house. Fan blades range from 24 to 36 inches long, with larger blades achieving greater air-transfer capacity.
As an example, this article will base all measurements on a typical whole house fan with a 30-inch-diameter blade and a sheet-metal cowling of 31 inches to allow for blade clearance. However, as size varies with make and model, carefully measure the dimensions of your specific fan and install accordingly.
First locate the ceiling trusses beneath the attic, typically located on 24-inch centers. Cut a square in the rigid board of your ceiling measured to fit snugly around the inner flange of the fan’s louver frame, ensuring a truss chord is located in the center of the square hole (do not cut a truss chord). We will assume this to be a 31-inch square cut into the ceiling board.
To support the fan properly, construct wooden “H” brackets between the exposed trusses. This will create a framed box to raise the fan above the truss system. Once sealed, this box, called a plenum box, ensures that air is drawn from the living space and not circulated from the attic. To mount a fan with a 34-inch base (30-inch blade) onto truss chords on 24-inch centers, construct “H” brackets according to the diagram:
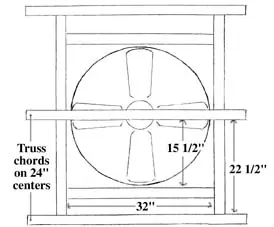
- Install two 22 1/2-inch wooden brackets (cut from 2-by-4s) between each truss, framing the blade of the fan. Separate the brackets by 32 inches.
- Because a truss is positioned in the center of the fan’s installation location, add two brackets to either side of the center truss to form a box, as shown.
- Measuring 15 1/2 inches from the center truss to allow for blade clearance, install 32-inch braces parallel to the trusses and mounted between your new brackets.
- Caulk all cracks and seams in the new H-bracketed truss frame.
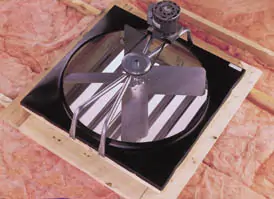
From the attic-side of the ceiling, the house fan will mount squarely onto the center truss. Measure the distance between the mounting brackets located on the fan’s housing. Install mounting brackets accordingly onto the center truss. Line up the fan’s mounting brackets with those on the truss and fasten the fan into place (bracket configuration varies among models). Then, air-seal any gaps between the fan box and truss frame so that when the fan is running, no attic air is pulled across the fan. Use house wraps, spray foam or caulk to seal the fan frame to the truss frame.
Install the louver frame of the fan from the house-side of the ceiling, but first drill a 1/4-inch hole in the middle point of the central louver. In this hole install a 1 1/4-inch-long, 1/4-inch-wide threaded bolt with a 1/4-inch nut. This will be the mounting device for the louver cover (mentioned later).
Having previously cut the ceiling board to fit the inside flange of the louver frame (31-by-31-inches), the louver frame should push snugly into the square opening. At this point it is important to ensure the louvers function properly (with no binding or sticking). Caulk to seal the louver frame flange to the ceiling.
A Fair-Weather Fan?
The whole house fan does have its drawbacks. Although running the fan whenever outdoor temperatures are lower than indoor will cool the house, the fan can cool the inside of the house only to the temperature of the outside air. And unlike an air-conditioning system, it does not dehumidify, so dust and pollen could be brought into the house through the ventilation. On the other hand, some homeowners prefer using outdoor air for cooling, finding that air conditioners dry the air too much for their preference.
Also, during cold seasons (and warm seasons if using air conditioning), a whole house fan may pose a potential energy loss because it is essentially a large, uninsulated hole in the ceiling. Because standard fan louvers do not insulate or seal tightly, you should prevent this air leakage by constructing a cover for the fan when it’s not operating.
Keeping Covered
One method to construct a louver cover is to cut a 3/4- to 1-inch-thick piece of rigid insulation board to the exact measurements necessary to cover the louvers completely. For this example, we’ll assume this to be a 30-inch square. Cover the board with white contact paper. Drill a 1/4-inch hole in the center of the square board to accept the 1/4-inch bolt you previously installed in the center louver. Install the board over the louver, pushing the bolt through the hole. Place a fender washer over the exposed bolt and secure the washer and board over the louver frame with the 1/4-inch wing nut.
Adding adhesive Velcro fasteners to the louver-side of the cover and to the louver frame helps to seal and attach the cover.
Cooling doesn’t have to rely on air conditioners. If you’re fortunate to live in part of the nation free from oppressive humidity, a whole house fan can be an effective – and economical – way to cool your house. Once your fan is installed, wired and covered, you’re ready to bask in the breeze.
SIDE NOTE 1
Installation Tips
Exhaust Air Ports: Follow the instructions included with the fan, paying close attention to the requirements for the attic exhaust area. The exhaust area is calculated in square feet. You must achieve or exceed this number, and there’s a good chance you’ll need to install extra roof vents.
The guideline for sufficient attic vent area is 1 square foot of net free vent area per 750 cubic feet per minute of fan airflow. Continuous ride and soffit vents may be adequate. However, vents with insect screens may have a net free area equivalent to only half the total open area of the vent, due to the screen interfering with airflow.
Dealing with Insulation: Many attics have blown-in insulation, and a powerful fan can create a virtual blizzard of the stuff. It may help to construct a topless plywood box surrounding the fan to deflect air to the roof. This will stop insulation from being sucked into the high-speed airflow immediately adjacent to the fan.
This box could also serve a dual purpose as a platform to support an insulated, attic-side cover for the fan, preventing air leakage when the fan is not in use.
Electrical Needs: A low-powered fan might not require a separate circuit for the fan. In any case, follow the national electric code with respect to whole house fans. If it’s necessary to install a separate circuit, and if you do not have an empty conduit conveniently available to accommodate future wirings, then locate where the large plumbing stack travels up from the basement area to the attic. Often plumbers leave enough space between the pipe and the framing to allow you to drop a string and pull a wire.
Caulk it All: Caulk all penetrations between the attic and living space, including electrical boxes for ceiling light fixtures, large cutouts for plumbing vents, loose attic hatches, exposed beams and recessed lights. A whole house fan creates a positive pressure in the attic and it is imperative that attic air is not forced back into the living space through cracks and gaps.
Avoid Backdrafts: Avoid backdrafting combustion appliances that are installed in the conditioned space. It is strongly recommended that combustion appliances not be installed in such a manner that they use the room’s air for combustion. A whole house fan is capable of pulling large quantities of air from the home and, particularly if not enough windows are open, may easily backdraft a water heater located inside a louvered closet door.
Label the Switches: Locate the fan controls higher on the wall than light switches to avoid confusion and to keep them out of reach of small children. Place labels over the switches to remind users to remove any energy-saving covers and to open at least two or more windows before using.
SIDE NOTE 2:
For more information on whole house fans currently on the market, give these companies a call:
Broan – 1-800-637-1453
Cool Attic – 1-800-433-1626
Kool-o-Matic – (269) 683-2600
Tamarack Technologies – 1-800-222-5932
SIDE NOTE 3:
Keeping Cool (and Covered)
The HV1000 whole house fan from Tamarack Technologies is equipped with twin hi-tech, super-efficient fan motors to minimize noise and power consumption. According to the company, the HV1000 is the only system with an automatic door assembly, providing an airtight seal with an insulating value of R-22. The HV1000 is designed for quick and easy installation, and the fan housing will fit joists 16 or 24 inches on center. It runs on 110 volts and exchanges 1,000 cubic feet of air per minute. For more information, visit www.tamtech.com.
