

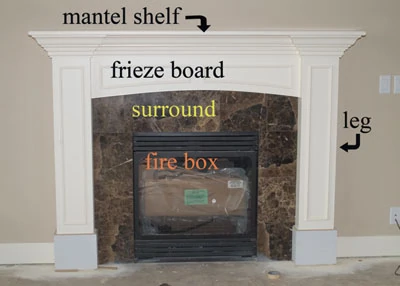
This classic mantel features an arched frieze and can be built using basic carpentry skills.
You have many options when it comes to fireplace design, like fuel types, locations, firebox liners, ventilation systems and masonry treatments. Mantels alone include a whole array of choices. A fireplace mantel can be natural wood or painted. It can include legs (pilasters) or may even incorporate a bookcase or other storage on each side. Some mantels extend all the way to the ceiling and include alcoves for displaying art or housing video screens. Surface design options include appliqués, fluting or surface designs. Raised or recessed panels can also be incorporated into the design. Mantels can be as rustic as a log set in river rock or as refined as the most elegant piece of furniture.
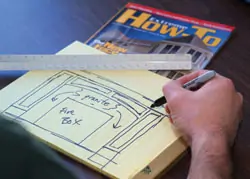
First sketch your design on paper.
Plan the Design
Mantels are either built in place or built as a unit (on or off site) and installed. How you attack your mantel job depends on your starting point. If you are building a mantel on a new fireplace install, check with any other trades for the order in which to do the job.
Some stone masons prefer to have the mantel in place before setting any surround materials while others would like to set the masonry first and then have the mantel built around it or installed over it. This doesn’t mean that the mason or stone setter should call the shots, but if they have a preference you might as well ask them before ignoring them.
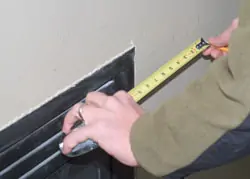
Starting with the firebox, measure and mark the width of the masonry surround, plus (3/4″). Measure from both sides of the firebox as well as above the firebox.
No matter the design or sequence of the mantel install, it must be built and installed with strength in mind. While mantels are decorative in themselves, they also function as a display shelf for the most precious of family heirlooms, so we have to make sure they are sturdy and well anchored to the house.
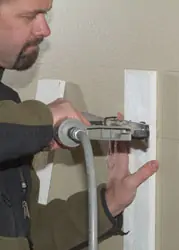
If there is no wallboard up, you have an opportunity to add some framing to help anchor the mantel. Do so as long as it doesn’t violate the required clearances for combustible materials.
Besides being sturdy, the mantel shelf itself must be deep enough to accommodate the items you wish to display there. Also, determining the mantel size is the size of the room. If the room is large and has high ceilings, you can and should build a larger mantel. Intimate spaces, on the other hand, should not be overpowered by a bulky mantel.
As the mantel shelf extends beyond the face of the legs, the wider it will be. This is because the corbels and crown moldings, which support the mantel shelf, extend to the sides proportionally to the depth.
Many homeowners use the mantel to display seasonal décor or treasured keepsakes, but for a bold and thematic touch, you might consider mounting an ornamental decorative sword above the mantel. It can fit beautifully within traditional, rustic, or medieval-inspired interiors.
The mantel design for this particular project is built around a zero-clearance firebox with a stone surround, but it will work as well with any number of surround treatments like brick or tile. The homeowner wanted a substantial sized crown molding, so we got the look by building up (or layering) two different moldings.
After measuring and marking your layout lines, cut and install the backing for the legs. The legs should extend from the bottom of the floor to the bottom of the mantel shelf. Horizontal blocks can serve as backing for the legs, depending on framing location.
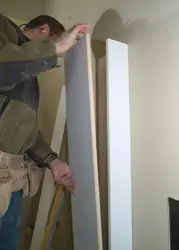
Rip the side walls of the mantel legs to width. Fasten the legs’ sides and faces with glue and nails.
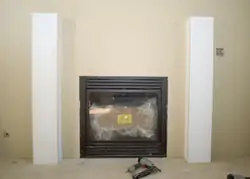
Mantel with both legs in place.
Step-by-Step Construction
It’s a good idea to start your project with a rough sketch, which is more or less to scale so you can get an idea of the proportions you think would look best. If you plan to use tile around the firebox, you can space the legs away from the firebox according to the tile width you want to use. Keep in mind that tile can be cut to width. If you are using stone it can be cut as well. Do a little research to confirm that the masonry you wish to use will work in the proportions you have planned.
Beginning at the firebox, measure and mark the width of the desired surround, plus 3/4 inch. The extra 3/4 inch allows for the thickness of the boards, which will make up the sides of the mantel legs. Measure from both sides of the firebox out, as well as from the top of the firebox up. For this mantel you will need to allow about 2 inches for the high point of the arc, which is cut out of the frieze board. For example, if you want to use 12-inch tiles, layout for 10 inches on the sides and 12 inches for the peak of the arc.
To get the mark for the top of the mantel legs, you will need to add the height of all of the exposed components up to the bottom of the mantel shelf. At each step you will lose some elevation to the area that is overlapped. For example, our crown molding overlapped the bed molding, which overlapped the frieze board.
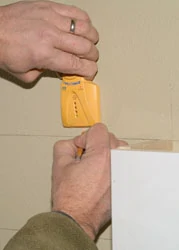
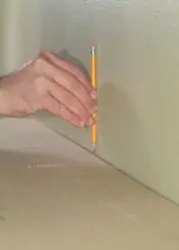
Use a level to mark both the vertical lines and horizontal lines. Measure and cut backing cleats for the legs. Depending on the location of the framing, the cleats for the legs can be vertical or horizontal. On our fireplace we used both techniques.
Rip the side wall pieces for the mantel legs. Cut the leg face pieces to length and rip them to width. Sand the saw marks off of the edges of the leg face pieces. Use a router to ease the edges.
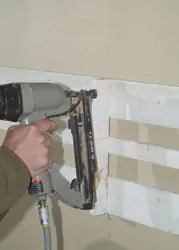
Nail the sides of the mantel legs to the backing. Apply carpenter’s glue to the edges of the leg side boards. Align the front faces on the mantel legs and nail them to the mantel leg sides.
Next, locate and mark the framing above the horizontal layout lines. Measure, cut and install cleats along the horizontal lines. Measure, cut and install furring strips to bring the frieze board out to the desired thickness.
Mark the framing above the horizontal layout lines. Then measure, cut and install cleats along the lines.
Install furring stirps to bring the mantel face out to the desired thickness.
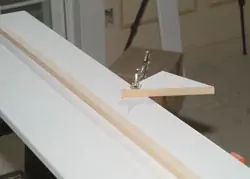
After measuring and cutting the frieze board to length, find the center and clamp a triangle-shaped scrap of wood with one point at the center line and the high point of the desired arc. Bend a thin strip of wood over the triangle point and to the corners of the frieze board and trace along the edge. Cut out the arc with a jig saw.
Sand off the teeth marks left by the jig saw. Use a section of the scrap cut off from the arc as a sanding block to match the curve of the arc. Do not ease or round over the edges of the arc.
After cutting the faceboard to length, find its center and clamp a triangle-shaped scrap of wood (with one point at the intersection of the center line and the high point of the desired arc).
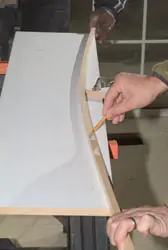
Bend a thin strip of wood over the triangle and to the corners of the face board. Trace along the edge. Cut out the arc with a jigsaw. Use a section of the cut-out scrap as a sanding block to match the curve of the arc.
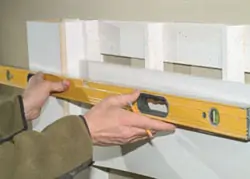
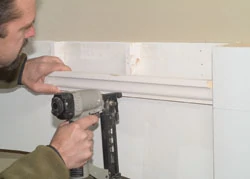
Install the frieze board over the furring strips at the desired elevation. Check the frieze board for level and nail it into the furring strips.
Lay out the bottom edge of the crown molding on the frieze board. Transfer these layout marks from the frieze board to the front of the mantel legs. Mark the bottom edge of the crown or bed molding all the way around the mantel legs.

Nail the frieze board into the furring strips.

Lay out the bottom edge of the crown molding on the frieze board.
Transfer the layout marks from the face to the front of the mantel legs.
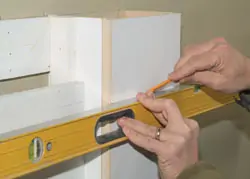
Mark the bottom edge of the crown molding all the way around the mantel legs.
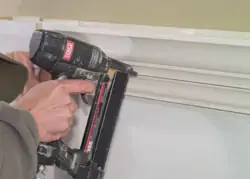
Begin the crown molding build-up with a piece of bed mold or brick mold cut at inside miters to the length of the frieze board. Follow the mantel legs with the first layer of molding all the way around the mantel legs. Measure the pieces at the point where they touch the mantel surfaces.
Mark the overlap for the next level of crown molding. Install the second level of crown in the same order as the first, beginning with the center piece and working out to the edges. Apply carpenter’s glue at all miter joints. A good technique at this stage is to cut a piece of crown just a little over size. After testing one miter for fit, hold the piece in place and mark the short point to indicate the precise location of the second cut.
A small overlap requires precise nailing. You may want to add a strip of wood to the top of the first layer of molding so you have more wood in which to nail. Measure the first round of moldings at the points where the crown will overlap.
Begin the crown molding buildup.
Work upward, adding profiles.
Close-up of crown molding construction.
A small overlap requires precise nailing. Add a strip of wood to the top of the first layer of molding so you have more wood in which to nail.
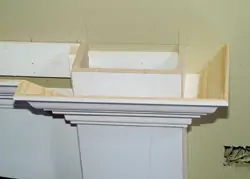
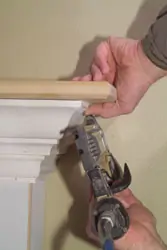
Measure and cut the mantel shelf. Note: The difference between the width of the shelf and widest point of the crown (from the wall to the front of the crown at the legs) is the “reveal.” Add twice the reveal to the longest point on the crown to determine the full length of the mantel shelf.
Use a router to shape the edges of the mantel shelf. Test the mantel shelf in place and scribe it to the wall if necessary. Fireplace framing and firebox flanges often cause bumps along the wall, which the mantel shelf must fit. Use a power planer to remove the wood to the scribe marks.
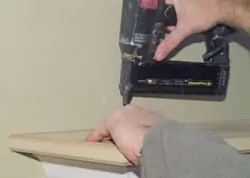
Nail the mantel shelf into the cleats along the back. Use a short level to double-check the mantel shelf from front to back and nail the crown into the mantel shelf along the sides and the front.
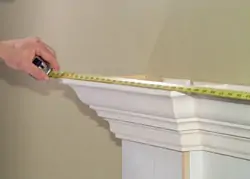
Measure and cut the mantel shelf, allowing for the reveal of the crown molding.
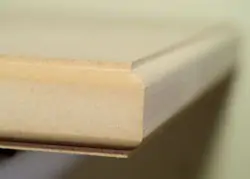
Use a router to shape the edges of the mantel shelf.
Scribe the mantel shelf to the wall. Use a power planer to shape along the scribe lines.
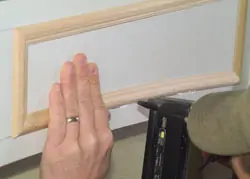
Mark the surface molding layout on the mantel legs.
Use a combo square to mark the reveal (spacing to the edge) of the surface molding along the arc. Mark the center of the arc. Layout the vertical edges of the two frames from center.
Cut and nail the surface molding in place. The miters at the arced horizontal piece will need a little extra attention. Use a couple of scraps to test the angles needed to make the connection or you can overlap the horizontal piece over the vertical and trace the angle. The new angle can be cut with a sharp utility knife.
Apply carpenter’s glue to the back of the bottom horizontal piece and bend it into place following the layout lines. When you like it, nail it.
After the stone surround is in place, mill a 1/4-inch-thick piece and bend it into place on the underside of the arc. Measure, cut and install base pieces or feet.
Add your favorite finish and the new mantle is complete.
Fasten the shelf from both above and below
Add surface molding to suit your preference.
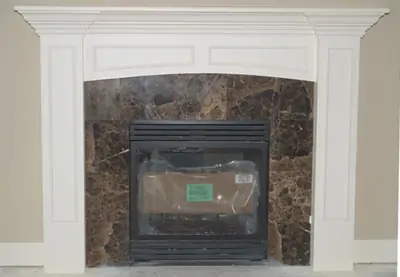
Mantel with surface molding complete and painted.
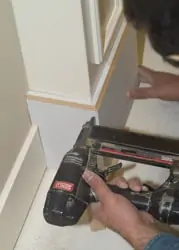
Add base molding “feet” for a finished look.
Materials
- MDF
- Table saw
- Compressor
- Nail gun(s)
- Sander
- Router
- Level
- Sliding compound miter saw
- Crown molding
- Bed molding
- 1” molding for panels
- Power planer
- Carpenter’s glue
