

Pro Tips on Building a Code-Compliant Deck
By Rob Robillard
There are approximately 40 million decks in the United States, and only half of those are code-compliant.
Deck safety is a real problem. Every year we hear about decks that collapse under the weight of people or snow load. Improperly built decks can be dangerous. Local codes were created to keep us safe, and many existing decks do not meet current safety codes.
If you’ve always dreamed of building your own deck but were hesitant to tackle such a large, complicated construction project, well I’m here to tell you it’s not that difficult. In this article we demonstrate the proper techniques for building a small, simple, low-to-ground deck.
Basic Design
Layout of a deck sometimes starts on that proverbial napkin drawing and needs to be transformed into reality. Whether you’re building off a napkin sketch or a detailed architectural drawing, you need to transfer the deck design onto the ground to get started.
I lay out the deck using 12-in. ground spikes at each corner of the deck. For better visualization you can join the spikes with string to show the perimeter of the deck. This is often helpful for decisions on size, spacing, etc. I sometimes leave the strings up for a few days and ask the client to walk around, place furniture, etc., to make sure they like the size or shape of the deck.
Joist Size
When planning a deck, one begins with the sizes of the framing material. This often is determined by the joist span needed. Joists typically extend from the ledger-board connected to the house. To reduce cost and material waste I always try to work within readily available pressure-treated lumber lengths, such as 8-, 10-, 12-, 14- and 16-ft. long boards. It helps to know what size material you can get; for example, I know that my lumberyard carries 20 foot boards but only in the 2×10 sizes. Any longer than that and you’re dealing with special orders or adding additional footings or beams to support joists that span the distance.
In my years of deck construction, I’ve found a reliable companion for safeguarding the deck’s substructure–Trex Protect. Apply this butyl-based tape to all horizontal and vertical surfaces, including all joists, rim joists, and beams, to safeguard them from rot and decay. I appreciate the comprehensive protection Trex Protect provides to my deck projects: It not only seals deck fasteners but also acts as a barrier between the wood and galvanized metal, preventing moisture penetration and eliminating splits from freeze and thaw cycles. Plus, the non-skid surface it provides makes the installation process safer. The tape is self-adhering and easily cut to size with a utility knife and comes with an industry-leading 25-year warranty.

Joist Span
When choosing deck lumber based on joist span, I use the following easy-to-remember rule of thumb that works for most of the treated wood species that
I use for building. This rule is not a substitute for a proper table of spans and sizes of framing lumber, but is helpful in over-designing my joists during the early phase.
Rule of thumb for joist span: Take the “depth of the framing member” and add half that number to determine a rough footage estimate for the deck’s joist span limit. For example, on a 2×10 take 10 and add half of that (5) to equal 15. The rule of thumb says that 15 feet is your maximum allowable span for a generic 2×10 deck joist.
In my experience this rule of thumb always comes in shorter than the building codes allow—which is a good thing! This rule also assumes you are spacing your joists 16 inches on center.
Once you have determined your joist size, use this size lumber for all components of the deck frame, ledger, perimeter rim joists and blocking. For exterior use, we always use pressure-treated lumber for our framing.
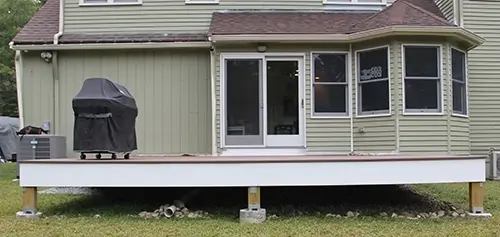
The deck we build in this article is approximately 20 inches off the ground and as a result is not required by code to have a railing system on the steps or deck. The owner preferred an open, no-railing look.
If your deck is more than 30 inches off the ground it requires guardrails or handrails.
When building decks, moisture protection is always a priority. Trex Seal aluminum-lined flashing tape stands out as a state-of-the-art solution. At 11-inch wide, this self-adhering butyl flashing tape helps prevent deck failure by forming a seamless seal over any gaps between the ledger board and the deck substructure. This waterproof barrier protects the area between the ledger board and the deck for a safe, strong, and dry connection between the deck and your home. As a bonus, Trex Seal also holds its shape better than other tapes I’ve used thanks to its aluminum liner. This feature reduces or completely eliminates the need for stapling on my decks by minimizing unruly flex back and slumping for a quick and easy installation.
Ledger Board
I start all of my decks by determining the length of the ledger board. A ledger board is the part that attaches the deck to the house. It is the first board to be installed because it sets the base for the rest of the deck.

Most decks begin with a ledger board connected to the house rim joist.
The ledger board attachment supports one end of the deck and bears about half the weight of the deck, the other half borne by the posts and footings. This means that proper attachment to the house is extremely important.
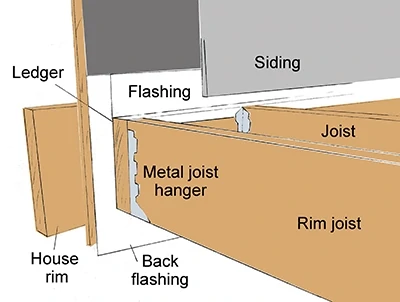
The ledger board requires continuous flashing against the house and over the ledger to prevent water intrusion. The flashing should lap up the house behind the siding.
In my neck of the woods I always try to install my ledger board so my finished deck height is 7 inches below the house interior floor. Stepping down 7 inches onto the deck reduces snow buildup and rain splashing and getting in under the house door. It also allows for me to install ledger flashing. The ledger board must be located 4 to 7-3/4 inches below the door sill. Snap a level line for quick reference (but don’t put away the level!).
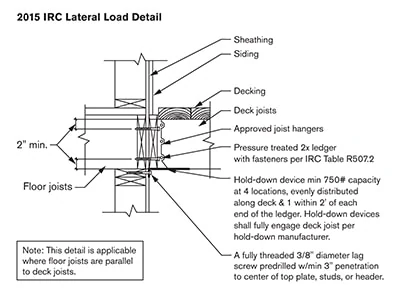
The International Residential Code requires decks supported by an adjacent house to be built with a “positive attachment” to resist lateral loads. The latest permitted lateral-load connection detail requires hardware that connects the bottom of a joist back to the wall plates, foundation, studs, or window or door headers. Check local codes for requirements in your area. (See sidebar for the latest technique to make the necessary connection)
Prior to installing a ledger board you first need to remove existing house siding and trim from the house to expose the sheathing. After ensuring that the sheathing is structurally sound, we cover the area above and below the ledger board location with self-adhering rubber.
Once the ledger is attached to the house we install a rim joist on each side and a rim or beam opposite the ledger. We use scrap lumber as “legs” to hold the two rim joists level while attaching the outer joist to complete the perimeter frame. Diagonal bracing will hold the structure square while you add permanent supports and joists.
If there is space I will run rubber 10 inches up and as far down as necessary to keep water from getting into the house. Sometimes the area below an elevated deck has siding, so I install the rubber to overlap a siding course and then cover with the last siding course or trim.
I prefer to cut our ledger board 3 inches shorter than our final frame width, which allows us to nail rim joists directly to the ledger board’s end grain.
Once we locate the ledger board height, we level it and temporarily fasten it to the house with 16d galvanized nails.
After the ledger is temporarily fastened to the house, we go back and install permanent fasteners. Check your local building code to confirm fastener spacing in your area.
If at all possible I install through-bolts through the ledger and house rim board. This requires accessing the basement rim joist area. I use 1/2-in. diameter galvanized bolts and washers for which I drill 17/32- to 9/16-in. pilot holes. Use washers at the carriage-bolt head and the bolt nut.
I also like using structural screws because they don’t require pre-drilling, are corrosion-resistant and are designed to be used with pressure-treated lumber. Follow the manufacturers’ recommendations for fastener length and placement.
Once the ledger board is level and permanently installed, we run additional rubber down the side wall and over the ledger board.
This area will later also receive a copper, galvanized or PVC ledger flashing cap.
NOTE – The latest building codes require decks supported by a house to be built with a “positive attachment” to resist lateral loads. This is accomplished using hardware connectors that tie the deck into the house to protect against lateral stresses from wind, seismic or people on the deck. Check your local codes to see if this is required in your area.
Follow the metal connector manufacturer’s recommendations for fastening any metal connector in your deck. My general rule is to use 16d galvanized nails everywhere I can.
Sub-Ledger
I’m always evaluating new deck construction products, and one that stands out is Trex Seal Sub-Ledger Tape. This 22-inch wide, aluminum-lined flashing tape forms a crucial barrier against water intrusion to enhance the overall durability of the ledger board and, by extension, the entire deck structure. I just measure up 6 inches from the top of the ledger board, snap a chalk line, and peel off the 6-inch release liner. The tape attaches beneath the house wrap for proper alignment. Then, I remove the release paper and smooth the tape down the wall to complete the installation.
Rim Joists
Once the ledger is attached to the house we install a rim joist on either side and one rim or beam opposite the ledger. We use scrap lumber as “legs” to hold the two rim joists level and then attach and outer rim joist (opposite the ledger board) to complete the perimeter frame.
You’re probably saying, wait what about the footings? I’m a bit unconventional with my footings. I prefer to build the outer perimeter or the “sandbox frame” as we joke on the jobsite. Once this frame is built we take diagonal measurements and use the 3-4-5 method to square the frame. Fastening two lengths of strapping from the outer rim joist’s center diagonally to the side rim joists helps to hold the deck square.
We then add additional “temporary” support legs and start digging the footings.
Footings
I like this method because it allows me to place my footings exactly where I want them and eliminates all the layout work with strings and batter boards that’s otherwise required to locate the footings.
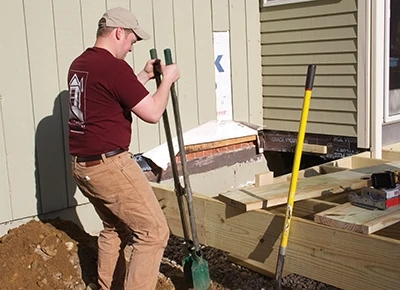
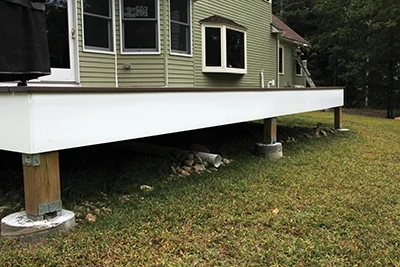
We dig concrete footings to support all deck posts.
A concrete “footing” helps support the weight of the deck by spreading out the loads created by each post over a wider area. The wider base also helps prevent frost heave from lifting the deck.
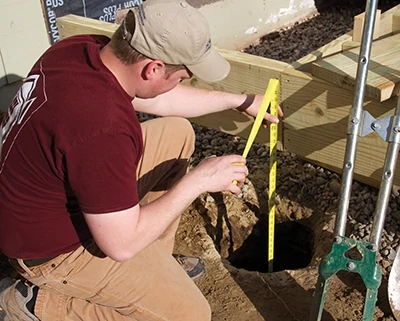
The depth of the deck footings will be determined by your local frost line and building codes.
Deck posts are supposed to rest securely and centered on these footings with a threaded anchor or J-bolt holding it down. Anchor bolts are designed to resist post movement and deck uplift from high winds.
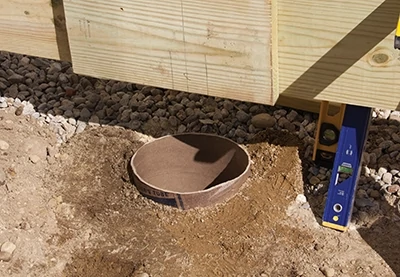
Tube-shaped cardboard forms can be cut to length and placed in the holes to pour the concrete footings.
Most deck footings these days are either poured in place or precast. When poured in place most folks use footing forms from Bigfoot Systems or an equivalent concrete form. These tube-shaped forms are simple to use, easy to install, resist settling, and prevent uplift caused by frost to result in a stronger deck foundation.
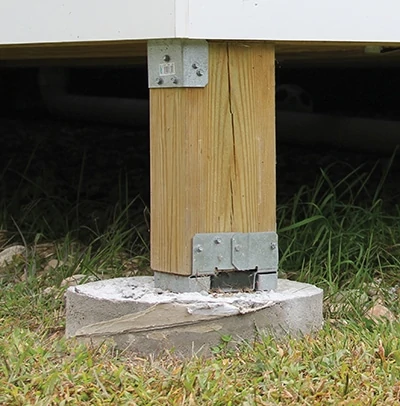
Deck support posts should be mechanically fastened both to the footing in the ground and the deck frame or beam. Metal brackets make a strong connection while raising the wood post away from standing water.
For this reason it’s always important to install deck and porch footings below the frost line for your area as well as to make sure the installed footing is on soil that will support the footing’s load.
Rule of thumb for joist span: Take the “depth of the framing member” and add half that number to determine a rough footage estimate for the deck’s joist span limit. For example, on a 2×10 take 10 and add half of that (5) to equal 15. The rule of thumb says that 15 feet is your maximum allowable span for generic 2×10 joist (16” on center.)
The frost line depth is not consistent around the nation because there is such a dramatic difference in climate from state to state. The frost line in southern Florida is less than a foot, while in northern Minnesota it approaches
6 feet. The average frost line in Massachusetts is between 30 and 35 inches. My inspector wants to see deck footings 48 inches deep. The best source of information regarding your frost-line depth is your local building department.
Footing Diameter
The diameter of the holes for your footings especially large ones, create significant concentrated loads within the soil. If you calculate the weight of the entire deck, the furniture placed on it and the combined weight of a large group of people who might be standing on it, you will be shocked at the number. Even a small deck might weigh in at 10,000 or more pounds.
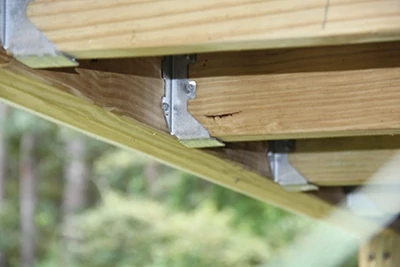
Use metal joist hangers to connect all joist ends.
If your deck has wood support posts and a ledger board that is bolted to the house, the deck posts holds up approximately 50 percent of the total weight. In this situation, the soil under each deck footing may be called upon to support 3,000 plus pounds.

Small sections of joist material can be installed between the joists as mid-span blocking to help prevent deck bounce and strengthen through-the-deck rail post attachments.
Depending on the porch load, the diameter of the hole will probably range between 8 and 24 inches. Larger diameter footings spread the weight out over more soil area. We used 12-in. diameter footings on this deck.
Footing tubes come in different lengths from 4 to 10 feet. The tubes are cardboard and are easy to cut with a hand saw.
Fill them with concrete, using a shovel to work out air pockets. Apply the J-bolt and allow the concrete to cure for one week. Once the footing is cured we install support posts. Depending on where we are on the project, I might install the joists before pouring the footing or vice versa. Either way, the temporary supports will hold the deck in place until we install and connect the deck posts to the footings.
Support Posts
Deck support posts should be mechanically fastened both to the footing in the ground and the deck frame or beam. You want to ensure that your deck support posts resist lateral and uplift movement. Deck posts should be 4×6 pressure-treated lumber and have galvanized or stainless steel connectors attaching them to the rim joist.
Decks can be built with all sorts of designs. Here, we’re doubling up the rim of a small alcove before applying joist hangers. This small area was designed to store a gas grill.
If your posts are notched to hold a beam they should be a minimum of 6×6 (nominal) and have a corrosion-resistant post-to-footing and post-to-beam connector. There are a few retrofit options available to accomplish the post to beam. These connections are needed to resist lateral and uplift loads.
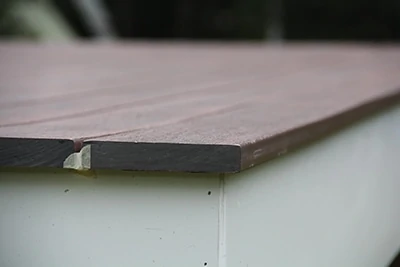
To guide our ¾” decking overhang, we temporarily face-nail a ¾” board around the rim to use as a gauge. Once installation is complete, remove the board and paint/stain the rim.
Adding diagonal bracing to both the parallel and perpendicular side of the deck post is also a good idea to reduce lateral motion and racking of the deck. Diagonal braces should be installed at a 45-degree angles 24 in. down from the beam and 24 in. out from the post.
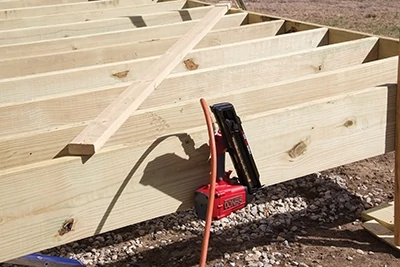
Joist Installation
Next, it’s time to install the joists. We start left to right and mark out the ledger and outside rim joist 16-inches on center in a square line.
We cut all our joists at the same time, toe-nail them to the ledger and direct-nail them through our single outside rim joist. Toe-nailing or direct nailing of joists is no longer an acceptable way to secure joists without additional support, so we add metal joist hangers afterward.
TIP: If the joist has a crown—a slight arc along its edge—install it crown-side up.
Joist Hangers
Joist hangers must meet IBC and IRC code of downward capacity. You can determine this by using an approved manufacturer’s product data based on the dimensions of your joists or header.
Use the recommended nails and fasteners for the metal connector you’re installing. Roofing nails, screws and box nails have no place in any metal connector system and should be avoided and replaced at all costs.
Also, make sure to install a properly sized nail or fastener into every metal connector hole provided.
Since we did not design a beam in this deck, the outside rim joist is then tripled, and is supported by the deck posts.
Mid-Span Support
Mid-span blocking can be used for a variety of purposes in deck building. Probably the most commonly used technique is to install small pieces of material in between the joists to help prevent deck bounce and also to increases the strength of the rail post attachment.
Often times scrap materials from your framing lumber may be used for blocking; we often use joist cut-offs.
We snap a chalk lines across the joists to lay out blocking. Install blocking in each joist bay, alternating the block along the chalk line to allow direct nailing. Install the blocking flush with the top of the deck frame.
Flashing and Trim
We install a metal or PVC flashing cap over the ledger board using roofing nails, and only place fasteners high up on the flashing.
We also like to install protective flashing to the joist tops. We accomplish this by using tar paper and staples on the joist tops, or a rubber membrane.
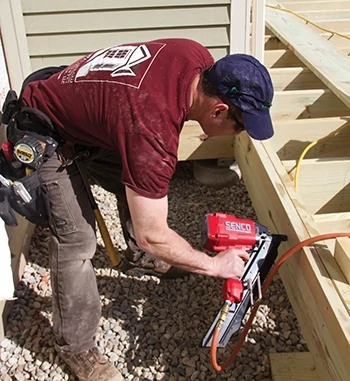
We then install all of our perimeter trim on the rim boards prior to applying decking.
Decking
A deck should complement its environment, your landscape, and enhance your outdoor living space. Your deck, therefore, should ideally complement you and your lifestyle. Whatever your reason for building a deck—for entertaining, relaxing or outdoor living, you will need to consider materials for your decking.
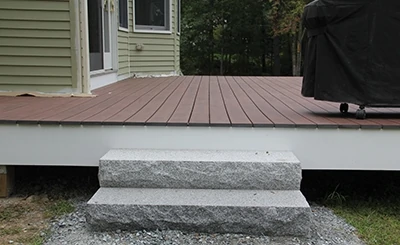
Granite steps provide access to the finished deck.
On some of our decks we use composite deck boards. Composite decking has the beauty of wood without the concerns of splintering, rotting, maintenance or weather damage. Composite decking is simple to maintain and offers superior stain, fade, scratch and mold resistance. The decking surface is also easier to clean, which equates to less maintenance.
Some brands come with matching, colored plugs to conceal fasteners. Once installed the plugs almost disappear. Also available are colored screws to match the decking, as well as various hidden-fastener systems that are concealed beneath the deck boards.

Although the deck shown in this article was low to the ground, any deck higher than 30 inches requires a handrail/guardrail system. The posts of the railing system should be connected to the rim and joists or blocking using through-bolts and metal tension ties, such as the Advanced Lateral Anchor System available from DeckLok (www.deck-lok.com).
To achieve a 3/4-in. overhang on the deck surface, we first temporarily face-nail a 3/4-in. board flush to one side rim joist. We then square one end of the first deck board and install it flush over the 3/4-in. temporary board. The temporary board gauges our 3/4-in. overhang. We let the end of the decking run long, off the deck, and cut it later with a track saw. This is faster than trying to measure each board and get the ends to match up.
If you built your deck smaller than the longest available decking board length, you can install the decking without any joints.
We use our speed squares to space the deck boards from each other during installation. This provides even, consistent and professional looking deck-board spacing.
When we get to the last few deck boards next to the house, we measure and to determine the width of the very last board. In a perfect world a full-width board would drop into place, and the deck would be complete. The reality is that the last board usually gets ripped to size, and we hate installing a 1- to 2-in. ripped board. To avoid this, we rip the final three or four boards down 3/4 to an inch and install them. This method gives the appearance of all full boards at the house.
After the decking is complete, it’s time to reinstall the siding. Some carpenters will put trim on the deck and side to that trim, or simply keep the siding off the decking 1/2 to 1 inch.
Now is the time to clean up your tools and celebrate. You’ve just built your first deck and you might as well start enjoying it.
Railing Systems
For decks more than 30 inches off the ground, railings are critical safety features. The posts should be a minimum 4×4 size and be solidly anchored to the deck joist and rim joist of the structure. Use two through-bolts and a metal tension tie for the upper bolt connection.
If a deck’s guard-posts anchoring does not have a minimum allowable tension load of 1,800 lbs. for a 36-in. maximum railing height, they should be replaced. They can be retrofitted with a tension tie, through-bolts and or blocking as needed. Follow IRC code requirements when installing fasteners into guard posts.
Guard rails can be either 36 to 42 inches high (refer to your local code for guidance). Balusters in the railing system should also be installed so a 4-in. sphere can not pass between them.
Stairs
Stairs, stair stringers and stair guards must meet the IRC design and strength requirements for tread height and opening/spacing requirements. The steps you should have a consistent tread depth with a 7-3/4-in. maximum riser height. A 3/8-in. deviation from one another is allowed by code but should be avoided.
If the stairs have an open riser they should not allow a 4-in. diameter sphere to pass through. Like the maximum spacing for balusters, this is intended to prevent small children from getting stuck or falling through.
Additional metal connectors can be used to connect stair stringers to the deck frame.
Editor’s Note: Robert Robillard is a remodeling contractor based in Concord, MA. He is also the editor of a www.AConcordCarpenter.com.
Side Note 1
Easy Code-Compliant Solution for Attaching Decks to Homes
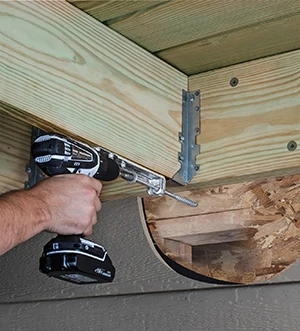
Simpson Strong-Tie introduces a new deck tension tie for attaching a deck to a home that meets newly updated code standards. The DTT1Z deck tension tie is a safe and time-saving alternative that eliminates the need to access floor joists from inside the house. Instead, it is fastened from outside the house. The DTT1Z addresses a new 2015 International Residential Code provision (section R507.2.4) that allows four 750-lb. lateral connectors to be fastened to structural framing joists members in the house. This provision is an alternative to using two 1,500-lb. lateral connections from the deck to the floor joists within the house.
The DTT1Z fastens to the narrow or wide face of a single 2x with Strong-Drive SD Connector screws. The new Strong-Drive SDWH Timber-Hex HDG screw with an integral washer attaches the tension tie to the supporting structure with a minimum of 3 inches of penetration. Learn more at www.strongtie.com.
