

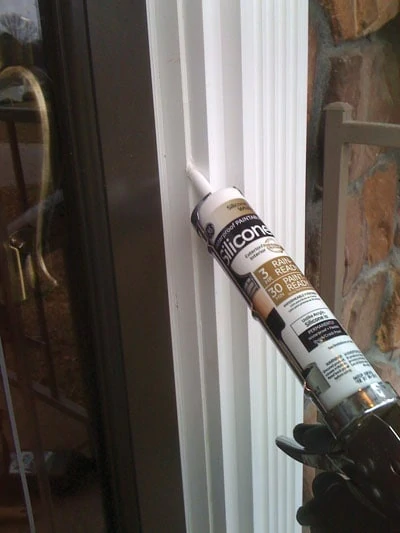
Siliconized caulk has long been a favorite for sealing areas exposed to moisture and the elements.
By Matt Weber
Applying caulk: It’s a messy job, but someone’s got to do it. Whether it’s an interior or exterior application, EHT offers 10 tips to help seal your joints with success.
1. Sealant Selection. When it comes to sealing joints for a trim installation or to weatherproof windows, choosing the right caulk/sealant is the first order of business. Silicone-based sealants have long been the staple for exterior projects where a waterproof seal is necessary. However, standard silicone cannot be painted and is incredibly messy and sticky to use. Newer formulations of silicone-based sealants can be painted—but only if indicated on the packaging—so pay close attention when buying.
Many pros now prefer polyurethane-based sealants for siding, windows and doors, because it stays flexible and doesn’t shrink, it has better adhesion than silicone—plus, it’s paintable.
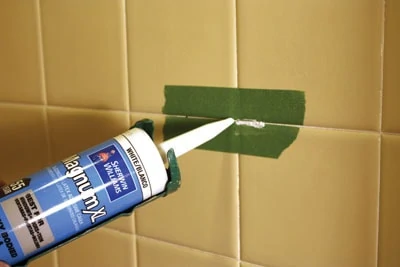
Silicone sealants work well for use in the kitchen and bath. They can be purchased with antimicrobial additives to fight mold and mildew, and can be easily removed and replaced when the bead gets grimy.
Acrylic caulk is only appropriate for interior projects and is not waterproof, nor is it very flexible and may crack over time. However, acrylic caulk can easily be painted and is much easier to tool and clean up than silicone. Standard acrylic caulk is primarily decorative and not intended to serve as a sealant, but it is also the least expensive option.
These days, many caulk/sealant products come in hybrid formulations containing some of the attributes of both silicone and acrylic, meaning they can be cleaned or tooled more easily, remain flexible, can be painted and still retain a waterproof seal.
Complicating the selection further is the advent of water-based and solvent-based caulk/sealants that have similar hybrid properties, and many of these new sealants serve double-duty as adhesives. Like silicone, solvent- and water-based sealants work well in wet areas where accumulated water would deteriorate acrylic latex.
For use around electrical wires and fixtures, use a fire-resistant caulk as an additional safety measure.
The easiest way to parse the many options is to pay close attention to the indications on the packaging, making sure they match the job at hand. Whether the product is waterproof, paintable or contains a mildew-cide additive, all features of the product should be listed prominently on the label.
2. Clean Caulking. Before applying any caulk or sealant, clean the surface of the work area thoroughly. This commonly overlooked step will prevent grit and debris from disrupting the application of the bead and keep unsightly dirt and dust from becoming embedded in your fresh caulk.
3. Tape Works Well. There’s no shame in masking off a caulk bead with painter’s tape. It’s an easy way to eliminate mess if you’re not an ace with the caulk gun, and can spare you a lot of time and frustration spent cleaning up sticky excess. Tool the edges of the bead level with the tape before peeling it off, and always remove the tape before the caulk dries.
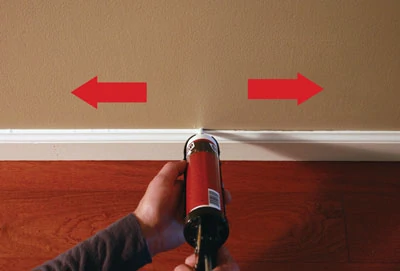
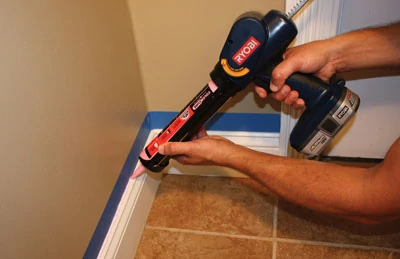
4. The Right Angle. Hold the caulk gun at a 90-degree angle to the wall as you move the gun to lay the caulk bead. The right-angle position strikes a balance between pushing and pulling the bead for consistent application and easy visibility on both sides of the nozzle.
5. Spray it Smooth. One option for shaping a caulk bead comes in the form of sprayable release agents, such as Caulk EZ. With these products, spray the completed caulk joint, holding the can or bottle 4 to 6 inches away. The release agents prevent the caulk from sticking to the areas you spray and make shaping the joint much easier.
6. Tools for Tooling. A simple caulk shaping tool is a short wooden dowel (or a variety of dowels of different sizes to create beads of varying sizes). Wet the wood and draw the round end of the dowel over the caulk bead to scrape away excess product and press the bead into a concave shape. Another option is a shaping tool such as the Hyde Caulk-Rite Pro Tool. These new rubberized shaping tools have a large enough working surface to clean away most of the excess caulk while offering a variety of bead shapes, and leaving no edge marks. Shaping tools are easy to use and wipe clean when done.
7. Caulk a Tub. When caulking a bathtub, fist fill the tub with water. The weight will pull the tub downward, maximizing the size of the joint. Apply the caulking along the edge of the tub in full contact with both vertical and horizontal surfaces. This prevents future stress and cracking of the caulk joint. Once the bead is dry, drain the water.
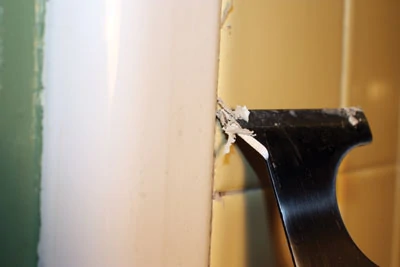
8. Remove Old Sealant. To remove a grungy bead of silicone for replacement, cut through each side of the bead with a utility knife and pull it away by hand. If you’re lucky, most of the bead will stay intact as a strip. To remove any remaining sealant, scrape it with a paint scraper held at a shallow angle. Finish up by scrubbing the surface with mineral spirits and an abrasive pad to get rid of any residue. Once clean and dry, apply a new bead.
9. Seal Big Joints. To seal a joint larger than 1/4-in. wide, use a foam backer rod as a filler before applying the caulk. Less expensive than caulk, the rods provide a cheaper way to fill the empty space than using caulk alone. Plus, when caulk is applied over a backer rod, it forms an “hourglass” shape with large surface areas of adhesion at the sides of the joint. The hourglass shape of the caulk bead withstands joint movement better than any other configuration. Furthermore, because there is no caulk adhesion at the rear of the joint, the joint is less susceptible to stresses that cause early failure.
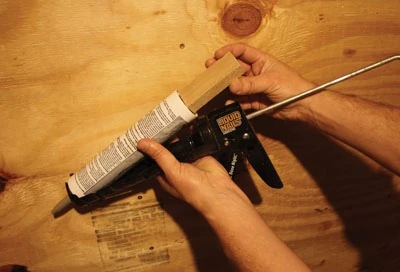
10. Get the Last Drop. Because the plunger on most caulking guns doesn’t extend all the way to the end of the tube, roughly 1/2 inch of caulk usually remains at the bottom and ends up in the trash. To salvage this last bit of usable product, remove the tube from the gun and use a short section of 1-1/4-in. thick dowel or a narrow wood block as a plunger extension. Drop the extension in the tube, replace the tube in the caulk gun, and depress the trigger until the tube is completely empty.
Side Note 1
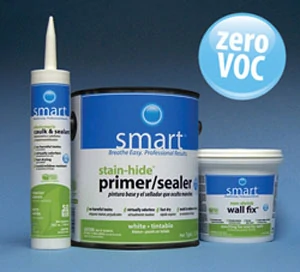 SMART Elastomeric Caulk & Sealant
With no harmful, irritating fumes, SMART Elastomeric Caulk & Sealant from Gardner-Gibson is a premium zero-VOC caulk that is ideal for occupied spaces. It promotes cleaner air for all; especially seniors, children and allergy and asthma sufferers. This crack-resistant seal is great around doors, windows, baseboards, moldings, countertops, trim and other adjoining surfaces. Apply on painted or bare surfaces, including wood, metal, brick, concrete, plaster, masonry, dry-wall or ceramic surfaces. It’s compatible with all latex and acrylic paints and cures quickly to speed topcoating. The SMART zero-VOC product line also includes primer and spackling. Visit www.gardner-gibson.com.
Other Caulking Articles
- Sealing and Waterproofing
- Caulking: Lay a Better Bead
- Chalk it up to Caulk
- The Latest News on Caulks and Adhesives
