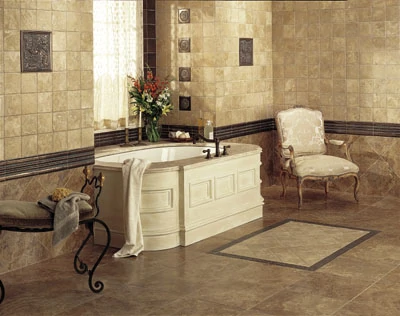
Installing wall tile is basically the same procedure as installing floor tile. And it offers the same advantages: flexibility of design; a wide range of colors, materials and patterns; and if installed correctly, years of durability. Ceramic or porcelain tile makes an attractive backsplash behind sinks and stoves, or encasing a bathroom or shower. It’s a strong and easy-to-clean material that offers great decorative advantages for areas exposed to water, while resisting moisture intrusion and protecting the walls of your home.
Extreme How-To caught up with Larry Ricketts, a 40-year veteran in the homebuilding and remodeling business, to get some professional insight on how to install wall tile. Ricketts was working in the home of Mr. Jeni Doshi, installing porcelain wall tile on a new shower enclosure, including a decorative border to give the shower a nice, finished look. He notes that while wall tile requires a similar installation procedure as floor tile, there are a few things to consider when choosing tile for areas exposed to water.
The Right Tile for the Job
Don’t base your tile selection only on color and size. Not all ceramic tiles absorb the same amount of water, so you’ll need to speak with your tile dealer about the right tile for a shower. “Nonvitreous” is the term for tiles that absorb the most water, and this type of tile should be avoided for showers, tubs and sink countertops. “Semivitreous” tiles are rated for low absorption, and can be used for splash areas. But for this shower enclosure, Ricketts went with a high-density, glazed porcelain tile that will absorb no moisture at all. Porcelain tile, specified by Mr. Doshi, ensures a long, attractive tile life in the shower and eliminates worries of water seeping behind the tile and rotting the wall beneath it.
The shape and size of tile is another option to consider. For flat areas, larger tiles of about 12 inches result in a nice, orderly appearance and are available in a wide range of materials. They can be cut to various sizes and shapes. Installing large pieces of tile can also be considerably easier than installing smaller tile. It simply takes less time to lay fewer pieces in the same amount of space, as opposed to an option such as mosaic tile. Mosaic is a good tile for small or curved areas because it is generally no larger than 1- to 2-inch squares. These small tiles can be more easily installed on a curve, because the joints between tiles allow the finished plane of tile to “bend” around problem areas rather than bridge them, which ensures the entire rear surface of the tile is securely anchored in mortar. Mosaic tiles are available with or without a moisture-resistant glaze.
Surface Preparation
Ceramic tile can generally be installed over nearly any clean, flat surface, as long as that surface can support the weight of the tile. However, for shower and tub enclosures, it is important to install 1/4- or 1/2-inch cement wallboard to support the tile. The wallboard, being a cementious material, will resist water should there be any cracks in the grout that allow water to seep behind the tile. Should this occur, the cement board will still protect the wall behind it.
Use a carbide blade or circular saw to cut the cement board to fit the area to be tiled. Anchor the board with thinset mortar and galvanized screws fastened about 6 inches apart. Fill the joints with thinset, and use fiberglass tape to seal the seams and joints where the cement board meets the original wall.
Tile Layout
When it comes to tile installation, layout is crucial. The first and foremost rule of tile layout: Make sure your pattern is square. Before laying your first tile, snap a couple of chalk lines to guide the installation. First step is to measure and mark the midpoint of the wall’s location. Because wall tile doesn’t always extend up the entire wall, base the midpoint of the tile layout according to where the tile installation will begin and end. Snap intersecting chalk lines at the center point of the site, forming a square cross. Align an A-square at the chalk-line intersection to check that the lines form right angles. If that’s not the case, then readjust the chalk lines.
If you’re new to laying tile, it may help to mark the wall with guidelines that represent where the tiles will be located. Form a grid, with each line level and square. If you plan for thick mortar joints in your tile layout, then account for the spacing of the joints when you draw your grid. These lines will help you install the tile straight. If necessary, adjust the center of the grid so that the last tile at each edge of the wall is the same as its opposite side. In other words, the top and bottom rows of tiles should be the same size; the far left and right rows of tiles should be the same size. This ensures a symmetrical layout.
Aside from the basics of a symmetrical, level and square installation, the style of layout is left up to the installer. There are plenty of options available to spruce things up, such as decorative borders, cap molding and accent tiles. When working with these decorative features, Ricketts suggests paying close attention to the focal points of the layout. He explains that when someone walks into a room, their eyes are drawn to whatever is in front of them. Keep this in mind when installing patterned tile. Your pattern, as seen with the decorative border that Ricketts installs, will inevitably have to break at some point. Because the door in this bathroom is on the left-hand side of the room when facing the shower, Ricketts breaks the border’s pattern at the left-hand corner of the shower enclosure – the least noticeable focal point when someone walks through the door and into the bathroom.
Installation
With your guidelines in place, make sure the wall surface is thoroughly clean of any dust or debris. Ricketts then suggests using a pre-mixed thinset mortar as adhesive (make sure the mortar is specified for high-moisture areas). Scoop some adhesive with your notched trowel and spread it evenly over an area of about 3 by 3 feet. Use the notches in the trowel to comb out the adhesive to form ridges. Hold the trowel at a consistent angle of about 45 degrees so the top ridges of the mortar have a uniform height. The pattern of the ridges is not important.
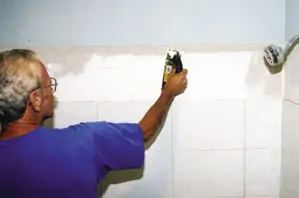
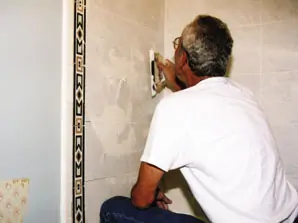
Apply the mortar to the wall, creating 1/4-inch ridges with the trowel. Press the tile firmly in place, making sure it is flat and level.
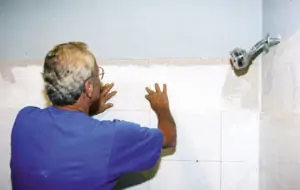
Next, press the tiles into place. To keep grout joints uniform, use small plastic spacers between the tiles. Spacers are usually available from your tile dealer. In this case, however, Mr. Doshi requested that the grout lines be very small. To accommodate this, Ricketts butts the tiles against one another which results in a very fine, hard-to-notice joint between the tiles, once the grout has been applied. After installing the tile, check it with a level to make sure the installation is straight. Repeat this process until the entire area is tiled.
Sometimes tight or uneven spaces eliminate the ability to trowel mortar over the wall surface. In this case, “butter” the mortar onto the back of the tile just as you would a piece of bread (but with more mortar than butter). Notch the mortar on the back of the tile with a trowel and press it onto the wall as usual.
Cutting Tiles
You’ll inevitably have to cut tiles to fit the last rows, to fit around soap dishes, pipes or any other obstructions. The most productive and professional way to go about this is with a wet saw equipped with a diamond blade. If you don’t own one, these can usually be rented from your local equipment supplier. A wet saw includes a brace and guide to stabilize the tile as you cut. This is also the best way to achieve a fine, smooth cut in hard, dense tile such as porcelain.
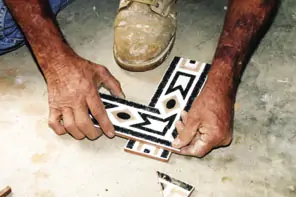
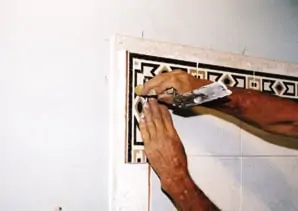
Rather than butt two border tiles together at a corner, Ricketts goes the extra mile to cut 45-degree angles where the two tiles meet.
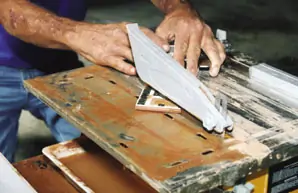
A wet saw with a diamond blade is a great way to make a smooth cut in porcelain tile.
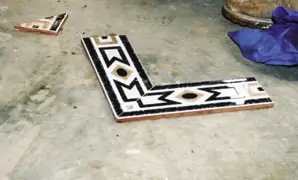
The mitered tiles preserve the continuity of the border pattern, which is especially important in areas of high visibility.
Otherwise, a standard tile cutter can be used. Simply mark the tile where it needs to be cut and go for it. Tile nippers are also available for small cuts, as for fitting around pipes. Nip off small pieces at a time and work toward the edges of the intended cut. The edges of the cut tile can be smoothed with 80-grit sandpaper. Keep in mind that most plumbing fixtures come with escutcheons that will cover up rough edges of tile.
Also, when positioning the cut tiles into the layout, try to keep the cut edges hidden as much as possible. “When using cut tiles, try to place the cut edge of the tile toward the far wall where the eye won’t pick it up,” says Ricketts. “Keep those edges pointed away from where people will usually be seeing it, because they can become noticeable if the edges are pitted from the saw.”
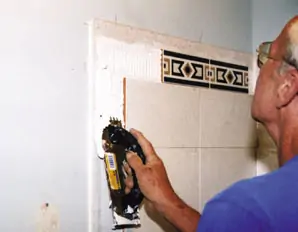
Ricketts applies mortar for the border tile.


In tight or uneven areas, such as corners and edges, it may help to “butter” mortar onto the back of the tile.

Edge tiles can add a smooth decorative transition to the non-tiled wall surface.
Grout Application
With all the tiles adhered to the wall, you’re ready to grout the joints. Use a rubber-bottom float to work the grout into the joints.
“I work the float in a diagonal motion,” says Ricketts. “Applying the grout at an angle prevents the lip of the float from dipping into the joint and removing any grout you’re trying to apply. This keeps the joints smooth and full of grout.”
Work the float up and down to get an even fill of grout. Then sweep the float across the tile surface to remove any excess. Remember, if you’re tiling a tub or shower, make sure to use waterproof grout.
Apply the grout with a rubber float.
The grout will leave a murky film on the surface of the tile. Before it has a chance to dry, remove this film with a sponge and water. Just wipe away the grout film with one side of the sponge over an area of about 3 feet, then flip the sponge over and use the other side to remove any remaining film in the same area. Rinse the sponge and repeat. Swapping sides and rinsing prevents the damp sponge from accumulating grout, which can just smear the film rather than remove it.

Remove any excess grout with a sponge and water.
In the case of tiling a bathtub, it may be smart to fill the tub with water. The weight of the water may be heavy enough to pull the tub downward, away from the tile and grout. Use a silicone or latex caulk to fill the joint between the tile and tub.
Thanks to Ricketts’ careful installation and attention to detail, Mr. Doshi had a nice, new shower enclosure with decorative features and the long-lasting durability that comes with porcelain tile. And you can do the same. Have fun tiling.
Tools and Materials
• 1/2-inch cement wallboard or water-resistant wallboard (amount depends on job)
• Wet saw with diamond blade
• Galvanized wallboard screws
• Fiberglass tape
• Pencil
• Level
• Tile Adhesive (Thinset mortar)
• A-Square
• Notched Trowel
• Selected Tile
• Plumber’s Putty
• Glass Cutter
• Grout
• Rubber Float
• Sponge
• Tile nippers
• Caulk
• Utility Knife
• Sandpaper