


I’ll give you fair warning—woodworking lathes are addictive. Although they appear daunting to first-time users, lathes are fun and can be used to create a wide range of projects. Lathes are commonly used for small projects such as bowls, platters, even pens, as well as furniture parts and cabinetry. Several techniques are used, with two basic turning methods, spindle turning and faceplate turning. The five projects included use both methods as well as duplicate turning, and something quite different.
Turning projects on a wood lathe is fun, interesting and a great way of “turning” small scraps of wood into lots of interesting presents.
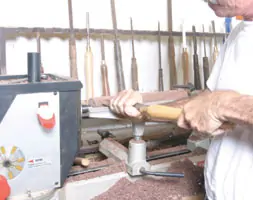
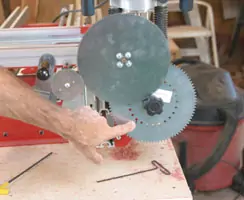
A number of manufacturers make lathes. They range from small to super-size heavy-duty models. The lathe shown is a Craftsman Professional 15-inch, variable speed model. It’s a mid-range size, but well designed with cast iron construction for heavy-duty work. Features include a one-horsepower motor to provide plenty of power. The motor maintains full power even at the slowest speed. The headstock swivels 90 degrees allowing for 20-inch outboard turning. A 24-index stop at 15-degree intervals allows you to use the lathe for router fluting and beading. The lathe has a 37-inch maximum spindle length and 15-inch inside bowl-turning capacity. The lathe comes with a 6- and 12-inch tool rest, spur center, bearing center, 4-inch faceplate and lathe center removal rod. In addition, we added accessories including the Craftsman Bowl-Turning Kit and Craftsman scroll chucks, as well as a work arbor with chuck and key.
Turning blocks can be purchased in a variety of sizes from local sources or mail-order. Cut the blocks to square before turning.
You will also need turning woods, which you may be able to purchase locally. Turning blanks are also available from a number of mail-order sources. Packard Woodworks carries all types of turning supplies from tools to wood to finishes.
Editor’s Note: The instructions in this article are for specific woodworking projects. All blueprints are at the end of this article. If you’re new to lathe work and want to learn the basics, check out “A Lesson in Lathes” by Monte Burch at www.extremehowto.com.

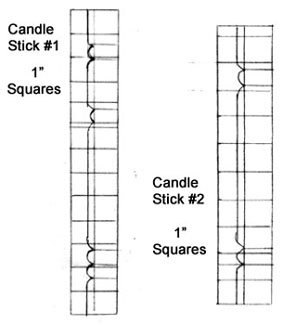
Turned Stone Candle Holder
Of course you can’t turn stone on a wood lathe, but with today’s “textured” spray paints such as Rustoleum MultiColor Textured Spray Paint you can easily simulate a stone “sculptured column.” The candle holder shown was turned from scraps of red cedar. Any scrap materials you have will work, but softer woods that turn easier and don’t show the grain are the best choice. The turning combines both spindle and face-plate turning.
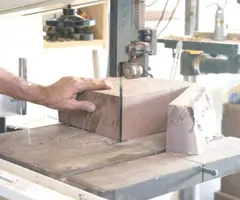
Mark diagonally across the ends of the block to locate the centers. Cut the corners off the turning block at a 45-degree angle on a table saw. This cuts down on the rough-into-round step.
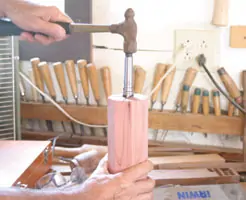
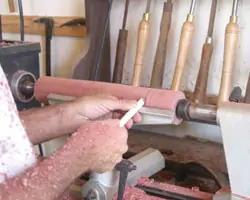
Cut on the diagonal lines of one end with a fine-toothed saw to about 1/16″ deep. Tap the spur center into the cuts.

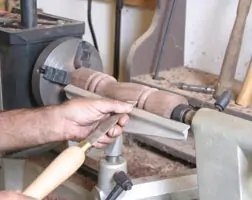
Cut the block to round using a gouge lathe chisel, and smooth up the surface with a skew chisel.
Draw diagonal lines across the ends to locate the centers. Using a fine-toothed handsaw, make cuts in one end following the diagonal lines to about 1/16-inch deep. Tap the spur center into the slots. The first step is to enlarge the squared drawing and create a pattern for the spindle portion. You can speed up the rough-in by cutting the corners off the stock on a table saw set at 45 degrees. Rough cut the stock to round with a gouge chisel. Use a straight skew chisel to smooth up and create a straight-sided cylinder.
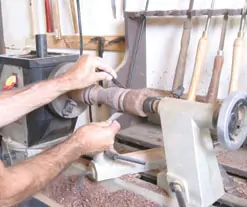
Mark the locations for the grooves with a pencil.
Then cut the grooves and rounded bead with a skew chisel.
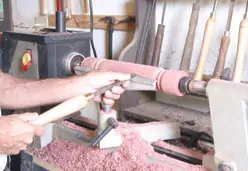
Locate the beads and mark their locations on the block with a pencil. Turn on the lathe and add more to the pencil marks for easy definition. Use a spear-point chisel to rough-cut the beads and finish the beads with a skew chisel. Sand the turning smooth in the lathe with progressively finer grits of sandpaper cut into strips. Part the stock from the lathe with a parting tool to about 1/2-inch and finish cutting off with a fine-toothed handsaw.
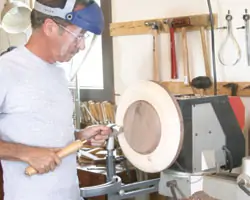
The bottom and top portions are turned using a faceplate to hold the stock.
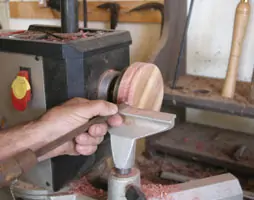
Cut a 3-by-3-inch square block of 3/4-inch stock for the base. Mark diagonally from corner to corner to establish the center and use a compass to mark the circumference of the base. Mount the stock on a faceplate with screws. Turn the base to round, and cut the decorative edge on it. Sand smooth.
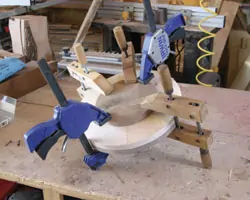
The flutes for the “column” are cut with a Legacy Revo milling machine and router.
The machine has an indexing head that allows you to precisely cut the flutes.
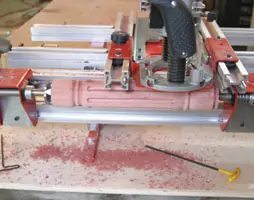
Shown are the resulting flutes for the candle holder.
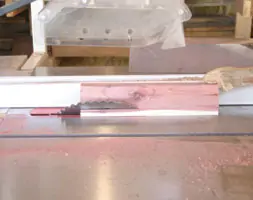
You can leave the candlestick as is, or you can flute it with a fluting bit in a plunge router and using a hand-made fluting cradle set on the lathe bed rails. The fluting shown on this project was done with the Legacy Revo milling machine, which is extremely simple and precise. The machine has an indexing head and a tail and headstock to hold the work piece between centers. Cut the top sections on a bandsaw. Fasten all pieces together with glue and apply the textured finish.

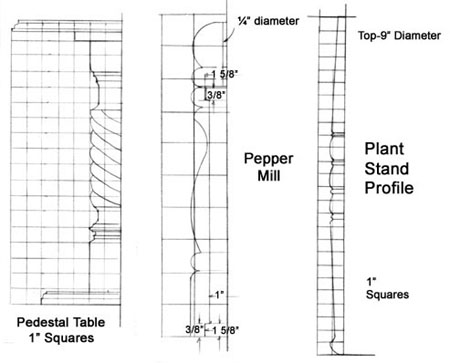
Pepper Mill
A pepper mill is a fun, practical and challenging turning project that makes a great Christmas present. The grinding mechanisms are available from several sources, including Packard Woodworks. The mechanisms are available in several sizes, and come with full instructions for turning the mill and installing the mechanism.

Round the turning blank of the pepper mill using a gouge chisel.
Smooth up the round stock with a skew chisel.
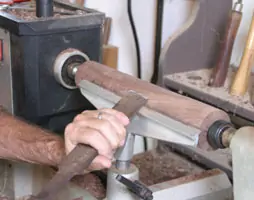
This is basic spindle turning with a few added challenges. Spindle profile turning is the simplest and a great way to learn how to turn wood on a lathe. Start with a small spindle and a soft to medium-dense wood. Walnut is a good choice. A good size is a 2-1/2-by-2-1/2-by-12-inch turning block. Enlarge the squared drawing located at the end of this article and create a pattern. The mill body is turned between centers. Rough cut to round using a gouge chisel and then use a skew chisel to smooth the cuts. Use a gouge and skew to complete the profile.
Cut a shoulder on the upper end of the body using a parting chisel. The shoulder should be 1-3/4″ in diameter and about 3/4″ long.
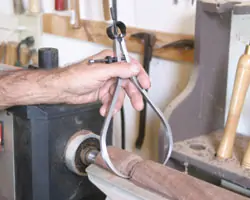
Calipers are used to check diameters throught the turning process.
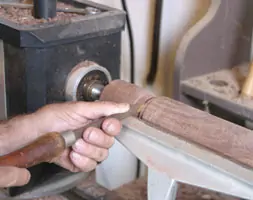
A portion of the top end must be turned down to 1-1/2 inches and will then be placed in a four-jaw chuck for boring the holes in the body. Once the body has been turned and sanded, apply a finish while still in the lathe. Apply a coat of salad bowl finish, allow to dry, buff with extremely fine steel wool and apply a second coat. Or, you can use polyurethane varnish. Once the second coat is dry, buff with a soft cloth.
Remove the blank, saw off at the shoulder and mount in a 3- or 4-jaw chuck. Turn the mill body profile using small gouges and skew chisels.

Use a parting chisel to square the bottom.
Place the body in the chuck, remove the tailstock and use a work arbor chuck with a forstner bit. Position the bit in place and turning at slow speed, use the tailstock to bore a 1-5/8-inch hole in the end. Then bore a one-inch hole as deep as you can into the body. Reverse the body and bore the top end 1-5/8 inches for the cap tenon. Then bore the hole in the body to complete the through-body hole. Use a fine-toothed handsaw or bandsaw to cut off the waste. Or, you can simply turn the body and use a drill-press to bore the holes. Make sure the stock is positioned perfectly parallel to the drill by clamping with a large c-clamp.
Sand the body while still in the lathe.
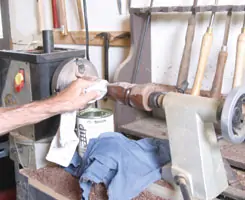
Then apply finish and buff while still in the lathe.

With the body still in the chuck, use a forstner bit in a work-arbor chuck to bore the holes in the mill body. Finally turn the cap.
Turn the cap with a tenon on its end to fit in the recess in the top of the body. Assemble the mill mechanism and mill according to the manufacturer’s instructions.

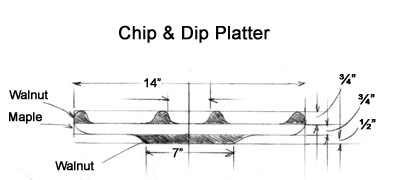
Chip and Dip Platter
Segmented turnings are fun, eye-catching projects, and the chip-and-dip platter is a typical example of what can be done. The platter is made of maple and walnut for contrast. The first step is to glue the large maple and walnut sections separately to create the width needed. Use Titebond III glue and make sure the boards are clamped flat and not warped or twisted. Once these boards have dried overnight, remove from the clamps and belt sand all surfaces, or run the boards through a planer to remove the squeezed out glue and create smooth, flat surfaces.
First step is to glue-up the stock alternating walnut an dmaple blocks. Use Titebond III waterproof glue.
Glue the top walnut segment to the maple segment, again clamping securely and making sure the assembly is square and not twisted. Once the glue sets, cut the glued segment square. Mark diagonally across the corners to locate the center on both the walnut and the maple face. Mark the platter circumference using a compass and cut the platter circumference to shape using a bandsaw. Cut a square for the bottom walnut segment. Note it is smaller in diameter. Locate the center of the square, mark its circumference and cut to shape. With a small square, mark across the edge of the segment at each diagonal line. This allows you to locate the smaller segment precisely on the maple segment by aligning the lines. Glue and clamp securely.
Segmented trunings using two different wood species are fascinating and fun projects. The project shown is a chip-and-dip platter using walnut and maple.
This is strictly face-plate turning. You’ll need a sturdy faceplate and a lathe with a 14-inch turning capacity, or outboard turning capacity. The Craftsman lathe shown has a swiveling head, and with the Craftsman Bowl-Turning Rest Kit, you can create turnings up to 20 inches on the outboard. Mount the faceplate on the top or large walnut segment, making sure it is centered.
Set the lathe motor to the lowest speed, in the lathe shown, 400 rpm. Mount the faceplate on the lathe and set up the tool rest to round the platter edge. Turn the blank by hand to make sure the turning doesn’t touch the rest. Turn on the lathe and round the edge with a gouge, followed by a skew to flatten it. Move the tool rest to the face or bottom side of the platter and turn the walnut “foot” to shape. Round the maple segment from the foot to the walnut face piece and sand the entire bottom side smooth.
Remove from the lathe. Remove the faceplate from the top walnut segment and place it on the smaller bottom segment. Make sure it is centered. Remount the turning on the lathe and turn the top and inside of the platter. The finished top has a walnut outer rim with maple bottom and a walnut dish-holding rim in the center for a dip. Determine the size dish you desire to use for dip and using a pencil, mark the inner and outer sides of the dip-dish, as well as the thickness of the outer walnut rim. Use a gouge to rough cut the walnut segment. As you deepen the segment, you will need to use a bowl gouge, because a regular gouge will catch on the sloping sides as you make the cuts. Once the segments have been rough cut, use a skew to flatten the maple bottom segment and round the edges of the bowl rim and outer rim. Sand smooth, and give a coat of H. Behlen salad-bowl finish (available from Grizzly) while on the lathe using a soft rag to wipe the finish on smoothly. Allow to dry, buff lightly with steel wool and apply another coat. Remove from the lathe, fill the screw holes in the bottom with walnut wood putty and smooth. Give the entire platter a third coat of salad-bowl finish. Buff with a soft cloth.
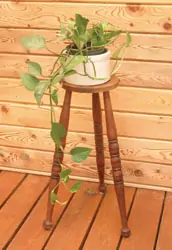
Three-Legged Plant Stand
The plant stand shown is a fairly traditional project and quite simple. It consists of three spindle-turned legs, and a bandsawn top section. Since you will be duplicating on the lathe you can use a lathe duplicator, such as the Craftsman Copy Crafter, or make a template to follow. Enlarge the squared drawing and create a template of hardboard or 1/4-inch thick plywood. Cut the template to shape using a bandsaw or scroll saw. Mount a block for a leg in the lathe and turn to shape, following the template. Sand smooth and finish the leg while still in the lathe. Turn the other two legs in the same manner.
With a compass mark the circumference of the top piece and divide the circle into three segments to locate the holes for the legs. Cut the top piece to shape on a bandsaw and sand smooth. The legs are splayed and the holes for the legs are bored in the top using a tilting drill-press table, such as the Craftsman Professional Universal Drill Press Work Center, or with a shop-made guide. The legs are held in place in the top with wedges. Using a fine-toothed handsaw, cut a slit in the top of each leg. Cut a thin walnut wedge. Insert the leg in the hole and tap the wedge in place. Repeat for the two remaining legs. Use a belt sander to cut the wedge-leg ends smooth with the top piece and sand with fine sandpaper. Apply finish.
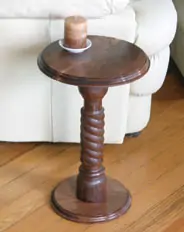
Pedestal Table made with the Legacy Revo
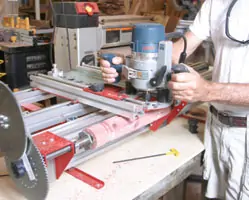
When is a lathe not a lathe? If you are intimidated by a spinning chunk of wood in a lathe, you might consider the Legacy Revo Milling Machine. It will do almost anything you can do on a lathe and then some. Basically the machine utilizes a router and a variety of router bits, including some special bits designed just for the machine, to cut wood stock to shape, including in the round, as well as to cut flutes, reed, and to follow a template for turning tapered and intricately formed pieces such as table legs. What’s fun is creating spiral turnings, even “rope” turnings. The Legacy Revo is a sturdy and extremely precise milling machine that comes with four DVD’s on set-up and explaining the various steps.
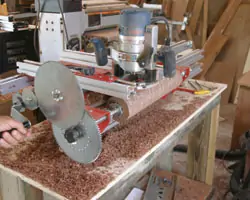
The project usually requires hours of hand rasping to create the rope. The table shown was made using a Legacy Revo milling machine and Bosch router.
For the fifth “lathe-turned” project we utilized the Revo Milling machine to simulate a turned pedestal table, with a rope-cut column. In the old days the column was turned into the round on a lathe, then the “rope” design cut with wood rasps and sanded smooth—a very time-consuming chore. The Revo makes the chore quick and easy, taking about an hour to complete the column.
You will need a good quality plunge router as well as four specific router bits to create the design shown. The bits designed specifically for the Legacy Revo Mill are available from Magnate. You will need a #3952 Classical Spiral, a #2704 Bottom-Cleaning Bit, a #7581 Rope Moulding Bit and a #7801 Bowl and Tray Plunge bit.
The table column is made from a 3-1/2-by-3-1/2-by-17-inch turning block. The table shown was made from walnut, but any hard, closed-grain wood will do. Similar to spindle turning on a lathe, the first step is to make sure the ends are cut square. Mark diagonally across the ends of the block to locate the center of each end. The Revo’s headstock utilizes a metal holding clamp with fingers that is screwed to one end of the turning blank. The fingers are then inserted into a mating clamp on the headstock end of the machine. The opposite end of the turning blank is held in place with a tailstock center point, much like a lathe. With the diagonals marked and the centers found, cut the corners off the blank with a table saw set to 45 degrees.
With the router fastened in place on the milling table, install the bottom-cleaning bit. Lower the router bit, lock it in place, and raise or lower the milling support guide so the bit rests on a flat area of the stock. Lock the milling support guide in place. Raise the router’s plunge-depth guide about 1/8 inch. Release the plunge lever and allow the router to raise completely. Move the milling table to one end of the stock and lower the router bit to establish the starting point. Lock one of the milling table guide stop-locks in place at this location. Move the milling table to the opposite end of the stock and lock that stop-lock in place as well. Move the milling table back to the beginning and note the starting point of the table on the ruler of the support guide. Lock the milling table to the threaded rod.
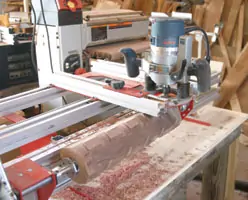
First step is to cut the blank to round. As the hand-crank is turned, the stock is turned at the same time the milling table moves the router bit across the stock surface.
Turn on the router, lower it in place and turn the milling machine hand crank. As you crank, the stock revolves at the same time the milling table moves forward, cutting off a spiral of wood to “round” the stock. Move the milling table back to the starting point, loosen the lock that holds the milling table to the threaded rod and move the milling table one inch. Repeat the cranking and routing steps until the stock is in the full round.
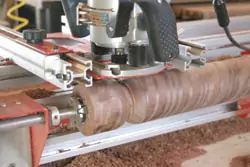
A decorative profile is cut in each end.
Remove the bottom-cutting bit and replace it with the classical spiral. Move the milling table so the center of the bit is located 3 inches from one end of the stock. Using the stop-locks, lock the milling table so it can’t slide lengthwise in either direction. Remove the lock to the threaded rod. Set the router bit depth to cut about 1/4-inch into the stock. Turn on the router, lower it in place and move the sliding milling table to center the router bit over the stock. As you turn the handle of the machine, the bit cuts the pattern into the stock, resembling a lathe-turned shape. Continue lowering the bit and turning the crank until you achieve the depth desired. Repeat this step on the opposite end of the stock.
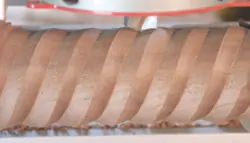
Then the rope is carved.
Remove the spiral bit, insert the rope bit and the “magic” begins. Locate a starting point for the bit about 1-inch from the previously turned profile. Lock the stop-lock in place and move the milling table to the opposite end and repeat the step. Determine the cutting depth to create the “rope” and lock the router plunge depth guide in place. Move the milling machine back to the starting point and reinstall the milling table/threaded rod lock. Turn on the router, plunge to the preset depth and turn the crank to revolve the stock and at the same time move the milling table. This will create the first of three spirals utilized to create the rope design.
Again move the milling table back in place, remove the table/rod lock and move the table 1-inch. Lower the router bit to make sure it is correctly positioned to cut the next rope twist. Turn on the router and repeat the step to make the next cut. Repeat for the third cut.
The last step on the table column shown was to insert a bowl-and-tray plunge bit and cut a design to clean-up the rope cuts. The cuts are extremely precise requiring just a little sanding to complete the column.
The table bottom, top support and top were cut to shape with a bandsaw, their edges routed and then sanded smooth. Fasten the bottom in place to the bottom of the column and the top-support to the top of the column with screws. Then fasten the top support to the underside of the table with screws. Sand and finish to suit.
Resources
Grizzly Industrial
1-800-523-4777
www.grizzly.com
Legacy Ornamental Mills
1-800-279-4570
www.legacywoodworking.com
Magnate
1-800-827-2316
www.magnate.net
Packard Woodworks, Inc.
1-800-683-8876
www.packardwoodworks.com
Rikon Power Tools
877-884-5167
www.rikontools.com
