

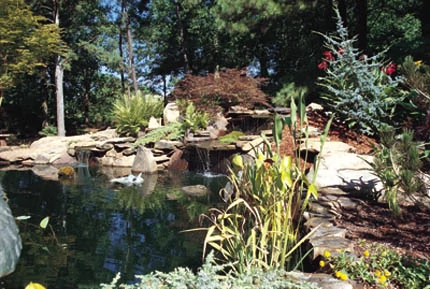
It’s no secret life can be stressful. Between fighting traffic, working long hours and paying the next stack of bills, everyone deserves a quiet place to escape. When the frustration reaches a fever pitch, and you’re ready to climb the walls, get outside where there are none. The soothing calm of a decorative water garden can provide a tranquil respite from the modern world. From the peaceful bubbling of an outdoor fountain to simple diversions such as frogs breast-stroking their way across a shallow pond, water gardens provide a serene and entertaining facet of landscapes across the country. And with a little planning and a weekend of digging, your own natural retreat can answer your relaxation needs in no time.
Local and regional water garden societies have sprung up across the states, providing forums where aficionados can find information on plant selection, pond-design ideas, maintenance advice and fish-care tips. When creating a private ecosystem for your property, the options for a water garden are endless, but a few critical first steps will ensure the new pond is built with both looks and longevity in mind.
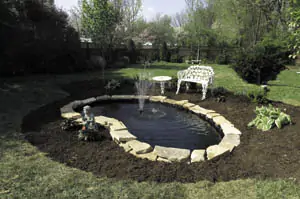
The first step is to plan the water garden’s location. Choose a level area and consider the pond’s location in relation to the interior of the house. If the water garden can be seen, and even heard, from inside the house it helps to bring its natural ambience into the living space. Also, consider the availability of sunlight. Many varieties of water lilies and other aquatic plants require six or more hours of sunlight to flourish. Another problem with too much shade is the fallout from trees in autumn. Although shade beneath a tree is a natural setting for a pond, you may want to use a lightweight net to catch falling leaves, which can clog filters and pumps. The roots of nearby trees also complicate digging the bed of the pond.
Accessibility to a water supply and electricity is another important factor to power the pump or any future accessories such as patio lights. And whereas the pool usually will stay full from tap water, occasional refilling will be required to accommodate evaporation.
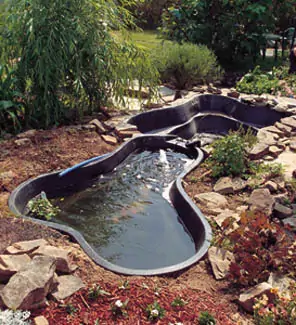
Once the location is decided, there are three methods to create the water garden. A concrete pool will last the longest if properly installed. However, an inadequate mix design or improperly installed reinforcement can cause almost immediate cracking of the concrete liner, so if you’re green to concrete work, this method may be best left to a professional. Flexible plastic liners present a popular, lightweight and inexpensive option and they can be cut into any desired shape. Rigid, prefabricated fiberglass or plastic pool liners offer the third installation option. These preformed liners are typically more expensive than flexible liners but offer enhanced durability.
A few accessories are required to supplement the liner, including a pump, hose, filter, water-treating additives and any fountain fixtures, fish or plant life you wish to add. The idea is to create a self-sustaining biological filtration system in which the constantly moving water is filtered both physically, to remove debris, and through colonies of bacteria to maintain the desired water properties to sustain plant and fish life.
A pump should be selected based on the water capacity in gallons of your pond. The pump flow rate should be large enough to recirculate the pond water at least once every two hours. For example, a 250-gallon pond would require a minimum-rated pump of 125 gallons per hour.
To simplify the buying process, flexible-liner water garden kits are available complete with accessories (fish and plants not included).
Flexible Liners
Installing a water garden can seem like a monumental task, but it actually can be a fun, do-it-yourself project, which is especially easy using a kit that includes everything you need to create one.
First, carefully select the site for your pond in a level area. If you are using a pond kit that operates on a 12-volt power supply, you can locate your pond up to 50 feet away from the outdoor power pack required for the pond system.
Outline the desired shape of your pond with a garden hose or a rope. Consult your local water-garden club or a landscaper as to the recommended size and depth for your area. Also, check for local laws that may regulate the depth of your pond. Some localities require fences around bodies of water at certain depths.
As you plan your water garden, consider the aquatic plants you may want to include in it. These plants can be grown on different levels or “shelves” within your pond. Create this bog-like area for plants by digging a 9- to 12-inch-wide ledge along the pond’s perimeter (too narrow a shelf won’t adequately support the plants). Consult your local garden center for plant varieties and their growing needs. Different plants may require shelves constructed at different depths within the pond, so research the desired plant varieties prior to digging the shelves.
Using the hose or the rope as your guide, begin digging from the outside of your pond inward. Level the top edge of the pond by using a carpenter’s level sitting on a straight 2-by-4 placed across the pond. Repeat this process for the width and length of the pond until the perimeter is completely level.
Remove all roots, rocks or other sharp objects that could puncture the pond liner. Line the bottom of the pond with a 1 1/2- to 2-inch layer of sand to provide a cushioned surface for the liner and to protect it from punctures. Lightly sprinkle the sand with water and tamp it down before installing the liner.
While digging your pond, open the liner fully and drape it across your lawn. As the sun heats it, the liner will become more flexible and will be easier to install. Once you finish digging the pond, drape the liner across the pond, making sure it overlaps equally on all sides.
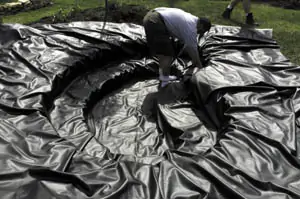

Contour and smooth the liner to the inside edges and bottom of your pond. Secure the edges with bricks or other heavy objects. Begin filling the pond with water. Water pressure will allow the liner to sink into the pond cavity and contour around the inside edges and plant shelves. As the pond fills with water, pull the edges of the liner up and smooth out any creases around the inside walls of the pond. Some folds are inevitable, but the less the better.
Continue filling the pond while you install the remaining pond components. Fill to within 4 inches of the upper edge of the pond.
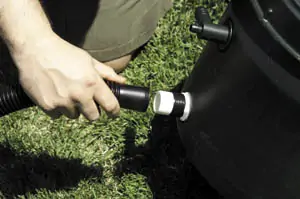
If using a low-voltage pond kit, mount the power pack near a Ground Fault Circuit Interrupter (GFCI) outdoor electrical outlet. Route the low-voltage cable attached to the bottom of the power pack to your pond site. Place the low-voltage controller next to your pond site. Insert the two wires from the end of the power pack cable into the terminals on the bottom of the low-voltage controller and tighten the screws.
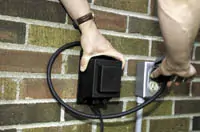
Set the pond pump inside the pond, keeping the end of the cord out of the water. Insert the two wires from the end of the pump cord into the low-voltage controller terminals and tighten the screws.
Many water garden kits come complete with fountain assemblies and underwater lighting systems, as well as instructions for easily installing them in the pond. Be sure to weigh down the base of the underwater lighting with rocks or pebbles to prevent tipping or floating. (If installing lighting as an afterthought, and using a system not included with a kit, it’s advisable to route all wiring through flexible conduit, which can be concealed beneath rocks or pavers.)
Trim off the excess liner around the edge of the pond, leaving at least a 12-inch lip.
Next, position the pond’s biological filter (discussed later) above the edge of your pond where you placed the inlet tubing from the pump. You will need to secure tubing in various locations on the pump. Make sure water will drain completely into the pond.
Before stocking your pond with fish and plants, you must remove the chlorine from the water and allow your biological filter to mature. Kits should include a bottle of chlorine and chloramine remover. Follow the measurement guidelines and add the correct amount to your pond after filling it with tap water.
Allow your biological filter to operate three to four days after filling the pond to build up healthy bacteria needed to purify the pond water.
Use a floating thermometer to ensure the pond’s temperature is at a safe level before adding fish. Generally, most goldfish and koi can survive in temperatures about 50 degrees Fahrenheit, but consult with your fish provider regarding acclimation procedures.
Preformed Ponds
The installation procedures for a flexible liner and a preformed pool are similar. For the preformed method outline the perimeter of the prefabricated pond shell with a hose or rope, staking it at intervals if necessary to retain shape. Make the perimeter 2 inches larger in every direction than the preformed liner.
Next, measure the dimensions of the pond shell. Then dig a hole that mirrors the shape of the shell but add 2 inches of depth to allow a layer of sand. Follow the contours of the liner, digging to match any plant shelves built into the shell. Clear away any rocks or sharp objects from the excavation and make sure the soil is firmly compacted. Line the hole with 2 inches of damp sand (or underlay material as supplied by some manufacturers).
Rinse the pond before installing, then lower the shell into the bed. Shells may have to be retrieved and lowered several times to ensure the edges are even. Use a level atop a 2-by-4 stretched across the edges of the shell. Level the pool in several directions. The pond’s edges should rest slightly above ground level so the dirt around the perimeter slopes away from the water to prevent soil runoff, lawn chemicals and more from contaminating the ecosystem being created.
With the shell in place, backfill with sand or loose soil between the pond and the excavation. After backfilling to approximately half the height of the shell, slowly fill the pond with water. As the water level rises, continue backfilling so all the shell’s walls are adequately supported by soil or sand.
Once full, the edges of the shell can be disguised with rocks or tiles overlapping the edge by a couple of inches. Keep in mind that working with stone is like solving a jigsaw puzzle. Lay out the edge rocks prior to mortaring them in place. Otherwise your mortar may dry while you’re trying to figure out the next piece of the puzzle. The overhanging stone edge serves multiple purposes: It looks nice and natural, it adds to the shade of the pond, which the fish enjoy, and it helps shield the fish from predators.
The water should then be treated and accessories added as with the flexible-liner water gardens.
Filtration
Upkeep of a water garden is much easier than a maintaining a fish tank. You can achieve a good biological filtration and natural, balanced ecosystem to maintain the environment.
Aquatic plants perform many functions in a pond. Not only do they add beauty, they also help to establish the ecological balance by keeping the water clear – especially helpful if you have fish. Many gardeners prefer lotus, which can help shade the pond, keeping the sunlight and water temperature down. Lotuses also help minimize algae and recycle the fish waste into fertilizer. Plus, the oxygen given off from the plants is beneficial to the fish.
A biological filtration system will provide the necessary bacterial ingredient that keeps your water at a recipe ripe for plant and fish life. The basics involve a pump circulating water through a filter created from some form of bacterial media. Bio Balls present a popular choice for bacterial media; they’re honeycomb-like plastic spheres with lots of surface area, promoting bacterial growth. But lava rock and even plastic spool-type hair curlers can achieve the same effect.
Filtration systems can be configured in a number of ways, from submerging them in the bed of the pond, to strategically positioning them at an easily accessible and aesthetically logical location within the layout.

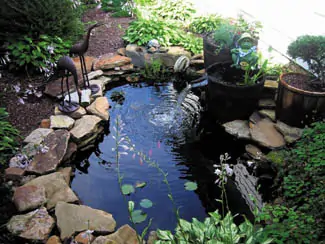
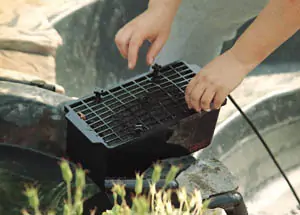
The decorative, “country-style” system depicted above provides both effective filtration and easy maintenance. Three whiskey-barrels are used as plant pots, but one houses the filtration system. With this system the pump hose is routed beneath the first barrel where it feeds water into the bottom. Inside the barrel, the feeder hose is elbowed to shoot water along the bottom edge of the barrel, creating a swirling, circular flow. Approximately 3 inches above the bottom of the barrel is a screen of expanded metal, which filters any large debris brought inside by the water line. A 1 1/2- to 2-inch drain spout is mounted on the bottom rear of the barrel to discharge collected debris from beneath the screen.
Resting on top of the metal screen are cheesecloth bags of lava rock – the bacterial media in this system. The circulating water filters through the cheesecloth and rock and returns to the pond via a spout atop the barrel.
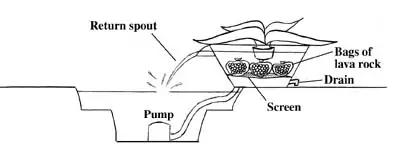
Aquatic plants hide the filtration system within the barrel, and the plants can easily be removed, along with the cheesecloth bags, for quick and simple cleaning with a hose. Backwashing the barrel is also easy using its rear discharge spout.
Plus, you can purchase test kits to ensure you’re maintaining the proper aquatic environment for your plants and fish.
For many water garden creators, their ponds are a continual work in progress. When planning its construction, keep in mind that down the road you may want to expand the size and scope of a garden. Upgrading to a higher-capacity pump can power a small waterfall built from staggered rocks, which also hide the water outlet. Add another shell next to the water garden, combining two ponds for a more expansive and dramatic presentation. Create a sense of fun and personality by installing statuary figures or fountains. Experiment with the waterscape, and the ideas will continue to flow.
Sources:
Pond Systems Division of Wayne Water Systems, www.waynepumps.com.
The Central Alabama Koi and Water Garden Society
