

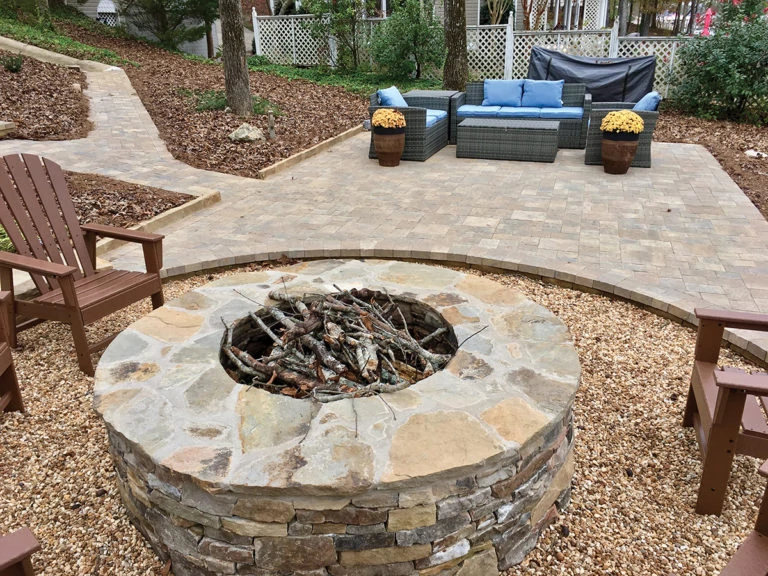
Brick patios, walks and garden terraces are some of the easiest-to-build home projects. They not only create a pleasurable outdoor space, but also add to the value of your home. The work, however, is fairly strenuous and the construction is permanent, so it’s important to thoroughly plan the project before you begin. You don’t want to tear up a brick patio just because it isn’t sited properly.
First, make sure no utility lines or pipes are in the excavation area. Although you probably won’t be digging very deep, these lines could be a problem. If the patio or terrace is to meet against a fence, you may wish to leave space for a raised planting bed to create a blend between the fence and the brick surface.
If trees or shrubs are in the location of the patio, simply build around them, rather than removing them. Each plant or tree should have at least 1-1/2 to 2 feet of open area around all sides so an adequate amount of moisture can reach the roots and allow them to grow. If the patio is raised and a tree is involved, create a raised well around the tree with mortared bricks to the desired height of the patio and fill with decorative gravel.
A brick patio can be constructed with bricks laid in a sand bed over a gravel base, or laid in a mortar bed over a concrete base. The sand/gravel-bed method is by far the easiest and most popular with do-it-yourselfers. If constructed properly, and in mild climates, a sand/gravel bed will last a long time.
In days past, sand alone was commonly used, but this method can settle, resulting in an uneven surface. Moles also love to tunnel through the sand, with bricks heaved up by their digging. These days a gravel bed of base rock is laid first. An edging must be used to hold the bricks in place. This edging can be made of bricks set on edge, either loose or mortared on a concrete “footing.” Other choices include treated 2-by-4’s, landscaping timbers, even recycled railroad ties. The latter must be set to about half their depth in the ground. Round or free-form patios or walks must be edged with a flexible material. This can be plastic edging, or again bricks. Edging materials can also be used as interior dividers that divide the patio into smaller areas, creating unique designs.

Bricks may be laid on a mortar bed, or on a sand bed. The latter is the most common and the easiest to do. The bricks are supported by a gravel base, then a sand base.
Pick your Pavers
The bricks used for patios, walks and steps are called “pavers,” which are different from the bricks used on house walls. Pavers do not have holes. Many older buildings, however, were constructed with solid or paver bricks, and recycled bricks from these old buildings can also be used for patios. In fact, that’s what we used on our patio. Interestingly, a brick company was located in our small town around the turn of the century, and we were able to scrounge some bricks that had the town name stamped on them. Some of these old bricks, however, may be soft and crumbly, and you will have quite a lot of waste, as well as a chore in cleaning off the old mortar.
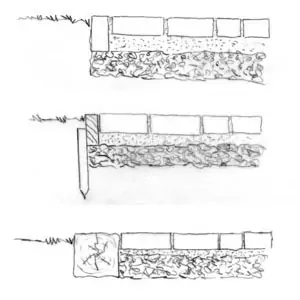
Edging is required to hold the bricks in place. This can be bricks laid on edge, treated 2x materials, landscaping timbers or railroad ties.
Modern paver bricks are available in a wider range of sizes and colors, as well as with a harder “finish” for a longer lasting, smoother surface. According to the folks at Acme Brick, bricks are now being produced especially for sand-based rather than mortared installations. These pavers have beveled or relieved edges that eliminate the problem of edge chipping. And they are also made slightly irregular to provide a “handmade” look. This allows for more variety in patterns and how the bricks are laid. Some pavers are also available with interlocking designs to provide a more “secure” surface. Pavers are available in two thicknesses; 1-1/2-inches, the most commonly used size, and 2-1/2 inches, which are normally used for heavier traffic-load conditions. Pavers are also available in several sizes with 4-by-8 inches being the most common. Other sizes include 3-5/8-by-7-5/8, and 3-3/4-by-7-1/2 inches.
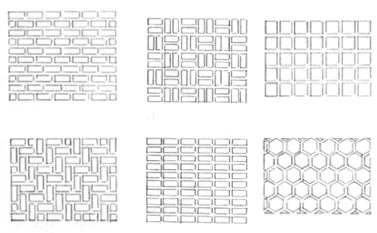
Bricks can be laid in various patterns. Most patterns use the common rectangular brick. Other shapes, such as square or even hexagonal, are also available.
Materials
Pavers can be laid in a number of patterns. Some of these include stack-bond, herringbone, running bond and basket weave. These standard patterns can also be created in a wide number of variations as well. The first step is to lay out the patio or walk with stakes and a string line. Then measure the area in square feet to determine the amount of materials needed. Estimate the amount of pavers. For 4-by-8-inch bricks, 4.5 pavers are needed per square foot. For 3-5/8-by-7-5/8-inch bricks, 5.2 pavers are required per square foot. For 3-3/4-by-7-1/2-inch pavers, 5.1 are required per square foot. You will also need to determine the amount of edging needed, and this is determined in lineal feet. For waste, add 5 percent for uncut laid pavers and 10 percent for pavers that are to be cut.
Walks should be slightly crowned to allow for settling.
Sand and crushed gravel are measured in cubic yards. One cubic yard equals 27 cubic feet. Normally 4 inches of gravel are used with 1- to 1-1/2 inches of sand covering that. To determine the cubic yards of sand needed for every 1 inch, multiply the square footage by .00309. To determine the amount of gravel needed for a 4-inch bed, multiply the square footage by .01235. If you are paving a heavy-traffic area, such as a driveway, you should use 8 inches of gravel. To determine the amount needed, multiply the square footage by .02469. You will also need string and wooden stakes. If using wood or rigid plastic edging, you will need to add wooden stakes or 8-inch metal spikes. Consider one stake or spike for each 3 feet of edging. Metal spikes can be cut from concrete reinforcing bar using a hacksaw.
Tools
For tools, you’ll need wooden stakes and string for laying out, tape measure, carpenter’s level, a wheelbarrow and flat shovel, as well as a sharp shovel for excavating. You will also need a trowel, broom, solid-tooth garden rake and a garden hose with a fine-spray nozzle. A 2-by-4 wood screed, at least 3 feet in length is also needed. You may also need an electric drill/driver for fastening wood edging in place.
Bricks are cut with a broad-blade brick chisel and mason’s hammer. Or you can use a masonry saw. A plate compactor can be used to tamp bricks solidly in place. These tools can usually be rented from a local rental store, or sometimes from a brick distributor. Safety glasses and heavy-duty or leather gloves are also required.
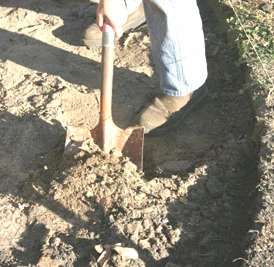
Outline the patio or walk with stakes and a string line. Then excavate to the depth required. Make sure all rocks and other obstacles are removed and the area is flat and smooth. Compact the soil if it is loose.
Breaking Ground
With materials on hand, and the patio or walk laid out with stakes and string line, lay some bricks in the area to determine the best pattern. This will depend on the shape of the patio, as well as the brick pattern you wish to lay. Most patterns are laid out in 32- or 36-inch squares for 4-by-8 bricks. You’ll need to adjust for bricks of other sizes.
Now it’s time to excavate. The amount of time and effort in proper excavation will pay off in a long-lasting, good-looking patio or walk. An uneven excavation job will result in an uneven and less appealing surface. Even with proper excavation, sand will often settle in some places, requiring lifting out the bricks and adding sand to level out the spot.
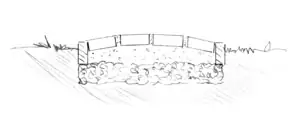
The next step is to determine the final height of the patio surface. A surface flat with the sod can be created, and this will allow for easy mowing. In most instances, however, the surface of the patio or walk is above ground level. A paving level about two inches above ground level is the most common. This prevents grass from growing over the edge, and is fairly easy to maintain with a string trimmer. There must be enough sod or soil to support the edging. The patio should slope at least 1/4 inch per foot away from any permanent structures such as house foundations.
Using a sharp shovel, cut down through the sod around the outline of the patio or walk. Then, using a flat shovel, remove the sod and amount of soil required for the depth determined for the gravel and sand bed plus the bricks. In compacted, hard surface areas you may need to use a pick to break through and loosen the soil. Remove all rocks, roots and debris from the excavated area. Check the slope of the excavation to ensure proper drainage. In most instances you will not have a perfectly flat surface, but may end up with humps and depressions. If you must fill in any depressions, then make sure they are well tamped and settled in place. Spraying a light mist of water while compacting can also help. The smoother, flatter and more compact the excavation, the better the resulting top surface will be. This is actually the hardest part of the chore; take the time needed to make sure it’s done correctly.
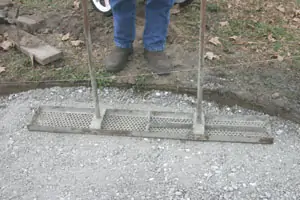
Add the crushed gravel to a minimum depth of 4 inches, 8 inches for heavy traffic areas. Smooth and level the gravel and compact it as well.
Building the Base
Once you’re satisfied with the excavation, add 4 inches of crushed gravel and smooth it down evenly with a hard rake. A rented concrete “puller” can also be used for this chore. The best choice in gravel is often called “road base.” It not only has the crushed stone, but fine dust from the crusher as well, and it compacts better than the cleaner gravel commonly used for concrete projects. The gravel should also be well compacted using a plate compactor.
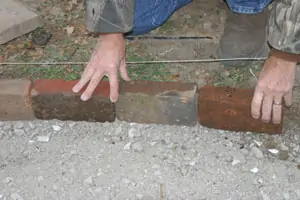
Put the edging in place, permanently anchoring one or two sides, and temporarily anchoring the other sides.
Place the edging of your choice, temporarily bracing or anchoring with stakes. Then experiment with the pattern you’ve chosen, again temporarily laying bricks around the perimeter of the area. As you will find out, complex patterns such as herringbone will require you to cut a fairly large number of bricks. Once you’ve determined the desired pattern will fit the area, remove the bricks and anchor a portion of the edging in place. For a square patio this means two sides, leaving the other two sides to be temporarily edged but not anchored until completion of the bricklaying. This allows for any variance in the layout, which will occur. For walks and smaller areas, anchor one side but leave the opposite side temporarily anchored.
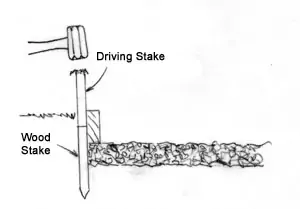
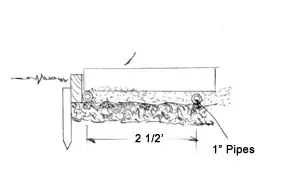
To create a leveling guide for the sand bed, first stake down the edging securely and then add screed guide rails against the edging. these can be 3/4″ x 1″ wooden strips or 1″ metal or plastic pipe. For wide areas, position the guides about 2-1/2′ apart.
For narrow areas such as a sidewalk, lay a piece of 1-inch pipe (plastic or metal plumbing) or 3/4-by-1-inch wood strips on either side next to the edging. This will be used to gauge the sand depth. For wider areas, place the sand gauge pieces 2-1/2 feet apart. Then pour or shovel the sand. Keep the sand moistened with a fine mist to help pack it down properly and prevent voids. Roughly rake the sand even with the tops of the gauge strips or pipes to an even depth of 1-to 1-1/2-inches. Then use the screed board, resting it on the screeding rails and using a sideways and pulling motion to level the sand to a 1-inch depth, even with the screeding rails. Remove the rails and fill the voids with sand, using a trowel to pack down the sand. Note that on sidewalks you may desire to create a slight crown, because the sand will shift down in the middle. After striking off the sand, lightly mist the sand bed again, then do not walk or disturb it.
Moisten the sand and keep it wet, applying it between the guide rails. Then use a wooden screed to drag the sand smooth and even with the tops of the rails. Remove the rails and fill in the voids with sand.
Laying the Brick
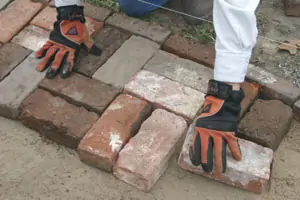
Now comes the fun part, laying the brick. Depending on the size of the project, this may take only a few hours or a few days. Unless you have a rainstorm, you can easily stop at any time during the project construction. In any case, make sure the sand base is well moistened and solid. Start at one corner where you have permanently anchored the edging; or, if joining to a house foundation, curb or other permanent edge, start at that point. Lay one square or run of brick adjacent to the two borders to set your pattern. Don’t tap or hammer the bricks in place, merely place them on the sand base. The bricks should fit fairly snugly with about 1/16- to 1/8-inch space between them. Recycled bricks are often more uneven than recently manufactured bricks. You may have to dig out or add a bit of sand to set them properly. Then continue repeating your pattern. Work from the brick side onto the sand. Don’t walk or disturb the sand base. If the sand base becomes disturbed, relevel with a broom or trowel. Use a carpenter’s level to make sure the surface is level as you work.
A string line across your working edge can help maintain a straight line. If your pattern wanders a bit, use a trowel or wide-blade putty knife to shift the bricks to make small adjustments. Small gaps between the bricks will be filled with sand.
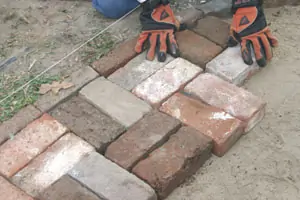
Starting at one permanently anchored edge corner, lay the bricks in the pattern chosen.
Once you have all the full bricks laid, anchor the final edges and then cut the bricks needed to fill in around the edges. Make sure the cut bricks are no smaller than 2 inches in width. Bricks can be cut fairly easily with a brick hammer and chisel. Place the brick on a smooth, flat and solid surface. Wearing safety glasses and leather gloves, position the brick chisel on one face and tap to score the face. Turn the brick over, position the chisel in place and rap it sharply. The brick should break on the scored line, but this does take some practice.
Check that all bricks are level and positioned correctly, then sweep dry sand over the surface and into the cracks. Start at one corner and do a quarter section at a time, sweeping in all directions to completely fill the joints. Lightly hose the surface to further settle the sand and wash away excess. You may wish to use the compactor to further settle the bricks, but first add a layer of sand over the bricks to prevent damage to their surface from the compactor. The sand in the cracks will eventually settle and require additional sand.

Sweep dry sand into the cracks, and then moisten it to further settle it. After it settles, add more sand as needed.
The joints can be filled with mortar, but these joints will eventually crack as the sand and bricks settle. If you wish for a mortar-filled bed, apply a dry mix of one part cement to four parts sand. Apply this as a dry mix, packing it into the joints with a trowel. Then moisten the mortar with a fine mist spray from a garden hose. Do not use a high-pressure washer. Continue to dampen the surface over the course of several days, and to flush away excess mortar. The process will probably need to be repeated in a year or two.
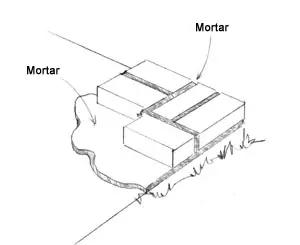
You can restore an old concrete patio by laying bricks on a mortar bed.
One way of refurbishing an old concrete patio is to lay a brick pattern in a bed of mortar on the patio surface. Clean the old surface as much as possible, then prepare a standard mortar mix and spread a 1-inch thick coat. Lay the bricks in the mortar in the pattern chosen. Place mortar on the ends and one side, position in place and tap each brick firmly to avoid air pockets. Frost can cause the bricks to heave around air pockets. Leave about a 1/2-inch wide mortar joint between each brick. Use a level and long straight edge or 4-foot level to make sure the bricks are level with no low or high spots. Trowel the joints flush, or lightly tool them with a mason’s jointer.
