

When we look around today, many—maybe most—tool handles available are made from something other than wood. As a rule, if you bend or break a steel handle, you can immediately discard the tool. However, such breakage is nearly impossible under most conditions of use.
Wood handles do break much more often, sometimes from no more than wear, but just as frequently from striking errors.
For claw and ball-peen hammers, handle replacement is usually quick and easy. For larger striking tools, a bit more effort may be needed, but not much. It’s not as much fun as watching a good ball game, but it isn’t a lot of difficult work, either.
Tools You Need
When replacing a broken handle, you’re going to spend an hour or less, from start to finish. You’ll need a drill and a twist drill bit (a 1/4-inch is just about right), possibly a sander, or a Stanley Surform tool or wood rasp to slightly reshape the handle for a good fit in the eye. You’ll need another hammer to tap the wedge into place, a soft-faced hammer to tap the handle in place, and that’s about it. Use a power drill to get the old handle out of the eye. For most handles, including sledge size, a 1/4-inch or 5/16-inch twist-point, metal boring bit is preferable. Don’t use a wood-boring bit like a brad point or Forstner. You will hit the sides of the eye, which will ruin either bit almost immediately. Too, there’s almost always one or two metal wedges that pin the wooden wedge in place. A couple of flea market chisels—battered chisels usually available for half a buck at flea markets around the country—help, first in removing the handle, and second, in opening up the wedge slot in the new handle.
In difficult cases, a rat tail file cleans out the eye nicely, but usually a bit of clean up with either emery cloth or sandpaper does the job. The soft-faced hammer isn’t needed if you use a chunk of wood on the handle being driven, hitting the wood, instead of the handle, with a steel hammer. I prefer to use a 2-pound Vaughan copper/rawhide-faced hammer for this kind of work.
Sizing the Correct Handle
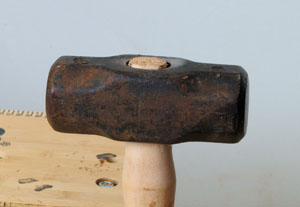
The first step is to examine the handle eye to determine its shape. There are basically two shapes, but a lot of sizes. Oval eyes are most common, and the most variable in size. Axe eyes are found on axes and on some splitting mauls, but seldom elsewhere. If you’re at all unsure about the eye type or size, remove the handle and use the head of the tool to check against the new handle size and shape.
Measure the handle length. Most carpenter’s (claw) and mechanic’s (ball peen) hammers from 20-ounce head weight or less, use a 15-inch long handle. When head weight hits 22 or 24 ounces, handle length grows.
You may find it more difficult to find a handle the correct size and shape than it is to remove the old handle bits and install the new one. Stores simply don’t carry the selection of sizes that we could once find, partly because wood-handled tools are not in high demand any more, and partly because Chinese replacement hammers are often about the same price as the new handles. Some hardware stores have them, most farm supply stores have them, and maybe a few other places. If you have American-made striking tools and want to keep them in good working order, you’ll find the search well worthwhile.
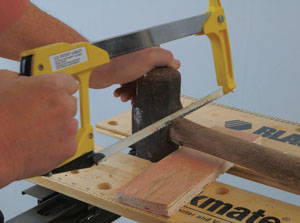
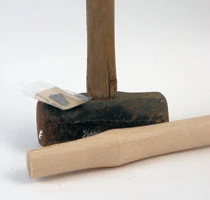
Fitting a Wood Handle for Striking Tools
Start first by removing the old handle. Saw off the handle as close to the bottom of the eye as you can. Because it is close to the metal eye, use a hacksaw or a jab saw with a disposable blade.
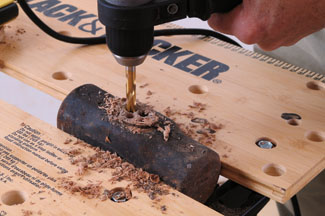
Drill out the waste inside the tool eye. I used a corded drill for the job. Almost any drill does as well, if it has the power to bore through hardwood that may be 2 inches thick with metal inserts. The tool head must be held firmly, especially smaller hammer heads that love to spin around the bit when loose.
Use the drill bit to cut three holes, forming a cloverleaf shape. Next, remove the webs between the “leaves” of the clover shape. Use a flea market chisel to knock those out. Then use a piece of dowel, placed on top of the handle in the head, to drive out the remains.
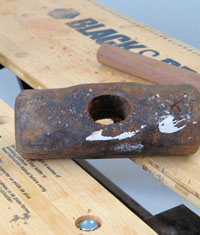
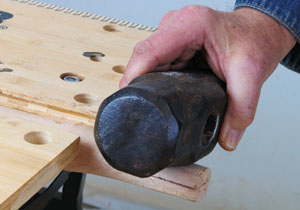
Clean the head using emery cloth, and check closely (any 3x or 4x magnifying glass works). Look for cracks, especially around the eye, that weaken the eye and make the tool dangerous to use. If you find any cracks at all here, discard the tool. Minor chipping and rust probably means nothing. We chucked a wire brush in the Bosch drill and used that for final head cleanup.
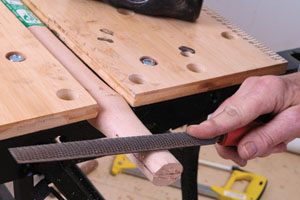
Hold the handle up to the head to check shape and fit. Slightly large is OK; slightly small is OK. Far too large or far too small means you need to return the handle and find the proper size. Correctly sized wedges force the eye contact when there is a minor size difference, but the wood only spreads so far before it’s weakened. When the handle is far too large for the eye, fitting it may weaken the wood. A good fit at the outset is the way to go. Use your sandpaper, wood rasp, or Surform to shape the insert section of the handle as needed, testing the fit every few strokes or scrapes. Using your hands, push the handle into the eye until it goes past halfway.
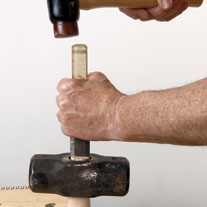
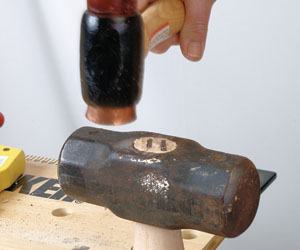
Insert the fitted handle into the eye. The best fit needs a soft-faced hammer to drive the new handle into the eye.
You do not want to remove the handle from the eye after this insert, though it can be done if things aren’t perfect (you’ll need your dowel again if you do). The handle on the top of the tool is a bit too long at this point. Support it well, and saw off any extra material (this step can be left until after wedging, if the extra length is 1/4 inch or less).
Wedge It
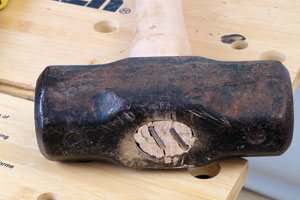
Another flea market chisel is useful here, to open up the slot for the wooden wedge. Try to use one that is just about the full length of the head’s eye. Again, emphasize the flea market chisel here. You don’t want to use a finely tuned, excellent chisel for this job.
Select a wedge for size, and place its smaller end in the wedge slot in the handle eye end. Slowly tap the wedge into place. There are different arguments about which wedge is better; metal wedges or wood wedges. Steel wedges do crush and tear internal wood fibers as they go in, whereas wood pushes them apart. Wood is a touch harder to drive well, tending to split. Either way, starting with a good fit helps the handle stay put for a good, long time. Usage usually dictates dual wedges; that’s the way most handles are packed, with one large wood wedge and one or two smaller metal wedges. The wedges are also available individually in hardware stores.
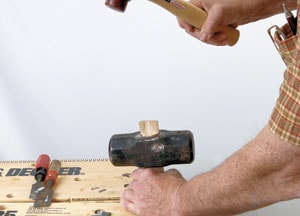
The best way to begin is to use a wooden wedge first. Drive it in and let it sit. Saw it, and any extra handle length, off. Let wood wedges extend beyond the top of the eye a bit more than the handle itself extends. Trim them flush with the top of the eye at the same time you trim the handle. Then drive a steel wedge at near right angles to the wood wedge. This serves as a lock for both wedges and keeps the handle tight longer.
Recent reading suggests standing a handle, eye down, in a pan of linseed oil, overnight, causes the wood to swell. Wood swells because it absorbs moisture all right, but in the form of water, not linseed oil. You can stand the striking tool head in a pan of linseed oil and let it soak overnight as well. The linseed oil doesn’t harm the head’s metal, but does help (a little) protect the raw parts of the wood handle. Remove, wipe, let dry and use. You can go ahead and use the tool immediately after wedging and trimming, too.
Fiberglass handles are easier to replace. Make absolutely sure the head is cleaned out, much cleaner than with a wood handle: Simply use the emery cloth for longer, until bright metal is showing. Then, check the new handle for fit.
Fiberglass handles come with a packet of epoxy. Once removal and clean-up is done, follow the packet instructions carefully. There really should be no trimming needed to get a side-to-side fit. You may have to trim the length a bit.
Slowing the Next Failure
The failure of heavier striking tool handles is often caused by over-strike, where the head misses the mark and the handle hits it, either damaging the handle or snapping it off completely. Wood handles can last many times longer with a simple sleeve shoved up against the head. Handle savers (there is an Original Handle Saver, one that was easy to find in a farm supply store) are a great help with larger striking tools, axes, sledges and splitting mauls. Find a piece of dense rubber, for a sledge or splitting maul, and use duct tape to wrap and hold it on the handle, just under the head. If nothing else is available, make a pad of duct tape and then wrap that in place. It will do for the time being.
