DIY Installation Advice
The most widely used material for deck boards is treated lumber. There is, however, a right way and wrong way to install treated deck boards to achieve the best results. The experts at Wolmanized® Wood offers the following tips to get the most from your material.
During installation, separate the deck boards as follows to allow for expansion and contraction. If they’re heavy and wet, separate boards no more than 1/16 inch as some shrinkage will occur, and you don’t want the gaps to appear to large and unsightly. If the deck boards are light and dry, separate boards about 1/4 inch to allow for swelling.
Shorter spans between joists will help to minimize warping and twisting of deck boards as they dry. Also avoid designs with long cantilevers unsecured at one end; check with your local building code department on maximum cantilever allowed. On decks with unsecured cantilevers, consider fastening a rim joist along the ends or blocking between them to prevent the joists from twisting.
Remember to cover your cuts. Applying a wood sealer on your end cuts will make a big difference in the long run. Learn more about why this is an important step in treated wood deck construction: Covering your Cuts when Building Outdoors
Lumber wider than six inches should not be used as a flat surface. Wide, flat boards are subject to ponding of rain water, which can lead to cupping problems.
Always install the deck boards bark side up. This side will be more likely to have treated sapwood on the exposed face. To determine which side is the bark side, inspect the ends of the boards and judge by the direction of the growth rings.
If a board is bowed, install it with the crown up. Gravity and the weight of people and furniture will flatten it.

For above-ground treated wood, make sure there is good underdeck ventilation, allowing airflow around the entire deck so the wood can dry, which inhibits mold growth. All above-ground treated members must remain off the ground and free of leaves or other debris.
Proper flashing or spacers should be used between all adjacent structures and the deck. The ledger connection to the house requires especially careful attention to prevent water intrusion, because it is the most common cause of deck collapse.
Cover upper ends of railing posts with post caps or cut them at angles to shed water. Before capping or after cutting, apply topical preservative solution to all ends, holes, or other intrusions in the wood. Exposed end-grain that is left unprotected will absorb water and contribute to rot.
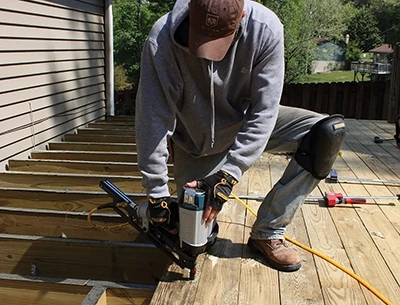
Use two fasteners across a 2×4 and three across a 2×6. Drive nails at a slight angle toward each other. Use 3-1/4-in. long nails on nominal decking and 3-in. nails for 5/4-in. decking. Check fastener boxes to make sure you are buying fasteners that meet standards. Fasteners should be hot-dipped galvanized meeting ASTM A 153 or equally protected material. Connectors should be made from galvanized steel sheet conforming to ASTM A 653 class G185.
Remember that although screws take longer to drive than nails, they hold boards more securely and will allow for easier removal if necessary. If a board has a slight bend to it, it sometimes can be straightened as it is fastened in place.
To reduce splitting, especially near the ends of boards, drill a pilot hole about three quarters the diameter of the nail. For dense or brittle wood, grind sharpness from nails or blunt the points by striking them carefully with a hammer. Blunt nails cut through; sharp ones pry apart.
Learn more about working with treated wood at www.wolmanizedwood.com.
Side Note
Maintenance Tips for Treated Wood Decking
- For surface protection against moisture damage, apply an effective brand of water repellent as soon as your deck project is finished or, for large projects, as sections are completed. It helps to re-apply a topical water repellent every year or two.
- Always mix deck stain/water repellent to evenly blend the solids and ensure a consistent color tone throughout the project.
- To revitalize a dingy appearance caused by dirt, mildew and mold, use a deck brightener to clean the wood.
- Check with the experts in the store’s coatings department for recommendations on water repellent, stain and cleaner.


