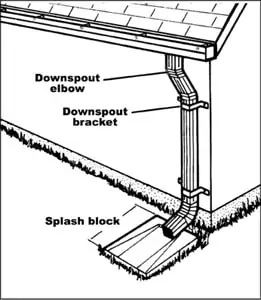
There’s not much glamour in gutter systems, but when properly installed, they do a great job of directing roof runoff away from your home. Flowing gutters drain hundreds of gallons of water away from the foundation. This keeps basements and crawlspaces dry, protects siding and windows from harmful backsplash, and prevents staining and rotting the walls of your house. So, while they may not be flashy, gutters are an important feature of the home, which require a balance of practicality and aesthetics.
Sizing Up Your Options
The first rule of selecting a new gutter system is to be practical. Gutters and downspouts are available in a wide range of materials, styles and prices. Choices include aluminum, vinyl, galvanized steel, stainless steel and copper. Even wood is an option, but wooden gutters are rare and primarily used in restoration projects. Because of the moderate pricing, galvanized steel gutters are popular choices. Aluminum gutters are slightly more expensive but require less maintenance. Vinyl gutters are inexpensive and can be easily installed by a do-it-yourselfer in a single weekend. Copper gutters, on the other hand, are very expensive, but they have a handsome appearance, never rust and never need painting.
Gutters are also available in various sizes and shapes called profiles, but are generally limited to rounds, half-rounds, ogees and rectangles. The most popular options are half-round and “K” profiles, in which the front profiles resemble the letter K. The ridges of these profiles not only add to the stylish appearance but also add structural integrity. Gutter channels are available in 4-, 5- and 6-inch diameters. Downspout sizes also vary in size, and come in round or rectangular shapes.
Colors vary as well. More than 25 factory-finished colors are available for sectional aluminum and steel gutters, making it easy to match house and trim colors. Brown or white have long been the most popular choices. Keep in mind that colors on gutters fade over time. You may also have to replace a section because of tree or storm damage. In such a case, faded colors can cause the replacement pieces to mismatch with the existing gutter. White is a standard gutter color due to its strong resistance to discoloration.
All gutters are either sectional or seamless. A seamless gutter means that a straight gutter is made of one continuous piece of gutter material. The only seams are on corner miters and downspouts. Sectional gutters are sold in pieces and installed as component systems. Seamless gutters are considered more durable because the seams of sectional gutters can weaken over time and cause leaks 10 or 15 years down the road. This is because constant expansion and contraction of the gutters tends to crack the seam caulk of sectional systems. In this case the seams have to be re-caulked from the inside with a special gutter caulk.
A good contractor will help you choose the best system to fit your home. But if contracting the work, carefully choose someone who professionally installs gutters and check their references. Gutter installation is an easy start-up business, and as a result there may be many new contractors in your area who don’t have much experience. And always get more than one bid, but don’t necessarily fall for the lowest price. If one bid is significantly lower than another, then the gutters used by the low-bid contractor may be made of a thinner, less durable metal. When specifying metal gutters, choose the thickest you can afford; 0.032-inch metal is recommended.
Finally, check the warranty of the gutters and accessories. A warranty that extends at least 20 years is advisable. And ensure at least one-year coverage on any contracted labor.
(Photo courtesy Slate & Copper)
Gutter Installation
With periodic cleaning, gutters are typically a no-hassle feature of the house. But storm and ice-dam damage, corrosion, dented downspouts or sagging gutters can require replacement. Or perhaps you’ve just added a new wing to your home, or you’re installing gutters in a new house. Whatever the reason, installing your own system is not out of reach.
The most DIY-friendly gutter systems are probably vinyl systems that are available at most big-box home stores such as Lowe’s and Home Depot. These systems come with step-by-step instructions that walk you through the process. The snap-together pieces are easy to figure out. The vinyl sections are joined with connector pieces with leak-proof silicone gaskets. The assembled gutters snap into hangers that are screwed to the fascia boards. You will need a chalk line, a drill with a magnetic screw-bit (or hex-nut) extension, a fine-tooth hand saw with miter box (or a miter saw), tape measure and pencil.
Sectional galvanized-steel gutters are also available, but the components must be soldered together – a tricky feat for inexperienced homeowners.
Professional installers usually prefer seamless aluminum gutters. They are virtually maintenance-free, you never have to worry about rust, and they rarely require painting. Companies such as Alcoa offer factory-preformed aluminum gutters in lengths up to 36 or 37 feet. They come in smaller lengths as well, but going seamless ensures a top-notch installation. Of course, transporting these long sections may present a problem. You can’t just strap these to the roof of the car. They need to be supported and protected from the wind. Your best bet may be simply to pay a roofing supply company a reasonable delivery fee to drop them at your doorstep.
Professional gutter installers often get around this problem by using a machine to extrude accurate lengths of gutters on site.
If replacing a gutter, then once the old gutter is removed, prep the fascia board with primer. If the fascia is damaged or rotted, replace it. Then determine the correct slope of the gutter, and snap a chalk line on the fascia to use as a reference. Gutters should slope 1 inch every 20 feet toward the downspout. Gutters in excess of 35 feet long should have a downspout at each end, pitching the gutter from the center to each downspout.
Vinyl gutters offer easy installation for the DIY’er. Most are available as sectional systems that mount to the fascia with brackets.
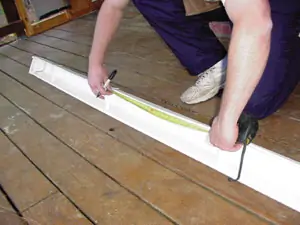
It’s generally easier and safer to take accurate measurements to determine the length of the gutter, and then assemble the entire gutter on the ground. This minimizes the precarious work you’ll have to do on top of a ladder. When measuring, bear in mind the small overhang of shingles at the edge of the roof. Also, check and double-check your measurements for the outlet tube. You must locate them in the right place with respect to the downspout location. It may help to use a framing square on the wall below to transfer the center line of the downspout up to the chalk line.
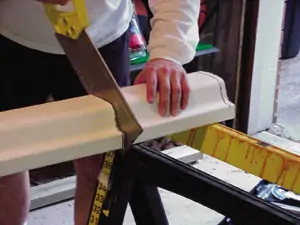
If installing a seamless system, cut the gutter to length using a hacksaw or miter saw and metal snips. (If cutting with a power saw, drop the blade slowly into the gutter, and wear goggles to deflect flying bits of metal). Remove burrs with a flat file.
The seamless and sectional gutters both require cutting to a length that will accommodate the various corners of the house.
If using a sectional system, assemble the sections according to the manufacturer’s instructions. Trim back any excess to fit between corners, slip-joint connectors, outlets and end caps. Before caulking the seams, dry-assemble the gutter and check it for fit.
The outlet tube of a sectional system will come as a component piece. However, for seamless systems, use the actual outlet tube as a template to draw a hole in the gutter. Support the gutter from beneath with a block of wood, and use a hammer and wood chisel to carefully cut the hole. Outlet tubes are usually installed with predrilled holes in the flange surrounding the tube. Seal all seams with gutter caulk.
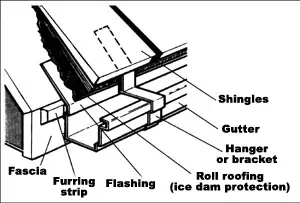
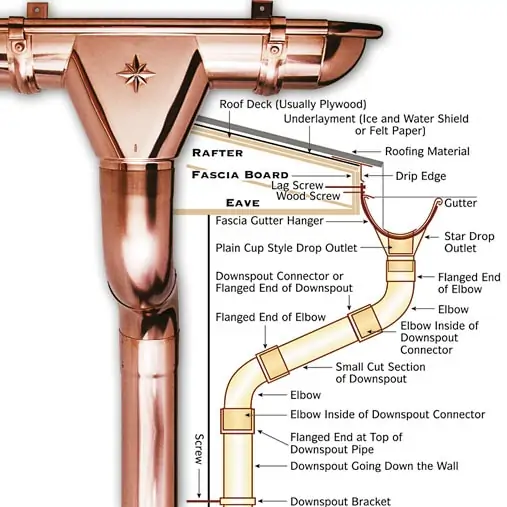
Next, install straps, hangers or brackets every 24 to 32 inches. Mount the hangers into a rafter tail, unless you’re lucky enough to have solid framing behind the entire length of the gutter board. Be sure to install hangers within 18 inches of any slip joints. Avoid using spike-and-ferrule hangers that tend to pull out of the wood over time. This can cause the gutters to sag. Instead, fasten the hangers with wood screws, which bite the wood and resist slippage.
Gutters are mounted with metal hangers or vinyl brackets that are fastened to the fascia with wood screws.
Make sure the gutter will be positioned so the drip edge of the bottom row of shingles flows into the midpoint of the gutter. It may be necessary to use blocks or wood strips to build out the fascia boards, adjusting the placement of the gutters.
A little assistance mounting the gutter couldn’t hurt, but if you’re flying solo, you can still install a 35-foot gutter by yourself. The trick is to hold it in the middle so it is balanced. Position the ladder in the center of the wall and make sure it is stable. And keep the gutter away from any overhead electrical lines. Mount the gutter, starting at the center and working outward. Have the gutter follow the slight slope designated by the chalk line.
Adding the Downspout
Measure and cut the downspout to length. Be sure to account for any elbows at the top of the downspout which may need to mount into the outlet tube. A second elbow at the bottom of the downspout should direct water onto a drainage system. Vinyl elbow connections are made with vinyl connector pieces. Metal elbows are connected with slip joints, pop rivets or liquid solder. Check the gutter manufacturer’s recommendations.
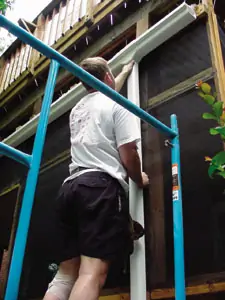
The high elevation of this rear two-story deck, coupled with a very steep slope at the end of the deck required the use of scaffolding for this gutter and downspout installation.
Fasten the downspout to the wall with straps at the top and bottom and at 6-foot intervals. If necessary, shim out the back of the gutter with wood blocks. Be sure the ends of the downspouts drain into a proper drainage system, such as a drywell, or onto pavement or a splash block that routes the water at least three feet downhill from the foundation of the house and onto properly graded soil. Doing so will ensure your new gutter system sheds all the water it needs to protect your home from moisture and rot.


