

Keeping Building Materials Out of the Landfill with Habitat for Humanity
By Rob Robillard
When you’re a carpenter you get all sorts of questions and requests for favors: How do I fix this? Can I borrow one of your tools? Is your pickup truck free on Saturday? One recent request really got my attention.
A good friend asked if I would help her remove some of the newer windows and doors from her house, already slated for demolition. She and her husband wanted to donate the items to the Habitat for Humanity ReStore.

Story Behind the Story
My friend is tearing down a circa 1960, energy-inefficient house that that was in need of major updating, exterior and interior, including all of the bathrooms and the kitchen.
They plan on saving the existing foundation and building an updated, better constructed home for their family with more energy efficiency.
When my friend and I met to go over the salvage mission she was emotional, explaining that they have 11 years of family memories in the house and could not justify destroying parts of the home that were in great shape and could be used by someone else.
She told me she had first heard of Habitat for Humanity when her husband had worked a few days constructing a house as part of a team-building effort his employer had organized. He shared his excitement with her and had always considered volunteering again for Habitat for Humanity.
While researching a place to donate her building materials, she came across the Habitat for Humanity website and wanted to work with them.
What is Habitat for Humanity?
Habitat for Humanity is a charitable nonprofit organization dedicated to building simple low-cost homes by forming partnerships with low-income families in need of decent and affordable housing.
Through volunteer labor and tax-deductible donations of money, land and materials, Habitat for Humanity builds or rehabilitates nice, simple houses.
Families are selected based on their level of need, willingness to work, acceptance of responsibilities and ability to pay a mortgage. Families must complete at least 300 hours of sweat equity and an additional 100 hours of homeowner education classes. Qualified families purchase Habitat homes with zero-interest mortgages, enabling them to own their home.
What is a Habitat for Humanity ReStore?
There are approximately 825 Habitat for Humanity ReStores (retail outlets) in the United States and Canada, and they accept donations of new and gently-used building materials and household goods. All materials are donated by local retail businesses, building contractors, suppliers and individuals. The Habitat ReStore sells new and used items to the public at a fraction of the retail price, typically 50 to 90 percent off.
The proceeds benefit Habitat’s mission to build affordable homes and help low-income families acquire them. All donations are tax deductible, and proceeds go back to the local Habitat for Humanity affiliate to build houses for families in the local community.
Habitat for Humanity and the Habitat ReStore rely heavily on corporate sponsors, donors and volunteers. What I liked most about the Habitat ReStore is that it gets folks who might not usually be interested in volunteering on a construction site to become involved in the process.
The Habitat ReStore is also a “green” process in that it’s an environmentally and socially responsible way to keep good, reusable building materials out of landfills.
The Habitat ReStore is operated by a local Habitat for Humanity affiliate and each one is unique. Most Habitat ReStores focus on home improvement goods like furniture, home accessories, building materials and appliances.
Volunteering
After hearing my friend’s emotional plea and the story of the Habitat ReStore, it clearly sounded like a win-win situation to me.
A home’s shelter is a basic need for all people and I was sold on the idea. I spoke immediately to my carpentry crew to see if they’d help me salvage items from the house prior to demolition day. They agreed that this was a worthy use of time and we scheduled the salvage detail for that Saturday.
Salvage Day
The homeowner received pre-approval for the items to be donated and then marked all of the items with blue tape to make identification easier for me and my crew.


We arrived at 7:00 a.m. and had to have everything removed by 10:00 am when the Restore truck was scheduled to arrive.
In order to run our reciprocating saws we had to run 200 feet of 12-gauge extension cords. The house power was disconnected and the jobsite’s temporary power was not yet live.

Removing the Windows
While we’ve installed plenty of new windows, we don’t usually remove them so this was an exercise in reverse for us. First we removed all of the interior trim and window sills before taking off the exterior clapboard siding immediately surrounding the window.


Once the siding was removed we were able to expose the window nailing flange, which was fastened approximately every 4 to 6 inches with roofing nails.
Careful use of a cat’s paw or nail puller was the key to removing the “roofers.”
After that it was simply a matter of tilting the window out of its opening and carrying it to the garage, our designated transfer location.


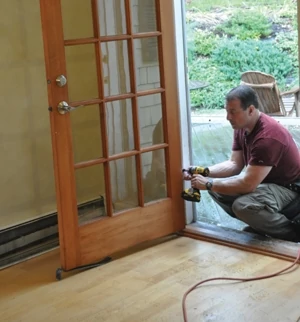
Removing Exterior Doors
Three newer exterior doors in this home were designated for salvage. Two were quality wood-frame doors and the third was an Anderson sliding door unit.
Upon closer inspection one of the exterior doors, a Simpson brand 15-lite door, had damage to its oak threshold so we made a decision to remove and salvage the door slab and hardware and leave the door jamb behind.
This Simpson door had a nice brass Baldwin knob and hinges set, so we removed the hinges from the door jamb but left them attached to the door for safe keeping. We took the hinge screws and strike plates, placed them into a plastic baggie and taped them to the door.

The front exterior door was protected by a porch roof and was in fantastic shape, so we removed the door and jamb, keeping them together as a unit.


To remove this door and jamb we first removed the door from the frame. To do this we used a nail set and hammer to tap the bottom of the hinge pins up, which allows for easy removal.


All three hinge pins were removed and then the door was removed and set aside. We used trim pry bars to remove the interior and exterior trim to expose the door jamb shims. Once exposed we used a reciprocating saw to cut the nails and then tilt out the door jamb from the framing.

Removing Interior Doors
Removing the interior doors was similar to the exterior doors, but easier to remove because they were installed with only a few finish nails.
The first step was to remove the door from the hinges, then all of the trim, both sides. Some carpenters do not use shims or install finish nails through the door jamb, and you’ll find out if they did at this stage. If the door has shims, it most likely has nails that need to be cut with a reciprocating saw.
Prepping the Doors for Transport
With the doors and door jambs removed from the framing we prepared them for transport. The doors were placed back into the jambs and the hinge pins were reinstalled.
A helper then held the doors in the frames to prevent sagging, and we installed one finish nail through the jamb and into the door, leaving the head of the nail exposed for easy removal.
Securing a door this way allows the door and its jamb to be transported and stored as one unit and also prevents the delicate three-piece jamb from sustaining twisting damage.
Removing the Slider
Removing the sliding door for reuse was like installing it in reverse. First the top retaining strip was removed so the moving doors could be lifted off the tracks and removed.
After the moving doors were removed the next step was to unscrew the fixed panel’s top “L” bracket and the four to five screws in the bottom of the threshold. Once all of the fasteners were removed the fixed panel slid toward the center and then tilted and lifted out.
Jamb screws were removed next, usually three to four on the side jambs and then three to four along the top jamb.
To remove the slider’s jamb we needed to expose the nailing flanges by removing the exterior clapboard siding / trim and any roofing nails in the slider flange.
The last step was to tilt the slider jamb and attached threshold out of the framing. We attached two diagonal braces to the opposite top and lower corners to keep the jamb from bending and damage.
Removing the Mantel
Most fireplace mantels that I have installed or removed were fastened with finish nails. This mantel was no different. Using two pry bars I worked my way down the mantel shelf and legs, prying the finish nails loose.
Once a space large enough for my hand was created I simply pulled the mantel off the wall.
We used end cutters to pull the finish nails out of the mantel from the rear to avoid damaging the mantel face.

Removing Sinks
The water in the house was turned off. We removed four Kohler sinks with attached faucets.
The drain at the P trap and the water lines were disconnected and then we focused on the caulking at the countertop.
We found that the best way to loosen this caulking was with a multi-tool and a scraper blade.
The multi-tool easily cut the old caulking, allowing us to easily lift the sinks out of the counter hole.
Editor’s Note: Robert Robillard is a remodeling contractor based in Concord, MA. He is also the editor of a www.AConcordCarpenter.com Visit his website to learn practical solutions to your home improvement problems
Side Note 1
Power Tools Overheating
Because we were using a super-long extension cord, we paid close attention to the tools’ temperature and any burning odor. Overheating means that your motor is working too hard and a drop in current can result in motor damage.
When a tool does not receive enough voltage to the motor, the motor may overheat. Overheating can lead to irreversible damage to the motor. Long extension cords gradually lose their ability to supply voltage. This loss can lead to overheating in tools so you need to use a shorter connection to the power supply if possible.
If you must use a long extension cord, use the thickest, lowest gauge extension cord you can find. We used 12-gauge cords and had no problems.
Side Note 2
Great Stuff, Great Price, Great Cause
Working to salvage items from this house was a very positive experience for all of us. And time well spent. Volunteering makes a meaningful, positive impact on my community and the well-being of individual families. What better way is there to connect with your community and give something back?
This is a great way to make that little corner of the world where you live just a little bit better. Whether you’re looking for a convenient place to donate, a rewarding place to volunteer, or a great deal on that one-of-a-kind item, check out your local Habitat for Humanity ReStore or visit online at www.habitat.org.
