

Using the Space Beneath a Gable Roof for Concealed Office Storage
By Larry Walton
Most of my storage areas are filled with seasonal stuff. I don’t use it all of the time, but when I need a gold pan or snorkeling gear I have it. When you start adding up camping, hunting, fishing, hiking, hockey, photography, soccer and golf, it’s lot of stuff. If I can keep it out of sight, I get to keep it, and making use of odd spaces in the house is a great way to maximize storage for my seasonal stuff.
My current house has a 12/12 pitch roof, which provides some useful second-floor space. The gables are on the east and west ends, which means you run out of head room as you walk north or south. It’s the triangular space beyond the headroom that we are making use of in this project.
If you have some top floor space with areas where you run out of headroom, we may actually be doing your head a favor with this project. If you start building your storage where you run out of headroom you’ll quit smacking your head on the ceiling. I know I did.
This storage-closet project does not involve framing in the traditional sense. It is simply comprised of bypass doors hanging from a backer angled to compensate for the slope of the ceiling. The track backer also backs the valance, which hides the track. The ends are capped off with a simple particle board sheet covered with drywall.
I started by standing a 6-ft. level on the floor, adjusting for plumb and marking where the edge of the level touched the ceiling. If you have a floor covering with a pattern in it, you may wish to match the outline to the floor covering. Otherwise it’s best to make sure the height of the new closet header is equal distance from the floor at both ends.
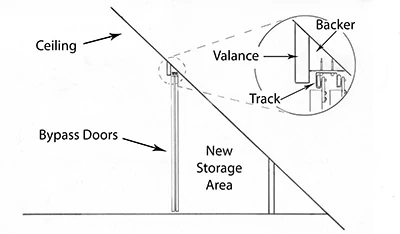
After snapping a layout line, we ripped some 4×4 stock with the ceiling rake angle along one edge. The other two surfaces support the bypass door track and the valance. The track attaches to the horizontal surface, and the valance attaches to the vertical.
We used our layout line to position the track and valance backer-board and make some measurements for our doors. We decided to build the doors before installing the backer-board to make sure we had the right clearance for the finished doors and bypass hardware.
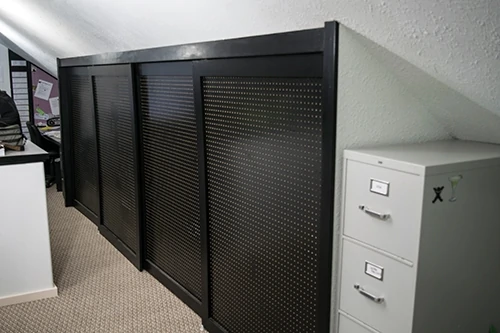
Hanging some bypass doors and capping the ends of the storage areas has proven to be an efficient and attractive way to hide my seasonal stuff. Here’s how we got it done.
Step by Step
![[02] LDW_15_01167](https://extremehowto.com/wp-content/uploads/2016/05/02-LDW_15_01167.webp)
We made the doors by simply mitering some 1×4 MDF trim boards with biscuits in the joints to form frames.
![[03] LDW_15_01179](https://extremehowto.com/wp-content/uploads/2016/05/03-LDW_15_01179.webp)
We nailed sheets of pegboard to the backs of the frames. Note that only 1/2 inch of the 1×4 frame is showing. This overlap of 3 inches onto the frame adds to the strength of the doors.
![[04] LDW_A_3790](https://extremehowto.com/wp-content/uploads/2016/05/04-LDW_A_3790.webp)
The finished doors helped us to determine the final location of the track and valance backer-board.
![[05] LDW_A_3793](https://extremehowto.com/wp-content/uploads/2016/05/05-LDW_A_3793.webp)
We fastened the backer-board with long screws into the rafters, which were at 2-ft. intervals. The backer-board required shims at some of the rafter locations to keep it flat.
![[06] LDW_A_3796](https://extremehowto.com/wp-content/uploads/2016/05/06-LDW_A_3796.webp)
We ripped the ceiling rake angle along the top edge of the 1×4 MDF trim boards and nailed them to the face of the backer board as a valance to hide the bypass track.
![[07] LDW_5444](https://extremehowto.com/wp-content/uploads/2016/05/07-LDW_5444.webp)
We used some particleboard sheets to cap off the ends of the storage closets. These ends did not need a precise fit along the ceiling and the back wall because they worked as a backer for the drywall finish. They did, however, need to be flush with the valance and plumb from valance to floor.
![[08] MRW_15_04831](https://extremehowto.com/wp-content/uploads/2016/05/08-MRW_15_04831.webp)
We attached 2x nailers to the floor and back wall for the particle board end caps. The top outside corner attached to the end of the bypass track backer and the valance trim board.
![[09] LDW_A_3853](https://extremehowto.com/wp-content/uploads/2016/05/09-LDW_A_3853.webp)
We installed drywall over the end walls and taped and textured them to match the existing walls, which as you can see had some random, rough texture.
![[10] LDW_15_01155](https://extremehowto.com/wp-content/uploads/2016/05/10-LDW_15_01155.webp)
Some vertical trim boards capped the front of the end walls and covered where the doors met the end walls. We left a little overhang past the drywall end walls so a bead of caulk could make the transition between the vertical trim board and end wall.
![[11] 3830](https://extremehowto.com/wp-content/uploads/2016/05/11-3830.webp)
We painted the doors, valance and vertical trim boards black to match our office furniture.
Side Note
PRO TIP FOR PRIMING & PAINTING
To prep the storage area for painting, we used a primer designed for the first coat on raw wood. These primers seal in resins, fill voids and improve adhesion. Also, be sure to prime and paint the backs of the doors to keep them from warping. Unsealed door panels will absorb moisture, which causes expansion on the unpainted side, resulting in a warped door.
