

By Matt Weber
The technical term for smoothing wood flat prior to finishing is “abrading,” but most DIY’ers know the process by the layman’s term, “sanding.” From removing paint to polishing grain for wood stain, sanding is an indispensable DIY skill.
The abrasive particles in sandpaper are graded and numbered as “grit,” indicating how coarse or fine the particles are, which directly correlates to the paper’s ability to scrape away material. Sandpaper with very coarse grits in the 50 to 60 range is ideal for heavy shaping and material removal, such as stripping away old finishes or thinning the stock. Medium grits ranging from 120 to 180 can be used for light shaping and finishing. Fine grits from 220 to 280 are suitable for smoothing the wood for the application of a finishing product like paint or stain. And the very finest grits range from 320 to 600, ideal for final finishing, taking off sharp edges, and sanding between coats of varnish.
A good approach for a DIY’er is to select three grits to have handy. Start with the sandpaper that’s just coarse enough to remove the worst surface defects. Using too coarse a grit risks leaving deep scratches in the wood, which requires more fine sanding later. Use too fine a grit, and you’ll be sanding forever. An 80-grit sandpaper is usually a good place to start. However, coarse grits will leave fine scratches on the wood, so the next step is to turn these large scratches into smaller scratches with a finer paper of around 120-grit. For the final sanding phase, a 220-grit sandpaper will work for most types of wood. Wood with dense grain may require finer grits, like 320-grit to remove the last of the scratches, resulting in a smooth, ready-to-finish surface.
The tools that hold the sandpaper come in a wide range of shapes and sizes, all with specific intended applications. Here’s a rundown of what’s available.

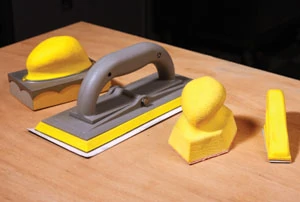
Manual Hand Sanders
Obviously, using a hand sander is slower and more labor intensive than using a powered sander, but it’s quiet, generates less dust and gives the user complete control of the sanding action. Rather than using a folded piece of sandpaper and rubbing with your fingers, you’ll get better results from a sanding block. A sanding block distributes the pressure evenly over the working surface of the tool for a flatter finish, whereas finger pressure can result in uneven grooves where pressure was concentrated only at the fingertips.
Generally, it’s best to sand with the grain of the wood to eliminate cross-grain scratches. In some applications, such as removing deep scratches or removing a finish, you will achieve faster material removal by sanding across the grain at a 45-degree angle, but expect a lot of cleanup sanding to remove the inevitable scratch marks. When sanding with a block, use firm but not excessive pressure. Let the abrasive grit do the work, and change the paper often—this holds true for any type of sanding tool. Another good rule of thumb is to finish up a sanding job by using a fine-grit paper to soften the edges of the work piece. Create a tiny bevel to eliminate sharp edges on wooden objects, which reduces the risk of splintering and nicks. Only use a hand sander—not a powered sander—to soften the edges.
On a smooth, non-grained surface such as metal, move the sandpaper in small circular motions.

Orbital Sanders
Powered orbital sanders, also called pad sanders, are available in models that use 1/2-, 1/4-or 1/3-sheets of sandpaper. Depending on the model, you can attach the sandpaper to the sanding pad with hook-and-loop fasteners, use precut sheets with peel-and-stick backing, or simply cut a sheet of sandpaper to size and attach it with clamps at the front and rear. Some models require two hands to operate, while smaller models, called palm sanders, require only one. Both types move in a slight circular pattern, which feels like they are vibrating, and should be used in the same direction as the wood grain to avoid scratching the stock. When selecting a sander, look for a palm sander that has a dust-collection device or a hookup for a vacuum system to help maintain air quality in the work area. Also, by sanding in a circular pattern the grit crosses the wood grain, which generally leaves tiny swirl marks on the surface. Before applying a finish, these swirled scratches need to be hand-sanded out in the same direction as the grain.


Random-orbit Sanders
Among the most popular hand sanders are random-orbit sanders that utilize a circular sanding pad. The unique motion of a random-orbit sander operates by rotating the sanding disk while the whole pad simultaneously moves in an oval pattern. This creates a random sanding pattern so the abrasive particles never follow the same path to minimize scratches. Random-orbit sanders are excellent tools to remove finishes and prep the wood for final sanding. Five- and 6-inch models are available, with 5-inch being the most popular for DIY’ers. Most models feature integrated dust control because the action of the tool will kick up a lot of dust. Also, look for variable speed control to help match the sanding speed to the application at hand.

Random orbit sanders do have limitations. For one thing, the circular pad means it can’t access enclosed square corners, such as the inside of a shelf. Additionally, while random-orbits work more quickly than other vibrating power sanders, they can’t remove material as aggressively as a belt sander for those heavy-duty chores.

Belt Sanders
Belt sanders are the real beasts of the bunch when it comes to fast, aggressive material removal. Much like a handheld, portable version of a small benchtop sander, these powered sanders feature a continuous loop or belt of abrasive paper that stretches across two wheels at the front and back. The belt spins and removes stock for quick work on the initial phases of rough sanding jobs. Since belt sanders remove a lot of material at a rapid rate, some have variable speed controls that enable the operator to adjust the sander to run at a more comfortable level. However, never use a belt sander for finish work, as the action is simply too aggressive and you’ll likely do more harm than good to the work piece. That fast spinning belt also works like a spinning tire pulling the tool forward, which can make these models tough to control and unsuitable for delicate sanding operations.
When operating a belt sander, use both hands and move around the work piece to prevent digging a divot in a single spot. Work the sander at an angle to the grain of the wood to rapidly remove a lot of material. Or, position it parallel to the grain to minimize scratches. Note: Always make sure the trigger is OFF before plugging in a belt sander, otherwise the sander may make like a tiny dragster and launch across the table or room, until it crashes into some object or jerks the cord out of its socket.
Walk-behind floor sanders are like belt sanders on steroids. They remove finishes, scratches and dents by aggressively sanding away the surface material at a rapid rate. Floor sanders are large and expensive, but can be rented by the DIY’er to avoid investing in the high cost of the tool.

Detail Sanders, Dremels and Oscillating Tools
Some models of palm sanders have a bullet-shaped abrasive pad with a pointed nose for detail work and to access tight spaces and inside corners. Some detail sanders, sometimes referred to as contour sanders, can be fitted with specially shaped interchangeable pads for sanding edges and rounds on non-flat surfaces.

Rotary tools, such as a Dremel, can also be outfitted as detail sanders for sanding around odd shapes and small nooks in woodwork. When equipped with small sanding drums they are frequently used for craft projects and millwork, such as window and door casings. Detail sanders are available in corded and cordless models and usually come with multiple attachments.

Among the most versatile types of power tools are the multi-function oscillating tools popularized by the Fein Multimaster. These days a variety of manufacturers, including Bosch, Rockwell and Craftsman, are running with the concept of these multipurpose devices, which do everything from scrape and grind to flush-cut and sand. Such tools generally come with a variety of attachments for removing floor covering and adhesive residue, and usually include hook-and-loop sanding plates for both rough and smooth sanding tasks.


Drills and Discs
For rough sanding and scouring rust from metal, several sanding accessories are available with a post that fits into the chuck of an electric drill. Sanding disks are available in 4- and 6-inch versions with a soft rubber face that can be fitted with a round piece of sandpaper. Another useful tool is a wire brush, similar to what’s often mounted on a bench grinder. Stiff wire brushes spread in a circle around a hub and operate similar to an abrasive paint brush.
When using a drill for sanding, use one hand around the motor and the other around the handle for best control. Only use the drill periodically, allowing it to rest and cool. Some drills may not be designed for sustained heavy-duty load, in which case you should opt for an electric angle grinder or a dedicated disk sander.

Abrasive power tools also have uses beyond wood prep and paint removal. Bench grinders, for example, feature an abrasive wheel for grinding and shaping a variety of materials, including tool-sharpening applications. Similar in concept but unique in design and engineering is the Work Sharp tool sharpening system. The Work Sharp utilizes a high-speed abrasive disc on a glass wheel, as well as an air-cooled abrasive port, to sharpen a wide variety of tools. This unique system sharpens everything from chisels and flat blades to lathe tools, carving tools, scrapers, putty knives and more. It’s just one more example of today’s sanding technology expanding and evolving to meet the growing demands of pros and DIY’ers alike.
Resources:
Craftsman, www.craftsman.com
Porter-Cable, www.deltaportercable.com
Rockwell, www.rockwelltools.com
SideNote 1
Fuzzy Was It?
After you’ve sanded a wood surface smooth for finishing, wipe it with a damp cloth and let it dry. This not only removes dust, but the moisture will raise the grain of the wood, making the surface feel fuzzy. Then sand away the fuzz. This extra step reduces the likelihood that the finishing product itself will raise the grain and affect the look and texture of the wood.
 SideNote 2
Paper Trail
Not all sandpapers are created equal. Here’s a rundown of what’s available for your next project.
Aluminum Oxide—The most common type of sandpaper is aluminum oxide. This is a good choice for smoothing and shaping wood, available in a wide variety of grits, usually brown or gray in color. Aluminum oxide is hard and sharp, and it fragments as it cuts, which renews the sanding surface.
Zirconium Oxide—The “new kid on the block” is zirconium oxide sandpaper, commonly known as cubic zirconium. Zirconium oxide has a diamond-like quality that is harder and sharper than standard aluminum oxide, so it cuts faster and holds its cutting edge longer.
Silicon Oxide—Silicon oxide sandpaper is usually black and glued on a waterproof backing for wet-sanding applications. Water is washed over the surface of the work piece, clearing away dust that can clog the abrasive to prevent heat buildup. Silicon oxide is available in finer grits, generally 400 and up, used for sanding non-wood surfaces, such as metal and stone, to a glassy finish.
Garnet Sandpaper—Typically reddish orange in color, garnet sandpaper cuts slower than other abrasives. Because it tends to burnish the surface, garnet sandpaper is best for prepping wood prior to finishing so the wood more evenly absorbs stain.
Emery Cloth—Emery cloth uses black emery abrasive adhered to a fabric backing so it remains flexible. The abrasive grit removes paint and corrosion from metal surfaces, while the finer grits clean and polish. Emery cloth is often used to prepare copper pipe before soldering.
Sanding Screens—Generally used for finishing drywall joints, sanding screens are a coarse fiberglass mesh covered with abrasive material. The drywall dust passes through the holes in the screen to prevent clogging, and the screens can be renewed by washing with water.
