

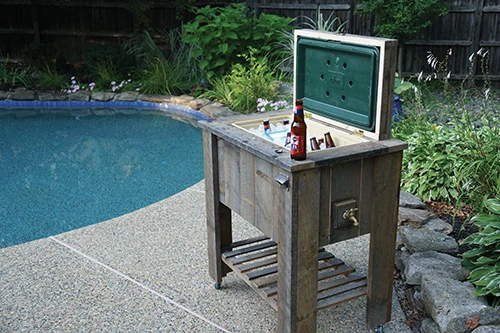
I love backyard barbecues, and for many years we used two Coleman coolers to store beer and soda. While this worked fine, I wanted something better looking, easier to access and maneuverable. After seeing a vintage rolling cooler at a media event, I attended, I decided that I’d like to make one of my own.
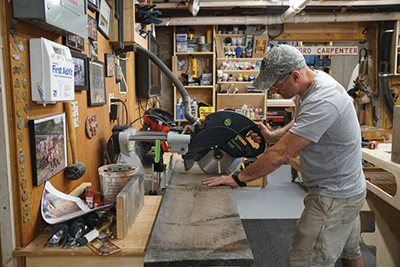
The first step is to gather all your materials together and decide what type of wood you want to use. I chose 12-in. rough sawn pine because I really like the rustic look of it.
Building the Frame
I had an old Coleman cooler sitting around so I chose to use that. I removed the handles, drain spout and hinges.
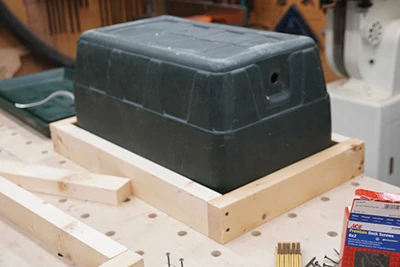
Tipping the cooler upside down on my workbench, I started this project by constructing an upper and lower frame. This frame is used as a skeleton to the project, and all the components from the siding, legs, top sill and lid will attach to it.
I constructed the “upper frame” out of framing material. I ripped scrap 2×6 down to 1-1/2×2-in. and built a frame to enclose the top portion of the cooler. I fastened these four parts together with two 2-in. screws at each corner. Make this upper frame snug. Later, you will be installing screws through the cooler and into this frame.

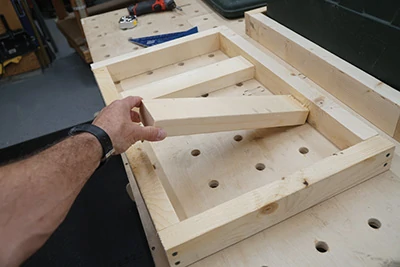
Next, I built the bottom frame. This is the frame that will hold the cooler and take the weight when full of beer and ice. This frame consisted of a perimeter of ripped down 2×6 stock and two wood stretchers bridging the frame.
Cut the Side Material
With the cooler upside down on my work bench and my bottom frame on top of the cooler, I then measured the height of the wood sides.
Important Note: Deduct the thickness of the wood you are using from this side material measurement. This is important because you will later be covering the upper frame with this wood. If you don’t take this step, your lid will not align and close correctly. I neglected to do this and had to add rough sawn spacers to the lower frame stretchers to make up for this error.
I ripped the rough pine down to 6-in. wide boards and then added a bevel to the cut ends for a decorative touch. To add the bevel you can use a block plane and do it manually, or set up a router and a bevel bit.
Note: throughout this project I tried to hide or eliminate cut edges when I could. Areas that could not be avoided ended up being on the top lid, and I’ll describe how I dealt with that later in the article.
Attach the Side boards
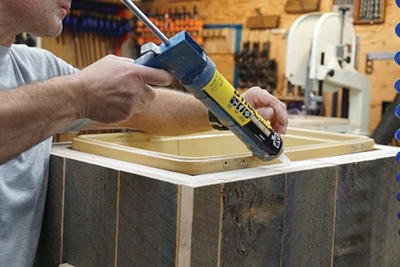
I attached the 6-in. side boards to the upper and lower frames using DAP DynaGrip Wood-Panel-Trim adhesive and 2-in. galvanized finish nails driven with a pneumatic nailer.
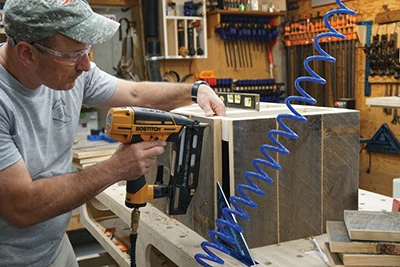
Note: The DAP DynaGrip Wood-Panel-Trim can be used for bonding all trim materials including wood, foam and PVC. It is a latex formula that wipes off and washes off your hands fairly easy. The new DynaGrip adhesives were designed to deliver high-strength bonds in hours and to provide exceptional performance even in extreme weather conditions.
When installing the boards, I spaced them evenly on the front face and left any filler gaps at the corners. Depending on how large or small the end corner gaps were, I filled them with scrap boards or left them. The areas are getting covered by the legs in the next step and will be hidden.
Note: The bottom is left open to drain and allow air to dry the back sides of the frame and side panels.
Making the Top Sill
The top sill covers the upper nailing frame and also overlaps the sides enough to hide the end grain of the legs, plus some additional overhang. I chose 1-1/4-in. overhang (3/4-in. leg coverage + 1/2-in. overhang).

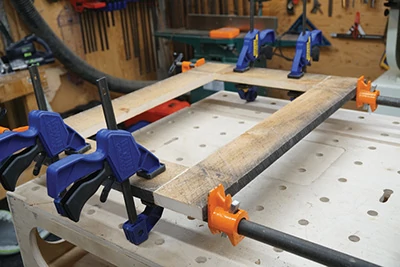
The top sill is constructed out of four rough sawn boards with live edges facing out and the cut edges facing the cooler.
The boards fit snug around the cooler’s perimeter. I left 1/8-in. of a space on all sides to avoid conflict with the lid closing. The top sill boards join together with butt ends. To ensure a solid fit I fastened them with a Festool Domino XL joiner and then glued and clamped.
Once the glue dried, I slipped the top sill over the cooler top and secured it to the framing with DAP DynaGrip adhesive and finish screws.
Note: This cooler does not have side handles, but the sides of the top sill lend itself to an intuitive handle, so I installed a few screws through the top sill and into the upper frame at this location. Keep the screws close to the cooler so the top lid hides them.
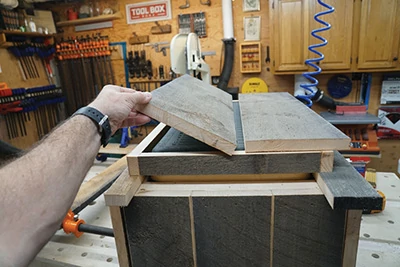
Build the Lid Cover
I then installed the Coleman plastic lid onto the cooler and measured the exposed sides. Ripping four boards to that size and fastening them together with finish nails gave me a skirt that would hide the sides of the lid. I secured this to the Coleman lid by fastening screws from inside the lid and into the wood. Take care to use the correct length fastener, and not over-penetrate the wood.
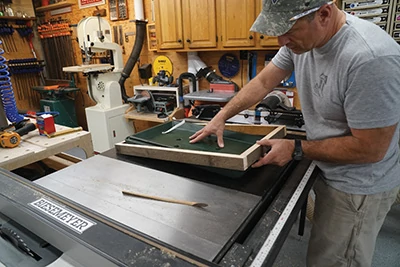
I finished the top of the lid by ripping a 12-in. rough sawn board into two even boards to completely cover the skirt trim I created. I used the Festool Dominos and glued this lid together, and then attached the lid to the sides with adhesive and finish nails.
When all this is complete, secure the cooler to the upper frame with screws. I then applied some adhesive on the Coleman lid top and placed it into the wood casing. I used 4-6 screws, from the outside of the rough sawn wood into the upper cooler lid.
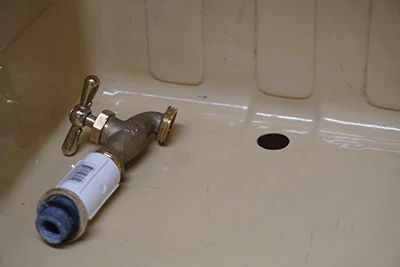
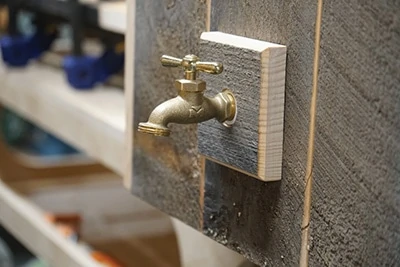
Attach the Drain Valve
Part of the nostalgic look of this cooler is the cool brass water spigot. I purchased some 1/2-in. PVC piping to connect the brass spigot to the hole in the side of the cooler.
Mark where the hole will go through the side of the wood surround. Then, drill a small hole through the wood from the inside. Next, use a larger Forstner or spade bit or hole saw from the outside to finish the full sized hole. The size of the bit will depend on the diameter of the pipe you’re using.

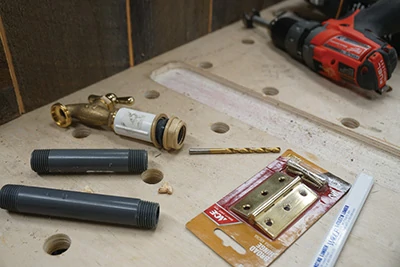
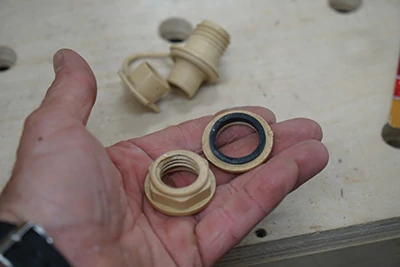
Your hardware store’s PVC pipe/sprinkler section will have the supplies. I used the plastic hardware that came with the cooler to attach to the threaded 1/2-in. threaded nipple. The 1/2-in. coupling secured to the other side of the cooler. I then used a 4-in. long 1/2-in. riser to go from the coupling to the spigot/shutoff valve. I reused the stop nut and washer to the original cooler drain.
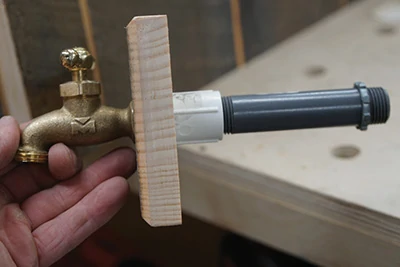
Note: I had to play around with pipe lengths to make this work, and in the end I added a wood block to the outside of the cooler to account for the extra pipe length.
Attach the Lid to the Top Sill
With the new wood-covered lid in place, on the back of the cooler, I measured in equal distance and marked my hinges on the lid and top sill. Using a sharp chisel I recessed the hinges on the top sill only. I then installed the hinges and also reinstalled the lid strap that came with the cooler. This strap keeps the lid from flopping over and will now protect the brass hinges.
Attach the Legs
I used 1×4 rough sawn boards for the legs in order to avoid having cut edges. I attached the two legs together with three 2-in. screws and then mounted them to the case, butting up tight to the top sill. Once in place, I fastened them with eight 2-1/2-in. screws into the top and bottom frames.
Attach the Hardware
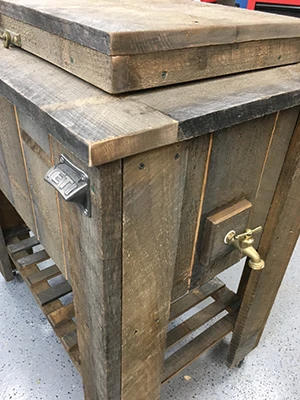
For the lid handle, I deviated from the normal handle look and instead opted for an old tarnished brass sash lock. I used the Domino cutter to cut a slot for the lock. To open the lid, you simply lift up the lock and pull.
I also mounted a YETI bottle opener, I chose the YETI opener because it’s cool looking – you pick what you like.
Attach the Wheel Casters
To attach the wheels, I added a block of wood (3/4x1x6-in.) on the inside of the legs for additional support and also to support a shelf. I placed the rough edges of the block facing out and used adhesive and screws to attach it to the legs.
I then fastened the casters to the bottom of the legs with four galvanized 1-1/4-in. screws.
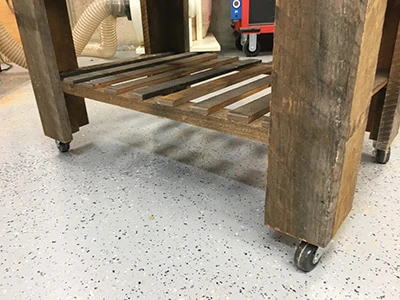
Build a Lower Shelf
I decided to attach two stretchers, one attaching the front legs and the other the rear legs. The idea was to allow for a “open slat” type shelf.
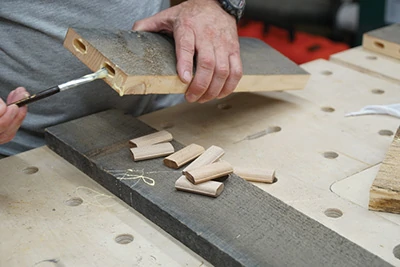
I ripped all the scrap rough sawn boards I had, favoring the ones with live edges, to 3/4×2-in. strips. I then ripped the 3/4-in. side down to 1/2-in. strips. Using a Ridgid belt sander, I sanded the end grain. I also used the belt sander to add bevels to the ends for decoration. The coarse abrasion of the belt sander helps maintain the rough sawn appearance.
Staining the Exposed End-grain and Edges
The last part of the project was to blend in the exposed end-grain and edges. I used a Minwax Early America 230 stain to darken the wood. I then rubbed a graphite pencil over this area and rubbed it in with sandpaper and a rag. The effect was to create an old, weathered, dirty patina to match the rough sawn boards.
Fill with Beer and Ice and Serve!
The best part of this project will be filling it with ice and beer and enjoying it. The casters will allow me to wheel it off of my screen porch and onto the patio or pool deck. I can then wheel it back to store it and keep it from the rain. This cooler is going to be a great addition for your summer barbecues, events and parties.
Side Note
Tools Needed:
- Miter saw
- Orbital sander
- Table saw
- Pneumatic nailer and 2” nails
- Drill
- Tape measure, ruler, pencil
- Wrench
- Bar clamps .
- Speed square
- Sander / hand sander
- Hand plane or router with bevel bit
- Forstner bit or hole saw set
- Wood glue
- DAP DynaGrip Wood Panel Adhesive
- Galvanized screws of different lengths
Materials Needed:
- Cooler to use an insert
- 4” PVC riser, 1/2” threaded piping,
- 1/2” threaded coupler
- Brass knob spigot/valve
- Four locking caster wheels
- 2 Hinges
- Handle(s)
- Bottle opener
- Bottle cap catcher
- Paint Brush
- Minwax stain – Early American 230
- Wood – I purchased 1×12 and 1×4 rough sawn wood for this project
- Reuse some of the cooler parts: Keep drain plug parts and the lid strap and stainless steel screws.
