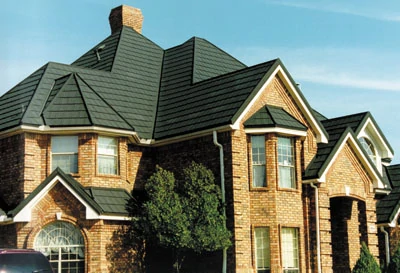
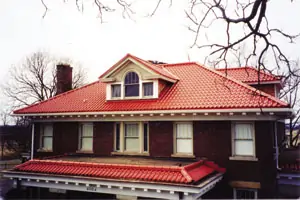
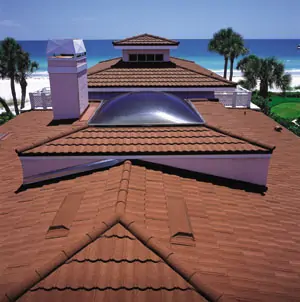
Strength and style: Everybody wants some — and when it comes to roofing — everyone can have it. The durability and longevity of a metal roof is probably the biggest selling point for using metal as a roofing material. But the striking appearance of today’s metal roofs is what makes the decision even easier. Choose from multiple styles, colors and textures to settle on a new metal roof that enhances the visual style of your home and withstands hail, fire, earthquakes and hurricane-force winds.
While weather exposure can cause asphalt roofing to require reinstallation every 12 to 20 years, a metal roof can withstand just about all the harsh weather Mother Nature can dish out. Other roofing materials such as wood shingles and tile have varying degrees of weather-related problems as well. Even concrete tile roofs experience problems with freeze/thaw cycles in colder climates. But a metal roof retains its good looks and performance for years, which is why most of them come with a 30- to 50-year warranty. And recoating a metal roof can usually extend its life even further.
The wide variety of styles is the second big plus for metal roofs. Many homeowners are surprised to learn that metal roofs come in a wide variety of patterns and designs that fit into any neighborhood décor. Many of these options look just like typical roofing styles, such as cedar shake, slate, tile, shingle and continuous-seam vertical panels.
A Strong Investment
A metal roof is certainly a big investment; because it’s a premium material, you can count on a new metal roof costing at least twice as much as an asphalt-shingle roof. You’re paying for long-term quality as well as the skilled professional installation required. The price is comparable to tile or cedar-shake roofing, but it’s an investment that will pay off in the end. While other premium roof systems look good at first, they break down over time from exposure to wind, rain and harmful ultraviolet rays. If you plan on staying in your home for years to come, then consider the cost over a
30-year period; when you would otherwise have to replace two or more asphalt roofs, your one-time investment in a metal roof will save money in the long run. It will stand strong in the face of snow, hailstorms or even wildfires. And many products are tested and even warrantied to resist wind gusts up to 120 miles (that’s equal to an F2 tornado, for those of you living in “Tornado Alley”).
Your insurance costs may even see a silver lining in the metal option. According to the Metal Roofing Alliance, some insurance companies in states such as Texas offer homeowners with metal roofs up to 35-percent discounts on coverage.
And the cost savings may not stop there. Metal roofs are excellent insulators and may save on heating costs in some situations. A light-colored metal roof can actually reflect a portion of the sun’s radiant energy, saving you money on cooling costs. New infrared-reflective pigments can result in high reflectivity in dark colors as well. And considering the low effort involved with maintaining the roof, which requires little more than an occasional spray-off with a garden hose, a metal roof saves you labor as well. This low-maintenance aspect is why metal is used so often for commercial and institutional buildings. If companies want a worry-free roof for 30 to 50 years, they choose metal.

One Tough Project
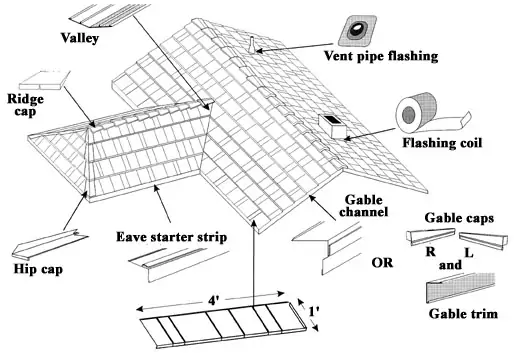
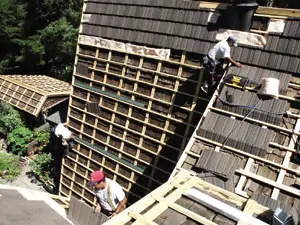
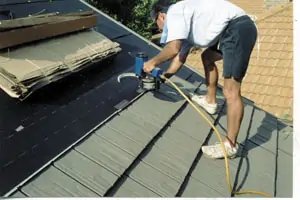
Metal roofing is not your typical weekend DIY project. Installation requires a wide assortment of tools, accessories and special techniques that only come from working with professional installers. While writing this article, I requested Classic Products’ installation manual for their Timber Creek Shake brand of steel roofing. Classic Products sent me the very detailed installation manual they supply to their professional installers — practically a textbook with highly detailed chapters on roofing gable channels, valleys, eaves, edge trim and more, as well as techniques and material lists for flashing virtually any type of roof protrusion. Suffice it to say, this issue of Extreme How-To doesn’t have the page count to do the complex installation procedure justice. And you can bet instructions will vary from manufacturer to manufacturer.
The smart move is to hire a contractor to install a moderate to complex metal roof. Look for a contractor who has substantial experience with the product you’re choosing or has been trained by the manufacturer. Metal roofs do not all install in the same manner. Be sure to check your installer’s references and make sure they have the proper licensing and insurance to work on your home.
Installing a metal roof is a very challenging, professional-grade project. But if you can follow instructions and have an assortment of metalworking tools, you may be able to complete a simple continuous-seam installation.
Selection
Today’s residential metal roofing is made to look exactly like common roofing material, only stronger and more durable. Check out some material samples to find the right style and finish to match your home and neighborhood. In addition to the many available shapes and styles, metal roofs are available in a wide array of colors and textures, such as metal shingles finished with ceramic-coated stone granules. Choose from a variety of metals as well — steel, tin, aluminum or copper.
With regard to the many options available for metal roofs, make sure the product’s design is appropriate for your home’s construction. Most metal roofs require solid decking, but some can be installed over lathe boards or over wood shingles on lathe. Some of the more detailed designs can even be installed over slate roofs.
First Steps
It’s no secret that roofing can be precarious work, so be very careful. As you reach the roof, inspect it for working hazards. Note the presence of loose roofing or weakened substrate, as well as protrusions such as pipe flashings, electrical wiring, nails, stabilizing wires and extensions cords. Look for moss growth or dampness that might make the roof slick or cause equipment to slip.
Always be aware of your position on the roof relative to your surroundings. Take note of the locations of roof openings, edges, equipment, co-workers and other potential hazards.
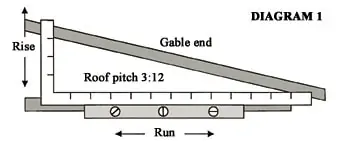
Check the manufacturer’s recommendations regarding the minimum roof pitch required for installation. You can check the roof’s pitch with a measuring square and a level. As shown in Diagram 1, a pitch of 3:12 will have 3 inches of rise to 12 inches of run.
The next step is to determine if you will be able to place the new roof over old shingles, or if the old shingles will have to be removed. Again, check the recommendations for which subsurfaces you can install over. In some cases, a new metal roof may be applied over old asphalt shingles. Inspection of asphalt shingle roofs should include:
- The number of layers of asphalt shingles — because of weight constraints, some local building officials limit the number of layers of old roof that can be covered.
- The condition of the asphalt shingles — badly buckled or cupped shingles should be repaired to provide a flat, smooth surface.
The process of removing old tiles is called a “tear-off” job. Remove the shingles with a wide, flat shovel, using a claw hammer and pry bar to loosen stubborn nails. Use the pry bar to loosen and remove the flashing around stacks and vents. A tear-off creates a lot of debris. As you move along, sweep the debris off the roof. Loose debris causes a hazard, especially on a steep roof. You should also have some method of collecting the debris and preventing it from damaging shrubs or flowers planted near the house. Dispose of the debris once you’re finished; there will be a lot of it. Once the old shingles and asphalt paper covering the deck have been removed, carefully inspect the decking for rotting or holes and replace any damaged decking. Small holes can be patched over with pieces of flashing. Most manufacturers of metal roofing require at least a minimum 1/2-inch decking or equivalent, fastened per local building codes.
The instructions included with your roofing system will specify the material and fastening requirements for the roofing underlayment. The underlayment must meet or exceed local building codes and fire requirements. A minimum 18-inch vertical and 6-inch horizontal lap is usually required. The underlayment should overhang all the roof edges by 1 1/2 inches, extend up all vent pipes at least 1 1/2 inch, and extend up all sidewalls and other penetrations by at least 6 inches. It is critical that the underlayment be installed correctly to avoid problems in the future. Metal roofing can develop condensation beneath it during certain weather conditions. The underlayment prevents this moisture from causing damage.
For years, the standard underlayment has been one layer of 30-pound roofing felt. In the case of metal roofs that rest right against the underlayment, a “slip-sheet” of red rosin paper was often installed over the felt paper to keep it from sticking to the metal. However, new technology is bringing many polymer-based underlayments that work very well beneath metal roofs because they serve as their own slip-sheet. These polymer underlayments are also very light and easier to install than traditional felt paper.
The Roofing Phase
When it comes time to install the actual components of the metal roof, that’s when this article takes a backseat to the instruction manual included with your roofing system. The basic rule of thumb is to follow the instructions to the letter. This is no time to get creative.
Make sure you or the installer use all matching components during the installation. A basic continuous-seam installation is generally done with lock-together metal panels, but even this job is not as simple as “tongue meets groove” — there is a raft of components and accessories required. All assembly parts must come from the same manufacturer and be specified for the make and model roofing system you’ve chosen. Don’t try to mix and match components from another system, and don’t try to fabricate pieces for the roof. These systems include special starting strips, clips, caps, edge pieces and more. All of these make up the total roof system and are designed to fit together to accommodate the proper ventilation requirements and the structural movement of the components due to changes in temperature.
Metal roofing moves in response to temperature changes, and this needs to be accounted for in the installation phase. Manufacturers are very aware of this movement and take this into account in their installation instructions. This is why it is so crucial to follow all recommendations, paying close attention to the installation of fasteners, fastener length, type and placement. When the metal roofs move, if these fasteners are improperly installed, a leak may eventually develop. Many metal roofs allow for expansion and contraction by being designed to “float” on their clip fasteners. Other products are designed with folds in the metal, which have an “accordion effect” to allow for the metal’s movement.
Final Note
One frequently asked question is: Would a metal roof be too heavy for certain types of homes, or for smaller structures like a detached garage or porch?
The answer is no. A metal roof is, on average, 50-percent lighter than an asphalt shingle roof and 75-percent lighter than concrete tile, fiber-cement shakes and slate. With metal roofing, weight on a structure is not an issue.
And, given the fact that installation of a metal roof is such a complicated, professional-grade project, it may be a good idea for those extreme DIY’ers willing to take on such a project to try installing over a smaller structure, such as a porch or shed, before jumping into a full home re-roofing job. Test your skills on a manageable, simple installation before getting involved in a project that may be over your head, so to speak.


