

By Larry Walton
Stepping through the floor was not the first hint that it had rotted out, but it sure moved the floor repair up on the priority list for a house with plenty of remodel projects to do. Other clues about the floor damage included discolored flooring, mold along the wall and lots of opportunity for water leaks with washer, toilet and water heater all in the vicinity.
If you want to make a distinction between dry rot and wet rot, this was quite wet, which means that the fungi that caused this wood damage were the types that prefer a wet environment. Dry rot involves less water, but the destructive fungi that cause dry rot still need some moisture to do their wood fiber-eating thing.
The homeowner had recently completed some plumbing upgrades, which took care of the water source for the rot, but the floor damage was already done. The demolition stage of repairing a rotted section of subfloor is like cancer surgery. Once you get started, you must keep following the path of the water-born destruction until you reach the full extent of the damage. You don’t always know where the surgery will take you. Sometimes it extends along subfloor framing for some distance. It can also damage the wall framing around it.
This project has all of the above, which makes it ideal for demonstrating subfloor repairs. The damaged area was large, it involved subfloor framing, it extended into two rooms and there was damage to the partition wall, which happened to be full of plumbing. We dealt with most of the worst-case components you might run into in a subfloor repair.
Subfloor repairs can seem very radical, but keep in mind that the original construction process was just putting boards together. Not going deep enough to address the full extent of the problem may seem easier at the moment, but covering it up will come back and bite you. The wood destroying fungi will continue to grow if not removed, and anything the subfloor system supports will be vulnerable. So do the radical surgery and put it back together better than new. Here’s how we did a recent subfloor repair.
Step by Step
The worst of the subfloor damage was found with a foot going through the floor. It didn’t take much to dig up some of the flooring, plywood underlayment and the 3/4-in. shiplap that served as the subfloor.
![[01] MRW_15_4599](https://extremehowto.com/wp-content/uploads/2016/03/01-MRW_15_4599.webp)
Pulling back more of the underlayment revealed that the water-fueled damage spread more than eight feet along the wall. Further exploration uncovered additional water damage in the adjacent room.
![[02] MRW_15_4605](https://extremehowto.com/wp-content/uploads/2016/03/02-MRW_15_4605.webp)
The damage to the subfloor extended under the wall and up into the bottom plate on this plumbing wall. To properly eradicate the damage, the repair would need to include the floor under the wall and at least the wall plate.
![[03] LDW_15_03809](https://extremehowto.com/wp-content/uploads/2016/03/03-LDW_15_03809.webp)
After marking the floor plate with a square, our carpenter Chad cut it with a reciprocating saw so the bad section could be replaced and so the subfloor underneath could be removed.
![[04] LDW_15_03819](https://extremehowto.com/wp-content/uploads/2016/03/04-LDW_15_03819.webp)
He used a reciprocating saw with a bi-metal blade to cut through the nails where the studs were connected to the plate.
![[05] LDW_15_03821](https://extremehowto.com/wp-content/uploads/2016/03/05-LDW_15_03821.webp)
He cut the plate up into sections for removal because this plumbing wall had lots of pipes to work around.
![[06] LDW_15_03829](https://extremehowto.com/wp-content/uploads/2016/03/06-LDW_15_03829.webp)
After removing all of the affected wood, Chad made up a strong bleach solution in a spray bottle to kill any remaining mold or fungi.
![[07] LDW_15_03837](https://extremehowto.com/wp-content/uploads/2016/03/07-LDW_15_03837.webp)
He measured and marked out a 4×8 sheet of plywood to replace the damaged subfloor.
![[08] LDW_15_03840](https://extremehowto.com/wp-content/uploads/2016/03/08-LDW_15_03840.webp)
He snapped a chalk line to connect the layout marks, which were centered over a floor joist.
![[09] LDW_15_03842](https://extremehowto.com/wp-content/uploads/2016/03/09-LDW_15_03842.webp)
Following the cutline on the subfloor, Chad used a cat’s paw bar to pull all nails that might be hit with the circular saw blade.
![[10] LDW_15_03851](https://extremehowto.com/wp-content/uploads/2016/03/10-LDW_15_03851.webp)
After removing all of the nails along the cut line, he set the blade depth on the circular saw to cut about 1/16 inch deeper than the shiplap subfloor before cutting along the line.
![[11] LDW_15_03857](https://extremehowto.com/wp-content/uploads/2016/03/11-LDW_15_03857.webp)
He removed the subfloor out to the floor joist beyond the damaged area.
![[12] LDW_15_03863](https://extremehowto.com/wp-content/uploads/2016/03/12-LDW_15_03863.webp)
A shop vac helps to clean out sawdust and other debris in the area under the subfloor.
![[13] LDW_15_03872](https://extremehowto.com/wp-content/uploads/2016/03/13-LDW_15_03872.webp)
Chad placed a pressure-treated 2×6 scab along one of the damaged floor joists to add strength and to provide a solid fastening area. The scab also provides more area for the new subfloor joints.
![[14] LDW_15_03876](https://extremehowto.com/wp-content/uploads/2016/03/14-LDW_15_03876.webp)
He nailed the scab to the existing joist with nails approved by the manufacturer of the treated wood, which has specific fastener requirements.
![[15] LDW_15_03881](https://extremehowto.com/wp-content/uploads/2016/03/15-LDW_15_03881.webp)
Chad positioned the subfloor plywood to go under the wall so he could lay out notches for the pipes in the wall.
![[16] LDW_15_03891](https://extremehowto.com/wp-content/uploads/2016/03/16-LDW_15_03891.webp)
After cutting the notches for the pipes, he positioned the new under-wall subfloor piece to reach the floor joist scab and to leave enough room for the full sheet of plywood subflooring.
![[17] LDW_15_03907](https://extremehowto.com/wp-content/uploads/2016/03/17-LDW_15_03907.webp)
At this point, most of the new subfloor was installed. Since the under-wall subfloor piece was notched for the pipes to slide in from the far side, the plan was to notch the new bottom wall plate so it would slide in from the near side to minimize the notch openings from lining up.
![[18] LDW_15_03923](https://extremehowto.com/wp-content/uploads/2016/03/18-LDW_15_03923.webp)
Chad used a level as a straight edge to mark the edges of new wall plate, in this case a 2×6, to replace the water damaged plate.
![[19] LDW_15_03929](https://extremehowto.com/wp-content/uploads/2016/03/19-LDW_15_03929.webp)
He used a framing square to mark the plate locations for both sides of each pipe.
![[20] LDW_15_03932](https://extremehowto.com/wp-content/uploads/2016/03/20-LDW_15_03932.webp)
He bumped his tape to each pipe and measured to the plate layout line to determine the depth of each pipe notch.
![[21] LDW_15_03934](https://extremehowto.com/wp-content/uploads/2016/03/21-LDW_15_03934.webp)
Chad used one of my jigsaws to cut out the plate notches. I didn’t even know he had my jigsaw.
![[22] LDW_15_03935](https://extremehowto.com/wp-content/uploads/2016/03/22-LDW_15_03935.webp)
After notching and fitting the new bottom plate, he nailed it to the new subfloor.
![[23] LDW_15_03939](https://extremehowto.com/wp-content/uploads/2016/03/23-LDW_15_03939.webp)
He positioned the studs, which were turned sideways in this plumbing wall, and toenailed them into the bottom plate.
![[24] LDW_15_03942](https://extremehowto.com/wp-content/uploads/2016/03/24-LDW_15_03942.webp)
On the longer diagonal subfloor splice, Chad predrilled for a plywood gusset.
![[25] LDW_15_03947](https://extremehowto.com/wp-content/uploads/2016/03/25-LDW_15_03947.webp)
He fastened the gusset under the existing subfloor so it extended out to support the edge of the new subfloor piece.
![[26] LDW_15_03949](https://extremehowto.com/wp-content/uploads/2016/03/26-LDW_15_03949.webp)
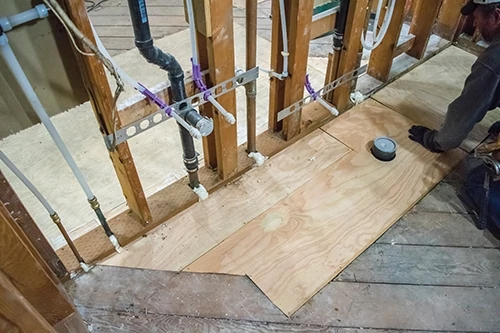
Wrapping up the subfloor in the adjacent bathroom required an interesting puzzle piece to bridge the floor joists, to match the diagonal shiplap of the existing subfloor, and to accommodate a toilet drain.
![[27] LDW_15_03954](https://extremehowto.com/wp-content/uploads/2016/03/27-LDW_15_03954.webp)
Chad completed the subfloor repair by “nailing it off” and sealing the gaps at the pipe.
Side Note
Using a Cat’s Paw
![[Sidebar 01] LDW_15_03844](https://extremehowto.com/wp-content/uploads/2016/03/Sidebar-01-LDW_15_03844.webp) A cat’s paw bar is a nail-pulling tool with chisel-like claws designed to dig into the wood surrounding a nail just below the nail head. Striking surfaces for hammer blows are located so the claws can be driven through the wood to the nail shank. A rounded heal acts as a pry bar fulcrum so nails can be pried out as you pull back on the bar shank.
A cat’s paw bar is a nail-pulling tool with chisel-like claws designed to dig into the wood surrounding a nail just below the nail head. Striking surfaces for hammer blows are located so the claws can be driven through the wood to the nail shank. A rounded heal acts as a pry bar fulcrum so nails can be pried out as you pull back on the bar shank.
