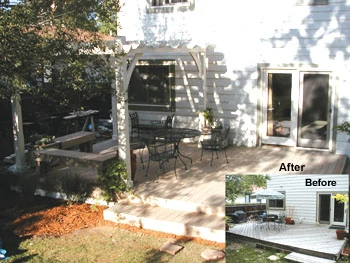
A board-by-board guide to renovating the best part of your home.
Dennis and Patti Peterson, of Broomfield, Colorado, faced the same problem that many other deck owners have faced. Over the years, sunlight, water and two energetic dogs had taken their toll on their redwood deck. Past the point of a simple staining and sealing, their deck needed a more extreme solution.
While they could have opted to replace the old redwood with new wood, doing this would only mean restarting the annual maintenance regimen. Rather than continuing to surrender one weekend per year, the Petersons chose a wood composite material. Composite costs more than wood at first, but after factoring in the annual maintenance supplies (and time); the Peterson’s determined that their total cost would even out in less than five years. And compared to the old stain and sealing routine, spring cleaning a composite deck would involve little more than a light scrubbing or a blast from a pressure washer. “We really liked the uniformity of the new decking,” says Dennis. He adds, “You really need to compare the cost of composite decking with clear cedar or redwood, which is almost impossible to find.”
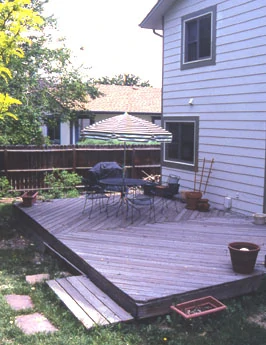
Replacing decking is a job well within the skill level of almost every do-it-yourselfer because, in most cases, it does not require digging or placing posts, or beam and joist calculations. “Redecking is basically a board-for-board replacement,” says Dennis. “The only trick is remembering what goes on top of what.”
Step 1: Out with the Old
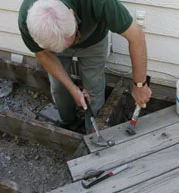
Redecking begins, quite literally, from the top. The first step is to remove the old deck boards so that you can inspect the underlying joists, beams and posts, and then make any necessary repairs or replacements prior to attaching the new decking. If you’re impatient, demolition can be accomplished with a circular saw and sledgehammer, but you may accidentally damage the underlying structure. A careful, methodical approach will enable you to reuse most of the metal hangers, and salvage the better boards for future projects. (Tip: Some woodworkers may cringe at the thought of putting old wood into their portable planer, but considering the cost of wood these days, it might be worth risking a knicked blade. Before planning old wood, knock off as much dirt and grit as possible with a wire brush, then run a paint scraper over each board to ensure that you haven’t overlooked a screw or nail.)
Start the redeck project by removing any deck screws (in this case, the previous homeowner used several dozen to silence creaking boards). Next, use a cat’s paw, as shown, to remove the nails from one end of the board. With only a few nails holding the wood in place, Dennis switches to a pry bar to lever up the board. To keep the area safe, remove all nails from the board, or hammer them flat; or else one will find a way into the bottom of your shoe before the job is done.
Once the decking is removed and the framing is visible, check for structural damage. Inspect the deck-to-house connection first. Tighten all fasteners. Look for any missing, bent, or rusted flashing and for any telltale black stains that might suggest that moisture is working its way into your home.
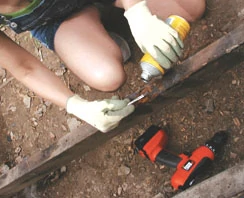
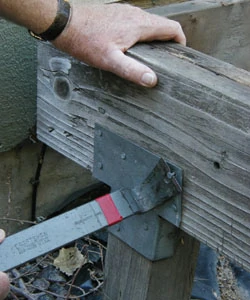
Next, inspect the joists. If you can sink the tip of a screwdriver into a joist or post, it means that you’ve got rot. In this case, several of the joists appeared structurally sound, but the top edges felt spongy. Wanting a little extra insurance, the homeowners chose to apply Minwax’s high-performance wood hardener. This one-part liquid consolidate strengthens and reinforces the wood, preventing future water- and insect-related damage.
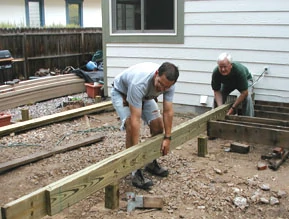
Redwood is considered insect-unfriendly; however, one of the doubled beams had become a home for a large ant colony. In this case, the best fix is a complete beam replacement. To do this, Dennis first removes all the joists that were attached to the old beam then removes the beam from the plate connecting it to the post. Before forming the replacement beam, sight down the top edge of each board to make sure the crown, or edge curve of the board, is facing up (the weight of the decking will flatten the curve). Nail the boards together with 16d galvanized nails in a zigzag pattern every 16 inches. To avoid measurement errors, drop the beam in place, and then cut it to length after it’s been installed.
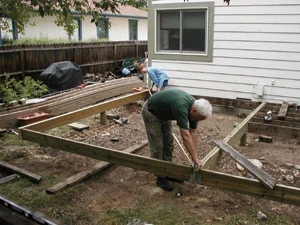
Even if you aren’t forced to go down to bare beams as we did in this project, you should check that your framework is level and square. To check for level, place a level on a beam or joist that is perpendicular to the house. Repeat this step on a few other boards to ensure that there isn’t a bow or dip in your framework. To make sure that the frame is square, measure opposite corners, as shown. Once the diagonals are equal, tack in a few temporary braces to secure the frame until you’ve installed enough deck boards to lock the framing in place.
Step 2: In With the New
Once the beams and joists are repaired and/or replaced, and the frame is level and square, you’re ready to start the fun part — laying the deck. Now is a great time to enlist friends and neighbors. With enough help, you might all be able to enjoy a cookout on your new deck by the end of the weekend.

Decking isn’t difficult work, as long as you take time to lay the first board carefully, and periodically check your progress. Be careful not to lay the first board at an angle; otherwise you’re whole deck will be out of whack. Since the homeowners had carefully squared the frame, they installed the first board with a 1/4-inch overhang. Consider using scrap wood spacers, rather than relying on your tape, to avoid measurement-related errors. If your decking runs parallel to your house, you can also use spacer boards to ensure an even gap between the siding and your first board.
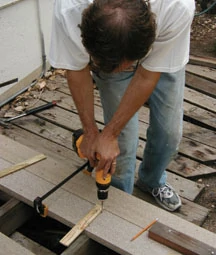
Decking generally needs to be spaced about 1/8 inch apart. This gap allows water to drain through the deck, and allows for the seasonal expansion and contraction of the composite boards. To ensure equal spacing Dennis created spacer blocks by driving 10d nails through leftover redwood, as shown. You could also use single nails, but the blocks helped prevent the fasteners from falling through the cracks.
Nearly all decking requires some degree of straightening during installation. Rather than trying to muscle crooked boards with a pry bar or chisel, Dennis uses a pair of reversible Quick Grip clamps, as shown. By fastening a block to the joist a foot or so ahead of the leading deck board, he can apply pressure exactly where it’s needed, ensuring that the gap stays consistent over the entire run of the deck.
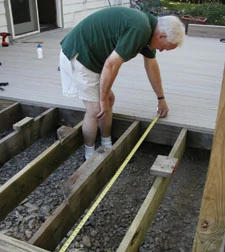
To check your deck spacing, measure the distance from the last board to the edge of the framing every 8 to 10 boards, as shown. Theoretically, the board-to-beam measurement should be the same on both ends. If it’s not, simply allow a little more space between the planks on the long end. In this case, boards were corrected by leaving the spacer nails “a little loose” on the long side, and “clamped tight” on the short side. In most cases, you should be able realign the decking within 2 or 3 boards, with no noticeable change in the gaps.
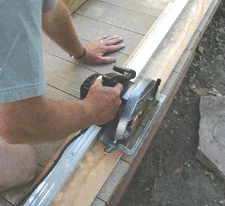
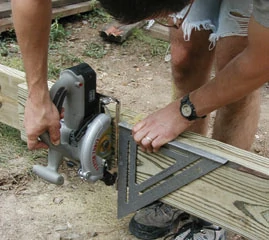
When installing decking, let the boards run long. That way, you can trim them all to length in one pass. To make the long cut, Dennis uses a chalk line to establish a straight edge 1/4 inch away from the outside face of the end joist. Next, he makes the cut using a 2-piece cutting jig, as shown.
This jig was made from a piece of aluminum angle iron and a scrap of 3/8-inch plywood. If you do not have metal handy, substitute a factory-cut edge of a piece of plywood. Leave the bottom piece longer than the base of your saw; that way, when you make your first cut, your saw will cut the bottom piece of ply, showing you the blade’s exact location.
You’ll want to finish the outside edges of your deck, not only to conceal the fluted bottom edge of the composite decking, but also to formally establish the borders of your outside space. To attach the fascia board, attach 3/8-inch-thick spacer blocks, 16 inches on center, to the outside face of the end joist, then fasten the ChoiceDek fascia to the blocks. The spacer blocks create a gap that’s the same width as between deck boards, and also allows water and debris to fall through the crack, rather than collect next to the joist.
While this project will require several weekends of work, you can look forward to a deck that’s guaranteed to look good for the next decade.
Side Note
Finishing Touches: Bench and Planter
Even if you aren’t ready for a complete deck-over, here’s a planter and bench you can build in a weekend, that’s sure to add new life to your backyard. Composites are again a smart choice for both projects. The composite wood will not rot or warp (wood planters rarely survive more than a few seasons). Another plus is that composites don’t splinter, so you won’t have to ever worry about being “caught” by the bench.
To build the planter, start with the box. Glue and clamp the sides together, overlapping the sides. Use an exterior adhesive, such as Titebond 3 or Gorilla Glue, to reinforce the joints. Once the sides are together, attach the bottom frame to one end then drop in the bottom panel. Seal all inside seams with a polyurethane caulk, then prime the box to protect the plywood.
Once you’ve built the basic box, work from the outside corners inward. Using a tablesaw, rip the stile pieces and then attach them to the box with 1 3/8-inch exterior screws. For cleaner-looking trim, screw out from the inside of the box. Next, attach the siding. (We used cement siding; consider building a style that matches your home.) Rip the top frame to width from deck or handrail boards, and then use a chopsaw to miter the corners. After nailing the frame together, glue it to the box with construction adhesive. As a final touch, add 1 1/4-inch wheels so you can slide the planters around your deck. You can easily hold a large potted plant. If you want to fill the box with soil, drill a few holes through the bottom to allow water to percolate.
To build the bench, start with the legs. To slice through the thick 5 1/2-inch posts, you’ll need to mark a cut line all the way around the post. Make your first cut as deeply as your saw allows, then rotate the post and make a second pass. Use 2 1/2-inch exterior screws to attach the legs to the seat’s frame. When attaching the decking for the seat, position the boards so they hang over the outside edge by 1/4 inch.
As with the deck, we used spacer blocks to hold the fascia away from the wood. This way, water and debris (which could eventually lead to rot) won’t collect in the crack. Attach the spacers with glue and 1-inch galvanized ring-shank nails. If you need to adjust the skirt-to-seat gap, countersink the nails, and then plane the spacers as necessary.


