

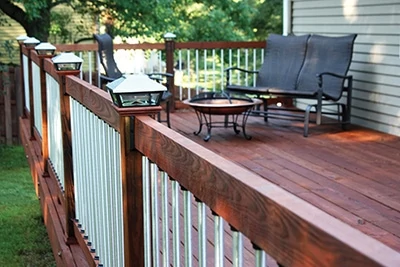
We’re all aware of the wonders of wood as a building material, but to preserve its natural good looks when used outdoors, it’s necessary to apply a stain/sealer to protect it from Mother Nature. From mold and ultraviolet rays to insect infestation and rot, the threats to wood are plentiful. Choosing the right sealant, prepping the wood for staining, and proper application of the product are all important to achieving the best results for your porch, pergola, deck, fence, or any other outdoor structure.

We turned to the experts at Armstrong-Clark Wood Stain to get some professional insight into the world of preservative stain/sealers. Jake Clark, President of Armstrong-Clark, was kind enough to field our questions.
What are some of the primary differences in the various formulations of preservative wood stains? And what are the advantages/disadvantages of the different types?
If we are talking about preservative wood stains, we are talking oil stains. The big differences are to what degree you trade longevity for ease of use. Stains that are extremely easy to use may not last long and they may have reduced square footage per gallon. On the other hand, some of the longer lasting brands may be using harder drying oils that may require more intense prep or stripping before reapplying. This is actually where Armstrong-Clark has made a name for themselves. It is very easy to use, maintain, and reapply, and yet is lasts as long as the stains with harder drying oils.
What preparatory steps do you recommend prior to applying wood stain/sealer to an outdoor project?
This is an excellent question. The reason is that different scenarios have different requirements. For example, if you have a surface mildew or mold problem, you want to use a bleach-based cleaner to kill growth on the surface. Including a surfactant with the bleach can help pull the bleach into the wood. If you have a mildew or mold problem deeper in the wood, you need to use a deeper penetrating product like Concrobium to kill the roots.
However, if you have tannin problems, bleach will not help you one bit, you need an oxalic acid-based cleaner (or cleaner/brightener). Only oxalic acid will help remove tannin and rust stains. Oxalic acid will not do anything for killing mold or mildew.
If you want the very best cleaning to make sure you address everything, you want to utilize a two-step process. Step one is a bleach-based cleaning (often sodium percarbonate works well unless you have a more serious mold/ mildew problem) followed by an oxalic acid cleaning.
There are a few other things to consider if you do not need to address mold/ mildew or tannin. For example: What is the final color you want to achieve? You do not necessarily want to clean with oxalic acid/ cleaner brightener if you are applying a gray stain. Oxalic acid returns a more natural blonde color to the wood, which shifts the color in a different direction from where you are wanting to go with a gray stain. You would want to use a bleach-based cleaner in this circumstance to keep the wood gray.
What are the most common application mistakes you see being made by inexperienced users? What best practices do you recommend?
The number one mistake inexperienced users make is thinking “more is better.” Let the wood tell you how much the wood can absorb. You can achieve this by always conducting a test with a sample can. There are still a few brands out there that still offer them for free.
Does the type of wood species have any effect on how well it accepts wood stain?
Definitely, especially if we are talking exotic hardwoods. Exotic hardwoods have very tight cell structures, which inhibit the stain regardless of how old and weathered the wood is. For example, ipe is so dense it doesn’t burn and it doesn’t float. The most a stain will absorb down into ipe is about the thickness of a thumbnail. Also, species like redwood and western red cedar have higher concentrations of natural oil, so they may take longer after installation to accept stain.
What maintenance steps do you recommend after the stain/sealer has been applied to outdoor wood? Are there certain cleaners or chemicals that should be avoided?
Rinse, sweep, or blow off your deck at least once a month. Dust, dirt and pollen can collect on the surface and can ultimately lead to surface mildew and mold growth.
If you have an issue with mildew or algae, consider an application of “Spray-and-Forget” or “Wet-and-Forget” a few weeks once a year.
For some stains, cleaning with bleach will strip off the stain. My recommendation would be to contact the stain manufacturer about what works best for cleaning wood applied with their product.
Wood stain is available in a wide range of colors and finishes. Are there certain applications where one type of finish would work better than another (i.e. semi-transparent versus opaque)?
For starters – if it’s shiny, you will need to strip and neutralize, or sand (or both), before applying a maintenance coat down the road. So, you need to ask yourself what you want to have to do next time, before you narrow down your selection to the brands that fit your plan. Pigment is the sacrificial raw ingredient which absorbs the UV radiation that turns wood gray. If you use a transparent stain, you need to understand the wood will turn grayer sooner, especially if you use a clear. Semi-Transparent colors fit a balance between having color last longer and still allowing you to see the wood. Recently, we have seen a large uptick in people using exotic hardwood colors on softwood. The reason is exotic hardwood colors often have more transparency than semi-transparent colors but better UV protection.
What is your recommended method for storing any unused stain for future projects?
Keep it in a dry location, preferably an area without big temperature swings. I suspect that on occasion the bottom of a can will rust out because of condensation in the airspace above a stain. In the case of oil stains, the water will sink to the bottom and can rust out the can.
Side Note
Tips for Stain/Sealer Application
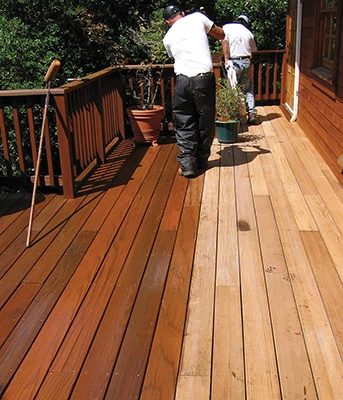
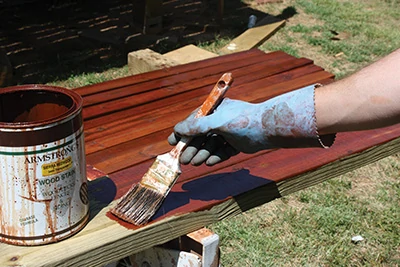
Always thoroughly mix your stain/sealer product to evenly blend the solids and ensure a consistent color tone throughout the project. Use plastic drop cloths to protect any surrounding walls, plants or other objects from exposure to the product.
For new construction, allow the new wood to dry before staining or sealing. Drying the wood is particularly important for pressure- treated lumber because the waterborne preservatives leaves moisture in the wood. Depending on the condition of the wood (if it’s dry enough), you might find it helpful to stain certain wood pieces before assembly. For example, staining wood hand rails prior to assembly makes it easy to access all edges of the boards with a brush.
Although the wood must be dry before application, some products don’t perform well when applied in direct sunlight, whereas this is not a problem for other formulations. Refer to the manufacturer’s recommendations for your stain/sealer.

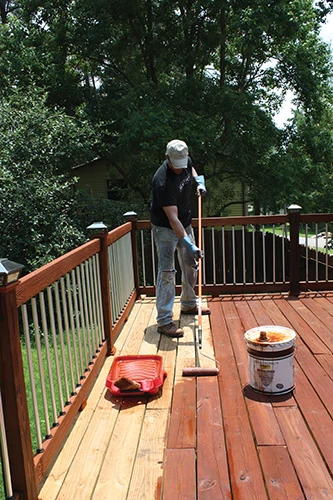
When staining both horizontal and vertical structures, brushing is the best method for stain/sealer application because the bristles push the product evenly into the woodgrain to increase absorption. Using a sprayer or roller can apply the stain more quickly, but both of these methods leave much of the stain on the surface without adequate penetration into the pores. If the product doesn’t adhere well it can wear away unevenly, so you should still back-brush it into the woodgrain for the most consistent appearance and best protection.
![]()
Armstrong’s deck and siding wood stain has nondrying conditioning oils that separate from the drying side of the formula. These oils penetrate deep into the deck or siding wood fiber where the wood’s natural oils used to be. This process rejuvenates the wood. The drying oils stay at the surface, lock in the conditioning oils and create a dry to the touch barrier. Armstrong’s deck and siding wood stain formulas also contain vegetable oils, transparent oxide pigments, water repellents, mildewcide, and solvent.
Quality is what Armstrong-Clark brings to you. Backed by 7 generations of oil-based coatings experience, coupled with modern technology, Armstrong-Clark can meet and exceed your need for oil based wood coatings.
Features:
-Can be applied in direct sunlight and heat of the day. If the first coat penetrates within 30 minutes a second coat can be applied for extra protection.
-Easily applied by brush, roller, or airless spray equipment.
When spraying – back-rolling or brushing will help even out appearance. If there are any puddles or glossy spots after 24 hours, remove with a dry rag.
-Non-drying oils penetrate deep to recondition older wood.
-Drying oils, pigments, and water repellents protect against water and UV damage and lock in the nondrying oils.
-Complies with all government environmental standards.
-No offensive odor.
Coverage:
Armstrong-Clark Wood Deck Stain applies at about 200 square feet per gallon on softwoods, 300-400 sq ft/ gallon on hardwoods.
Contact:
Armstrong-Clark Company
14949 Camage Ave.
Sonora Ca. 95370
W: Armclark.com
P: 800-916-8211
F: 209-588-8973
E: [email protected]
