For those new to laying tile, the temptation is to pick the straightest wall and start laying the floor along it. While that may work with other flooring materials, tiles must begin from the center of the room. This gives you plenty of space to work outward to the walls and ensure a symmetrical pattern.
The first and foremost rule of tile layout: Make sure your pattern is square. Before laying your first tile, snap a couple of chalk lines to guide the installation.
The Quarter Method
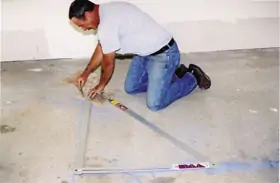
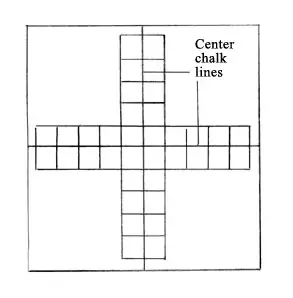
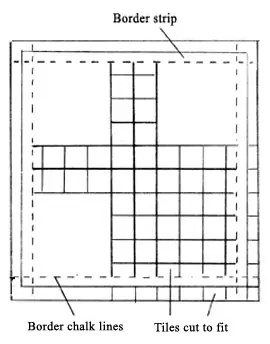
A standard procedure for tile layout is the quarter method, in which the room is actually divided into four quarters to help sequence the layout. First step is to measure and mark the midpoint of all four walls. Snap intersecting chalk lines at the center point of the site, forming a square cross. Use the 3-4-5 rule to check that the lines form right angles. Measure and mark a point 4 feet from the center along one line. Measure and mark a point 3 feet from the center on the intersecting line. A diagonal line between the two points should measure 5 feet if the chalk lines are at 90 degrees. If that’s not the case, then readjust your chalk lines.
A large A-square can make checking your guide lines a snap. Just align the A-square with the chalk-line intersection to make sure the lines are at right angles.
Once the chalk lines are square, lay out the entire floor in a dry run, with no mortar. Start by laying a row of tiles along each of the four lines, all the way to the walls, creating a cross of tiles in the center of the room. If necessary, use plastic spacers to keep the grout joints even.
At the ends of the walls you will likely be faced with a space that’s too small for the width of a last tile. If this space is less than half the width of a tile, adjust the layout so that the last tile along the wall will be at least half the standard size. Also, check that the last row of tiles against each wall is uniform in size so the room’s layout will be symmetrical. If not, adjust accordingly.
Then fill in the remaining fields of each quarter, keeping the tiles square and the spacing uniform. Work from the intersection toward the walls. Once the tiles are laid for the dry run, you can adjust the placement of individual tiles based on color harmony or texture. Just create a system to help you remember where to place them during the actual installation.
The quarter method is a standard procedure for laying out all tile sizes, shapes and materials. In order to lay the tiles in a staggered fashion, such as a running bond pattern, lay the tiles only along one axis of the intersecting chalk lines. Work from the center, filling in the quadrants and offsetting the grout joints from row to row.
Diagonal Layout
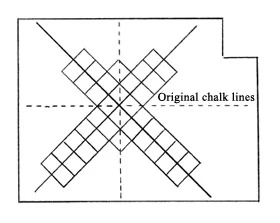
Tiles can also be laid diagonally across the room. Using the center point established with the quarter method, snap lines across the two diagonals of the room creating an “X” on top of the cross. Then install the tiles as with using the quarter method. Make sure the lines are at true right angles and that the cut border tiles are equal in width.
Complex Layout
More complex layouts can add an artistic appeal to the floor but can be more difficult to install. Many such intricate designs use differing shapes, sizes or colors of tile with borders or special feature strips. When planning a complex layout, use graph paper to create a scale blueprint. Be very careful with your measurements and make note of details such as color choice.
At the Borders
If you’re installing a border of different-style tiles, remember to plan your layout to allow room for the cut tiles. This can be done by snapping chalk lines around the room, parallel to the walls. Keep the lines at the required distance from each wall to allow for the border. Then follow the quarter method for installation, laying the dry run from the center to the border lines, rather than the walls.
Also, when laying out a dry run, it’s easy to correct your mistakes. But be careful when mortaring the tiles in place during the actual installation. Boxing yourself into a new tile layout is a beginner’s mistake. It can force you to step on freshly laid tile, requiring reinstallation. Laying the field one quadrant at a time helps prevent this. Before tiling the field all the way to the wall, leave enough space to get into the corner. Lay the final rows as you back your way out of the corner. If you have a partner, they can be cutting border tiles as you lay the field so the border will be ready for installation by the time you reach the wall.
Editor’s Note: Thanks to William Moulton of Better Built Construction and Jeff Davis of Straight Line Design for help with this article.


