By Larry Walton
When we were kids we could make use of small spaces throughout the house for forts and games of hide and seek. Into the teen years some of these same areas came in handy to stash… Well, let’s just say we made use of storage opportunities that may have been overlooked by our less imaginative family members.
Making use of odd spaces is a great way to maximize the square footage of your house. We’ve found that desks can fit into any number of these areas. Many families have wisely placed the computer desks for “kid” use in the public areas of the house for monitoring by mom and dad and by other enforcers who may wish to inform on a sibling. Often these desk areas can be found under staircases or in wide hallways. I’ve owned a couple of houses with 12/12 pitch roofs that have had space where you eventually run out of head room as you approach the sloped ceiling created by the rake of the roof framing—an area that makes a great place for a desk that requires little headroom.
You can test a space in your house for desk use by putting a folding table in the spot for a while to get a feel for what it would be like to have a desk there. This can also help you position the front edge of the desk.
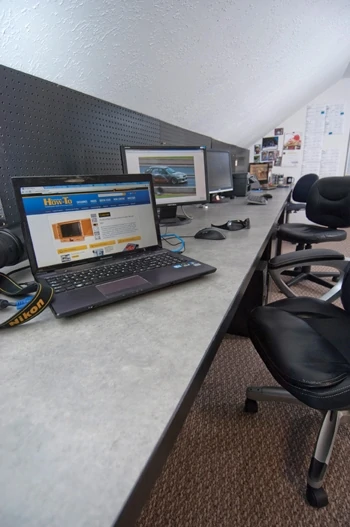
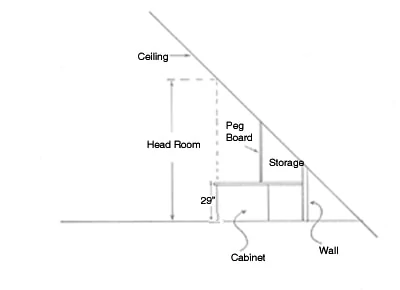
For our current home office setup we had a 20-ft. area that was bordered with a 3-ft. vertical wall where. At 6 ft. 3 in., my son and staff member, Tim, could only get within 5 ft. of the short wall before hitting his head. This is how we determined where to put the front edge of our mega desk with three work stations.
We had a couple of options with the depth of the desk. We could have walled off the area behind the desk until the desk surface was about 3 ft. deep. To make use of the 2 ft. of space between the two walls would require access behind the desk. We decided the simplest solution was to make the desk 5 ft. deep and make panels at about 3 ft. deep. For now we are hanging pegboard panels painted black with plenty of storage for office supplies. (We’ll use these pegboards as recessed panels in frames for sliding bypass doors when we do an upgrade planned for later.)
We build lots of desks in small alcoves by building a simple frame to support the desk top. When the desk area is large enough we can put a cabinet base beneath it. Because of the size of this desk, we would need some serious support supplied primarily by oversize cabinet base units along with countertop strong-backs made of lumber for the longest spans. Because of the extreme depth of the desk, we built our custom base cabinets more than 3 ft. deep, which means we have file drawers that will extend out of the cabinet 2-1/2 ft. That’s a lot of file space!
We built the base cabinets 28 inches high, and they determined the elevation for all of the remaining ledgers and strong-back structure to support the field of countertop materials. One tricky component was getting the cabinet fronts all lined up and level with each other, which we did with the help of a string line.
We finished our countertop with plastic laminate. We knew that the sheer size would present a serious challenge to hiding the seams between laminate sheets (not an issue with a conventional desk size), so we put the seams where we plan to install partitions between the work stations during our next upgrade.
We’ve been using this desk for months now, and it’s working out great. Here’s how we built it.
We built custom cabinets as the base for our new office space to replace the temporary desks we were using.
Once we determined the side-to-side layout for the work stations, we positioned and leveled the cabinets.
We built a network of ledger boards and counter support frames connecting the base cabinets to each other and to the wall.
We nailed blocks to the sides of the cabinets that acted as cleats to attach face frames and countertop supports.
To handle the 5-ft. depth of the counter and the large spans in the outside work stations, we added a second set of cross braces.
We added framing between the longer spans and glued and nailed an additional layer of plywood behind the face frame piece to add strength.
Biscuits and glue played an important role in joining the large particle board sheets we used for countertop substrates.
We lined up the joints with support framing to give strength to the desk unit. It’s a good idea to cut the center section slightly undersized so you have room to tip it in with the biscuits in place.
We didn’t bother finding particle board wider than four feet in width since the back seam would be hidden inside the planned storage area at the back of the desk.
We used 1×2 poplar as the self-edge. This board strengthens the front edge of the counter as well. Be sure to glue the self-edge before installing.
We used a combination square to mark the location of the front of the face frame. This helps place the nails when attaching the countertop so you can prevent shiners (nail blow-outs) that can make a mess of the face frame.
We started our laminate install with the center piece and dry-fit the end pieces leaving room at the walls to place them without interference from the wall surface.
Lately we’ve been using a foam mini roller can help you spread the contact cement evenly. Make sure you work in a well-ventilated area with a proper rated respirator.
We have two routers set up for laminate installs. The smaller one has a bearing-less flush cut bit to cut off excess laminate, keeping the bit moving helps minimize heat that can burn the wood self-edge.
Our second router is set up with a 45-deg. chamfer bit. You can adjust the depth of the bit for the style of self-edge you’re going for.
We use a file to match the chamfer on the ends near the walls where a router cannot reach.
A hole saw can be used to cut both the laminate and counter substrate at once to make access for computer wires. We used a router to ease the edge of the hole to avoid damaging cable insulation.
Our finished work area with the self-edge painted black makes for good contrast with the light gray laminate counters


![[01] LW_12_02350](https://extremehowto.com/wp-content/uploads/2013/03/01-LW_12_02350.webp)
![[04] LW_12_02357](https://extremehowto.com/wp-content/uploads/2013/03/04-LW_12_02357.webp)
![[03] LW_12_02358](https://extremehowto.com/wp-content/uploads/2013/03/03-LW_12_02358.webp)
![[05] LW_12_02359](https://extremehowto.com/wp-content/uploads/2013/03/05-LW_12_02359.webp)
![[06] LW_12_02362](https://extremehowto.com/wp-content/uploads/2013/03/06-LW_12_02362.webp)
![[07] LW_12_02367](https://extremehowto.com/wp-content/uploads/2013/03/07-LW_12_02367.webp)
![[08] LW_12_02365](https://extremehowto.com/wp-content/uploads/2013/03/08-LW_12_02365.webp)
![[09] LW_12_02366](https://extremehowto.com/wp-content/uploads/2013/03/09-LW_12_02366.webp)
![[10] LW_12_02369](https://extremehowto.com/wp-content/uploads/2013/03/10-LW_12_02369.webp)
![[11] LW_12_02373](https://extremehowto.com/wp-content/uploads/2013/03/11-LW_12_02373.webp)
![[12] LW_12_02374](https://extremehowto.com/wp-content/uploads/2013/03/12-LW_12_02374.webp)
![[14] LW_12_02380](https://extremehowto.com/wp-content/uploads/2013/03/14-LW_12_02380.webp)
![[15] LW_12_02388](https://extremehowto.com/wp-content/uploads/2013/03/15-LW_12_02388.webp)
![[16] LW_12_02394](https://extremehowto.com/wp-content/uploads/2013/03/16-LW_12_02394.webp)
![[17] LW_12_02395](https://extremehowto.com/wp-content/uploads/2013/03/17-LW_12_02395.webp)
![[18] LW_12_02408](https://extremehowto.com/wp-content/uploads/2013/03/18-LW_12_02408.webp)
![[19] LW_12_02411](https://extremehowto.com/wp-content/uploads/2013/03/19-LW_12_02411.webp)

