

The ultimate “extreme” in woodworking is building a project from wood you personally cut from a tree, dried, planed and then worked. I know, I’ve done it for many years, and it is the most satisfying form of woodworking. This allows you to create with specialty woods that are prohibitively expensive or for the most part unattainable to the do-it-yourselfer. Several good examples include crotch walnut, quarter-sawn oak, burl oak, burl sycamore and bird’s-eye maple. Some of these may be available in small sizes for craft items, but not in large enough pieces for furniture. The astute wood forager can, in many instances, also use portions of trees that might even be discarded because they are unfit for commercial logging operations. Crotch walnut is a prime example. A prime walnut log starts at a 12-inch diameter and goes up. Prime log length ranges up to 16 feet, free of knots and other blemishes. The timber buyer or logger takes those and leaves the rest. A twisted, forked walnut tree, even if it’s a fairly big size, is often left. The forks or crotches of even the best trees are also often discarded. But the beauty of the wood can be unbelievable.

Other uses of home-sawn logs include planks for rough outdoor projects such as sheds and barns. Thick structural beams can also be cut and milled. Logs can also be milled on three sides to create a “log-home” with solid walls and a smooth interior.
How do you “forage” these woods? If you own timberland, regardless of the species, you have the potential for a great wood project. Another situation is storm-damaged trees, trees that have become damaged by disease or insects or simply have become too cumbersome for the backyard or neighborhood. These are all potential wood-project materials. But it does take effort and time. You need to fell the tree, then remove the limbs and finally buck it into reasonable lengths that can be sawn. Then it must be sawn into planks of the desired thickness and it must be cured. After all that it can be planed to the final desired thickness and worked into projects, including beautiful once-in-a-lifetime furniture pieces. Although all of this sounds daunting, taken step-by-step, the process is fairly simple and is as old as working with wood.
You’ll need a good quality chainsaw for the initial logging operations. A wide variety of models and sizes are available, but these days any name-brand chainsaw will do the job. Make sure you follow all safety rules as per the manufacturer’s instructions.
General safety rules include
1. Inspect the saw before each use. Make sure the chain is sharpened and has the proper tension. Check the chain brake to make sure it is working.
2. Plan your cutting job safely. Avoid such hazards as electric lines, dead limbs, roads and bystanders. Check wind direction and the lean of the tree to be felled.
3. Start the saw safely. The safest method is to start it on the ground. Make sure the saw sits securely; the chain isn’t touching the ground, and hold the saw in place with your right foot on the handle.
4. Protect against “kick-back.” Don’t modify or remove the chain brake. Always manually activate the chain brake when moving from cut to cut.
5. Keep a stable, safe stance while cutting.
6. Do not saw above chest height, nor reach far out with the saw.
7. Wear protective gear including: eye and ear protection, a helmet, work gloves and protective clothing. Avoid loose clothing.
Basic Cuts
It’s important to understand the basic cuts, which include felling, limbing and bucking.
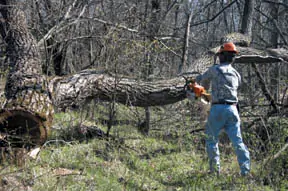
Felling. Tree felling can be easy or difficult, depending on the tree, the location and the intended direction of fall. Before you start, plan the fall of the tree. Also look for any dead branches that might fall during the operation. Remove any obstacles from around the tree. Determine the fall trajectory by looking at the natural lean of the tree and taking into consideration wind direction. If possible, fell the tree with the natural lean. Wooden or plastic wedges can also be used to help start the tree in the right direction. Plan an escape route off to the side, not directly behind the tree.
Different tactics are required for different size trees. The notch method is used for trees small enough that the bar will reach across their diameter. First step is to cut a notch in the direction of the fall and about 1/3 the diameter of the trunk. Remove the notch and then make a back-cut two inches higher than the back end of the notch. Do not cut all the way through to the notch cut. Leave a 2-inch hinge to guide the fall of the tree. If the tree doesn’t begin to lean in the proper direction and there is room behind the saw blade, drive a plastic or wooden wedge in place to start the fall. This forces the cut open. Continue to drive wedges in place to force the tree to fall. Or continue cutting to the hinge if necessary until the tree begins to fall. As soon as the tree begins to lean, remove the chainsaw and get away fast. Leave the chainsaw if necessary. Larger-diameter trees require other methods, including the draw across and apple core as shown.
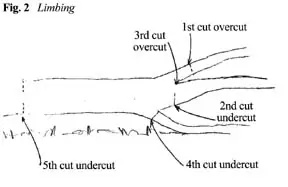
Limbing. Once the tree is downed the next step is to cut away the limbs to leave the final log. In valuable woods such as walnut, even the limbs can be important to the wood forager. Limbing can be as dangerous as felling due to the tension on the limbs from the weight of the tree. Begin limbing on the outer ends of the limbs. Cut the upper branches first if possible and work downward and back toward the trunk. If limbs are too high to reach, cut them off at the trunk to allow them to fall downward. Buck the smaller branches and limbs at the same time they are limbed, cutting them into firewood or saw board lengths, depending on their diameter. Anything less than 8 inches in diameter should probably be cut into firewood. Be extremely careful in cutting off the limbs the tree is resting on. A lot of pressure is applied to these limbs. When the pressure is released by cutting, the tree may drop suddenly, or even roll over. Make these cuts slowly and carefully from the bottom of the limbs to release tension and be ready to move quickly out of the way.
Bucking. Cutting the tree into firewood or saw-log lengths is called bucking. First determine the length of logs that can be milled. This will depend on whether you have a mill, or plan to have the log milled by a commercial saw mill. In most instances this length will range from 12 to 16 feet. The most important factor, however, in home creation of lumber is cutting the trunk to get the most useable wood. This is especially so with crooked trunks. Even two 4-foot sections are better than wasting material in an 8-foot log because the log is crooked.
Milling
Sawing the log into planks, or milling, is most often done by commercial sawmills. In large-scale operations the logs are skidded or pulled to a loading yard. With today’s portable chainsaw or bandsaw mills the logs can often be milled in place. For a fee a sawyer will bring a portable bandsaw mill to your property and saw the log. One-man mills are also available for do-it-yourself milling operations.
Both chainsaw and bandsaw mills have grown in popularity with landowners and wood “scroungers.” Chainsaw mills are the most economical. The Jonsered SM2095 Chainsaw Mill is powered by their largest chain saw, a 94cc 2095 Turbo. The chain is guided on a mill with two 10-foot rail sections, providing an effective cutting length of 17 feet. The mill utilizes a saw carriage that runs on rails at ground level, making it easy to set up the log without heavy lifting. Precision controls let you mill the type of lumber you want, from siding to thick structural beams.
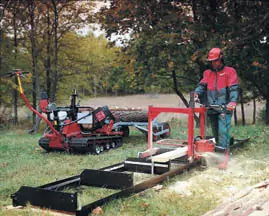
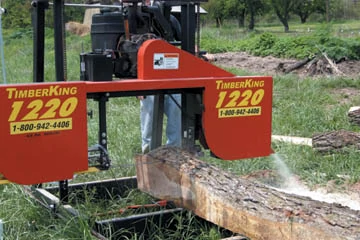
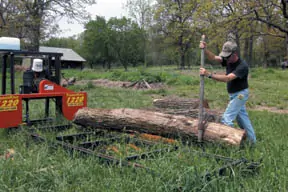
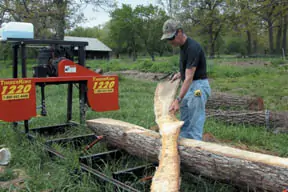
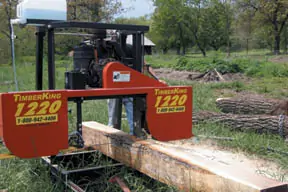
Portable bandsaw mills, such as the TimberKing models, have become increasingly popular. Not only can these mills be towed to the logging site, but they are much safer and easier to use than circular mills. Rather than a huge spinning circular saw blade, these machines utilize a heavy-duty bandsaw blade. The thin bandsaw blade doesn’t waste as much material, and if you’re cutting for rough projects, the surface is smooth enough for use without further working. The smallest of the TimberKing models is the 1220. It will handle logs up to 12-feet long and up to 29-inches in diameter. With a 15-horsepower, electric-start Kohler engine the price for the mill is around $5,517. The transport package adds another $725. Although this may sound expensive, a few choice logs can more than make up the price. You can also farm-out milling to pay for the machine. Or, if you don’t wish to purchase such a machine, check the local area for someone who does custom bandsaw milling to mill your trees.
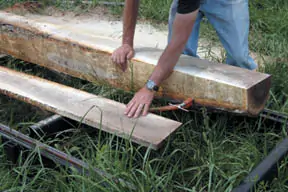
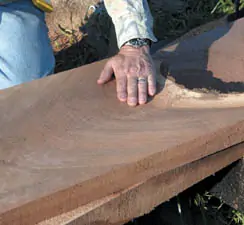
Logs are cut into lumber in one of two ways, plain-sawn or quarter-sawn. Plain-sawn is the most common method and results in less waste. With plain-sawn wood, when the log is cut into planks all the cuts are parallel to each other. Quarter-sawn lumber produces beautiful and unusual patterns, but takes more time and wastes more wood. With quarter-sawn wood the log is first quartered and then cut into planks, with the cuts made diagonally from the center of the four quarters. This results in a more vertical grain appearance. Quarter-sawn lumber also resists cupping and wears more evenly than plain-sawn – one reason the method is often used to cut oak flooring.
The best grades and clearest lumber are found immediately inside the bark. In most instances the logs are turned to create a “cant” with four straight sides. First, lock the log into position and make the first cut. Then turn the log one-quarter and make another cut. Again, give the log another one-quarter turn and make another cut. Turn the log a final quarter turn and cut the log square into a “cant.” Then cut the cant into the thickness desired. As you cut valuable wood such as walnut, you can vary the turning and cuts to garner the most wood. For instance, you may wish to make an initial cut, then turn the log once and make a couple of planks, leaving the bark on one side to garner the most of the center wood. With this tactic you can vary the thickness of the wood needed from as little as 1/4 inch for panels to large blocks for turnings.
Curing or Drying
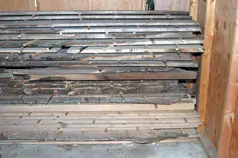
If the wood is to be used in rough-sawn projects, construction beams, planking or fencing, it is sometimes air-dried for a month or two, or even used immediately. One example of a good wood that must be used immediately is sycamore. It is lightweight and works easily, but twists and curls unless fastened down immediately.
Wood used for fine furniture, house trim and other projects must first be dried. Most woods must be dried down to 6-percent moisture. Commercial kilns are often used to kiln-dry woods. But the simplest drying method, although the most time-consuming method, is to air-dry wood. This is an ages-old, traditional method. I have air-dried many board-feet of lumber in the loft of our barn. All that’s required is a dry area with plenty of ventilation. It does, however, take quite a bit of time. Soft woods, such as cedar or pine can air-dry in a couple of years. The hardwoods, such as oak or walnut may require from four to ten years, depending on the thickness and species. Air-dried wood should be “conditioned” for several months in your home or shop.
The first step is to coat all ends with paraffin or boiled linseed oil. Then stack the wood on a perfectly flat surface with “stickers,” or 1/2-by-2-inch flat pieces of wood placed between the planks. This prevents the planks from twisting or warping, but allows air to circulate and gently dry the wood cells.
Small quantities of wood can also be cured and dried at home with small kilns, including solar models. A number of small kiln designs are available on the web from the Department of Forest Products, Virginia Polytechnic Institute and State University Extension. A good deal of this information is linked through www.woodweb.com. Most of these kilns will dry woods such as walnut or oak in two to three months.
You will also need a moisture meter to determine the moisture percentage. The Lee Valley Tools Timber Check meter is an excellent economical choice, although there are more sophisticated and expensive models on the market. Woodcraft Supply also carries several models of moisture meters ranging in price from just under $35 to almost $290.
Planing and Finishing
Once the wood has been properly cured and dried, it must be kept stored in a dry area and stacked perfectly flat. It can then be planed to the correct width. Or you can create a special molding for a very distinctive project or home interior.
If you’re looking for the “extreme” in woodworking, try creating your own lumber.
Sources
Jonsered SM2095, Tilton Equipment Co., 1-877-693-7729, www.jonsered.com
TimberKing Sawmills, 1431 N. Topping Avenue, Kansas City, MO 64120, 1-800-942-4406, www.timberking.com
Woodcraft Supply, 1-800-225-1153, www.woodcraft.com
