

(Photos in this article are courtesy of Gastineau Log Homes)
By Monte Burch
The romance of building a log home in the wilderness has long been the dream of many: A place, hacked out of the wilds by your own hands, in the traditional American pioneering spirit. Granted, much more is involved these days than simply cutting down a few trees and stacking the logs together. But, yes, you can build your own log home in a variety of ways, depending on the amount of work, time and money you wish to invest.
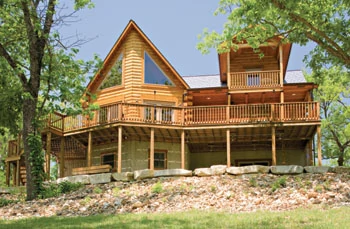
Today, log homes are available in a wide variety of styles, shapes, sizes and materials and can range from a simple cabin in the woods to an ultra-sophisticated mansion, complete with multi-car garages, basement and all the amenities. Log homes offer a great deal. They are aesthetically beautiful, but also a home that is cooler in the summer and warmer in the winter due to the bulk of the materials. Not only is this more energy efficient, but also a savings on the environment.
Log homes help conserve natural resources. It takes less wood to construct some log homes because there isn’t the waste of milling the wood. The energy needed to mill the wood is also saved. The logs used are often the “thinning” trees normally removed to allow better grade trees to grow to saw-log size.
One of the main advantages homeowners find, however, is the ease of maintenance. No painting, scraping and all the other hard work associated with many building exteriors. Another advantage in many cases is log homes usually cost less than comparable stick-built homes, and if you want to trade your own sweat for dollars, you can really save.
Choices, Choices
Log buildings can be acquired in several ways. The least expensive, but hardest work is to cut or purchase logs and build your own log home. To do this requires lumberjacking and log-building skills, plenty of time and lots of muscle. Wholesale Logs of America (www.wholesalelogsamerica.com) provides a variety of log sizes and materials direct from the mill.
The simplest and most expensive method is to purchase a manufactured log home and have it erected by the log home manufacturer. The logs in these buildings are normally milled to precise shapes to ensure tight, secure buildings. Or, you may prefer to have a log crafter build your home. These are usually “one-of-a-kind” homes built to the purchaser’s designs. Both of these cases are commonly “turn-key” jobs, sometimes right down to the paint, draperies and carpeting.
Other packages consist of shells constructed by the dealer or a contractor working for the dealer. In this case the contractor erects the log shell and encloses the house. You do all the finish work, such as wiring, plumbing, interior finishing, trimming and in some cases, roof shingling. This is an excellent way to get started if you don’t have the experience, time or tools to construct the log shell. Some do-it-yourselfers prefer the opposite approach: constructing the house shell, then subcontracting other chores. Of course, the more you can do yourself, the greater the savings.
A closed shell usually consists of girders, floor joists, floor insulation, subflooring, perimeter log walls, caulking, windows with screens, exterior doors, roof support systems, roof insulation, roof sheathing and sometimes shingles—plus porches and decks, if included in the plans. In essence, everything needed to lock up your home and keep its interior weather-resistant is included. As with any other type of house construction, but even more so with log construction, you should plan to begin construction in plenty of time to enclose the building before fall and winter weather sets in.
Cabin in a Kit
The next step, involving more work but a great deal less cost, is to purchase a “kit” log home and erect it yourself. This is essentially a package of “precut” logs. Package homes are available in a wide variety of types. For instance you can purchase only milled or debarked logs if you wish to cut your own notches, window and door openings. You can also purchase a kit consisting of only the walls, along with spikes, gaskets and other items needed. Another type is the “shell” kit, which includes the walls, roof and floor framing, and sometimes the windows and doors. You will typically have to supply the roofing, finish flooring, interior finishes and so forth. Eagle Panel Systems (www.eaglepanelsystems.com) sell complete cathedral roof systems, especially designed for log homes. These are typical tongue-and-groove wood panels and rigid foam insulation, as well as pre-applied tongue-and-groove sheathing.
If you already have the land, all that’s necessary is to pick the home style you desire from the many offered by kit-home manufacturers. The manufacturer may even help arrange financing. Companies usually do not provide financing, but can assist in finding a lender. Financing is one factor you should look into at the start. Some lenders will not do country property or log construction projects. First, understand what you need, and then shop around.
With financing arranged, order your log home package and, while waiting for delivery, prepare the site and construct the foundation. Within a matter of weeks, the kit arrives on flatbed trailer trucks. A quality shell kit can be erected in a matter of days, usually within a month, even by inexperienced builders. Kit log homes are delivered to your site on large, 40-foot trailer trucks. Your site, including the access road, must be able to accommodate a truck of this size with enough room to properly unload the materials, and also be able to turn around and get out. There must also be plenty of room to store the logs. A crew of friends and neighbors should be on hand to help unload the truck when it arrives because some drivers may refuse to do the unloading. Ask what is needed for delivery and unloading before ordering.
Although kit log homes are relatively easy to build, they require extensive planning. There are hundreds of kit log homes available from almost just as many manufacturers. Most are reliable and offer a good product. But as in all of life, there are a few bad apples in the barrel. Shop around when considering a home package. A life savings invested in a house of poor materials, of poor design or shoddy joinery can create big disappointments. Consult several log home companies. Ask about modifying standard plans to suit your lifestyle. Most companies are willing to make substantial changes to suit individual requirements. In fact, you may be able to send your own design for appraisal and a quote.
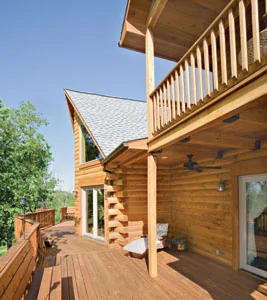
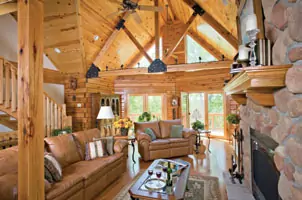
When purchasing a manufactured log home kit, make absolutely sure you understand exactly what will be furnished and how. In most instances you will be purchasing a building from a photo or drawing and a floor plan. All materials for log porches and balconies should be included if they are in the plans for the home. Models with cathedral ceilings should have cathedral ceiling rafters and collar ties. Accessory materials, such as shingles, wiring, plumbing and interior partitions can usually be purchased locally at a lower cost than having them shipped. Plus, when shopping locally you can select the grade and type of material. The complete shell kit should come with a set of instructions and numbered logs. These take quite a bit of effort in construction, but with patience and a little skill, you can build your own log home.
Kit Considerations
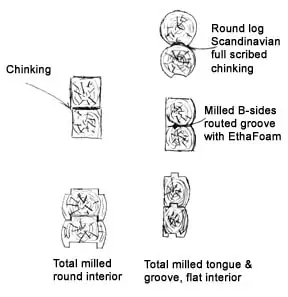
Log buildings are constructed in several ways, and kits can be purchased with different types of construction. This includes Scandinavian full-scribed, chinked round logs, milled square logs, hand-hewn square (or simulated hand-hewn), rustic slabbed logs and milled logs with rounded exteriors and flat interiors. Kits with uniform-size, milled logs are more expensive because it takes more effort to mill the logs to the same size and shape. There are, however, definite advantages to uniform-size logs. No “shelves” are formed on the inside or outside of the house to catch rainwater, dust or dirt. Using uniform logs also saves construction time, and makes installation of interior woodwork much easier.
Kit logs are milled in various cross sections. The basic shapes are: two-sided, three-sided, four-sided and completely turned or shaped. A two-sided log has two parallel sides and is normally cut whole from one tree with the heart of the tree left in. These are usually cut from a tree larger than 8 inches in diameter. Three-sided logs may or may not be cut from a whole tree. In most instances they are not. These logs are usually cut from trees 24 inches or larger in diameter. All timbers are cut to a uniform size. A four-sided log is usually cut from a larger log, but sometimes a whole tree is used.
Turned logs are normally cut from a whole tree, using giant lathes or milling machines to turn the log to a uniform diameter. These logs range from 6- to 12-inches in diameter. A shaped log is usually four-sided. Three sides are cut flat and the fourth shaped to one of several different exterior designs.
Log Styles
A whole log with the full heart of the tree offers the best durability. If the entire heart is in the log, it won’t check through in seasoning and will be more rot-resistant. Cut logs can check entirely through the log. In the case of milled logs, sometimes the flat surfaces utilize a sealant or foam strip between them. In other instances, splines or tongue-and-grooves are milled into the mating surfaces. Corner joints may be scribed, scribed and chinked, hewn and chinked, or with a variety of notched or tongue-and-groove joints. In some of the latter cases, the joints are also insulated with foam insulation. (Note: “Chinking” is the gritty, mortar-like material seen between courses of logs in many log homes. Modern Chinking is a flexible, textured sealant.)
Corner styles also vary, and can not only provide the aesthetic appeal, but depending on the style, a difference in construction effort and longevity. Scandinavian scribed log construction typically utilizes interlocking corners. The logs are notched to interlock at the corners with a half-height difference. The Scandinavian scribe is one of the most difficult corners to construct as you must also scribe the log bottom to fit over the log below it. This notch is more commonly used by custom log builders, rather than in kits. A similar method is the Swedish cope saddle notch. In this case the logs are not scribed on their bottoms, but fit full with milled joints or splines. This makes it somewhat easier to do and is a common kit-home style. A similar notch is the double-notch. This consists of a notch on top and one on the bottom of the crossing logs. This also alleviates the need for cutting the bottom cup or groove, but produces a much weaker corner joint.
A very simple joint is the sharp notch. This is quick and easy to build and again, no under cup or groove is used. This is a common corner joint simple cabins, and rarely seen with kit buildings. With the sharp notch method the joints must be well chinked. The ends of the logs have a sharp knife edge cut on their tops, and their undersides cut to fit the notch below them. It doesn’t take much cutting to produce this corner joint.
The butt-and-pass is one of the joineries typically used with kit-built homes and logs that are milled on at least the top and bottom and sometimes on the inside as well, creating a flat interior wall. The first sill logs are laid with the log ends protruding past the foundation the desired amount. These ends can be further trimmed after the walls have been erected. The adjoining logs are cut so their butt ends meet the outside corners of the protruding logs. If the inside faces are round, for a tight joint, the butt ends should be scribed to meet the contour of the adjoining log. As the joints are basically open, they should be well caulked. This style produces a symmetrical and attractive interior wall surface, but is not as strong as other joints.
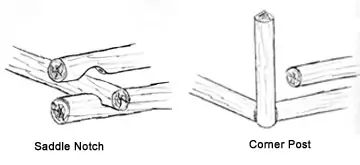
A corner notch is also fairly simple, but is more commonly used in post-and-beam or when several materials and styles are used in one building. One method of corner notch is to cut a slot in the corner logs and then cut a notch in the end of the adjoining logs and use a spline.
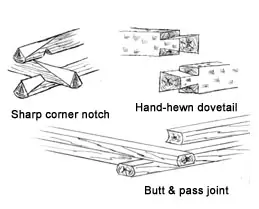
The dovetail notch, used with hand-hewn logs, is a difficult notch to create by hand, but is sometimes cut by machine for kit-homes. This creates a traditional American log cabin appearance. Because the notch locks the logs together, it’s one of the strongest. The double dovetail is even stronger. The ends of the logs may protrude slightly, but are more commonly cut flush.
The type of wood used for the logs is also important. Depending on the manufacturer, logs may be of pine, cedar, spruce, oak, aspen, larch or cypress. Pine is used in about 80 percent of the log home kits. It’s easy to work and has a pleasant odor. Cedar is another excellent choice, especially Western red cedar. Spruce is also popular. Spruce is often cut from standing dead timber, which reduces drying time and shrinkage problems. Spruce, however, is subject to severe cracking and checking. Although some of this is cosmetic, some cracks run entirely through the log, particularly if the log is milled to shape. Larch, aspen, and cypress are used to lesser degrees. Oak is used in some areas, but the odor, weight and high value of oak for other purposes, limits its use for kit-built homes. Oak, however is the most common material used for hewed log homes. Oak checks severely, pine not as much, and cedar negligibly. In better-quality packages, all the bark will be removed from the logs.
Depending on the kit, the logs may or may not be treated against decay and insect infestation. Many kit-log builders pressure-treat the logs. A variety of preservatives are available these days, such as Perma-Chink (www.permachink.com) clear coatings, that are environmentally friendly, clean and easy to apply. These are typically applied to the exterior after the logs are erected. Some are also applied to the interior to maintain the color of the logs and add to the décor.
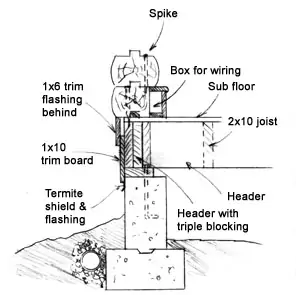
Proper construction details can also make a difference in preventing decay and log deterioration. Good drainage around the foundation is important so storm water can’t collect around and under the building. The site should be graded so water drains away from the building. For a single-story building, the overhang should project 23 inches and the eaves should extend beyond roof supporting members. A steeper pitched roof can also drain away rainwater faster.
In the old days the spaces between the logs were chinked with materials on hand, including moss, mud, grass and even chunks of wood. Modern chinking, however, often consists of a wide range of materials, such as Log Jam and Chinker’s Edge (www.sashco.com). They are easy to use and will even stay flexible.
Can you do it yourself? Yes you can, and people do it all the time. Raising a log building, however, takes muscle-power, skills and tools. The skills are fairly easily learned and most kit-home manufacturers provide a fairly comprehensive construction manual, in addition to the floor and elevation plan, and a numbered set of logs to match. You’ll probably need a good medium-size chainsaw, and a heavy sledge for driving spikes. You’ll also need standard construction carpenter’s tools including hammers, cordless drills and saws, levels, squares and so forth.
Editor’s Note: Monte Burch is the author of The Complete Guide to Building Log Homes
